Implement a Custom WebSocket Protocol Client in JavaScript
This document contains the following sections:
- Introduction
- WebSocket and Protocol Frame Boundaries in Stream-Based Data
- Implementing a STOMP Protocol Client Overview
- Implementing a STOMP Protocol Client in JavaScript
- Developers looking to jump straight to a code example of how to read and write WebSocket data fragments can jump to Review the writeFrame() function and Review the readFragment() function.
- In most cases, the proxy service on the Gateway will support a custom protocol client connection to a backend service. For an example of a Gateway proxy service, see proxy, amqp.proxy, and jms.proxy.
Introduction
The goal of this tutorial is to explain how to handle WebSocket frame boundaries in a client for any framed protocol, and how to ensure your client can handle WebSocket frame boundaries in stream-based data correctly. To describe how to create a protocol client that can handle WebSocket frame boundaries, this tutorial describes the code required in a STOMP protocol client that communicates with the Gateway to access a back-end STOMP-compliant server.
The steps in this tutorial show you how to use the KAAZING Gateway client libraries to create a JavaScript client, and how to build a STOMP protocol client library to communicate with a back-end STOMP-compliant server, that serves as a message broker.
WebSocket and Protocol Frame Boundaries in Stream-Based Data
The Gateway frames the TCP-based protocol data frames it receives from the back-end server in WebSocket frames and sends these to protocol client applications. The TCP-based protocol data is therefore split across multiple WebSocket frames when it arrives at the protocol client. Protocol client applications must then assemble the WebSocket frames to obtain the TCP-based protocol data within each WebSocket frame (in the WebSocket frame payload) and reconstitute that data. If the protocol data is raw bytes, then the application must be able to handle raw bytes.
One common example of a protocol client that can manage WebSocket frames is a web browser. When the Gateway proxies TCP-based protocol traffic to web browsers over WebSocket it frames the TCP frames from the back-end server in WebSocket frames. These WebSocket frames are sent to the web browser that must then parse the WebSocket frames to obtain the payload of those frames (the TCP-based protocol data stored in each frame) and reconstitute the TCP-based protocol data.
If a protocol client application does not anticipate frame boundaries and protocol parsing, then when it receives partial TCP data messages across WebSocket frames it will be unable to reconstitute these messages correctly. This type of error can occur in the following scenario:
- Back-end server. The back-end server sends and receives data with the Gateway using a TCP-based protocol. The TCP traffic is sent to the Gateway in TCP data frames and fragmented as needed.
- The Gateway. The Gateway acts as a proxy between the TCP back-end server and clients, and uses the WebSocket protocol to communicate with clients. The Gateway frames the TCP-based protocol data frames in WebSocket frames and sends these to the client application.
- Protocol client application. The protocol client application communicating with the Gateway assumes that it is receiving complete messages and that no fragmentation of the TCP-based protocol has occurred.
As a result, the protocol client application does not attempt to identify WebSocket frame boundaries and reconstitute frame payloads and communication fails. This error can occur in situations where the Gateway is deployed to extend a specific TCP-based protocol over the Web using WebSocket. In some cases, developers might not notice framing issues during development because they are only streaming single messages locally in their development environment.
The protocol client application example provided in this tutorial is intended to help developers understand how to write protocol clients that manage protocol frame boundaries when communicating with the Gateway. For example, in the code samples provided in this tutorial, you will create a function (readFragment()) that reads data fragments sent from the server to the client. readFragment() tries to process a complete frame from the fragments and retains incomplete frames in a read buffer until enough fragments arrive to form a complete frame. You will also create a function (writeFrame()) that writes the frames in the way the protocol expects them.
- For detailed information about frames and fragmentation with WebSocket, see RFC 6455, Section 5.
- Clients using WebSocket must support receiving both fragmented and unfragmented messages.
Implementing a STOMP Protocol Client Overview
In this tutorial you will learn how to write your own protocol client implementation using the KAAZING Gateway client libraries and what you must consider before writing your own protocol implementation. The tutorial then steps you through creating a protocol implementation in JavaScript. In this tutorial you implement the STOMP protocol, but you can take the same approach to implement any other protocol.
Before you start, review the technologies that you are going to be working with: client libraries, STOMP, and JavaScript.
Overview of KAAZING Gateway Client Libraries
The Gateway offers set of protocol-specific client libraries available for many languages, such as Objective-C, JavaScript, Java, and .NET. Currently, the following client APIs are available in each language:
- ServerSentEvents. Allows clients to connect to any standards-compliant Server-sent events stream.
- WebSocket. Allows clients to open a WebSocket connection to communicate directly with a back-end service using text-based protocols (Jabber, IMAP, and so on). A connection is established by specifying a target server URL. In the case of some client libraries, such as JavaScript, the WebSocket API in the KAAZING Gateway supports binary messaging via
ByteBuffer. For more information, see Migrate JavaScript Applications to KAAZING Gateway 5.0. - ByteSocket. Allows clients to open a WebSocket connection to communicate directly with a back-end service using binary protocols, such as AMQP. The ByteSocket client library is layered on top of WebSocket.
The client libraries are implemented using a layered architecture. For example, the ByteSocket client library is layered on top of the WebSocket client library. The WebSocket client library enables direct communication using text-based protocols, and the ByteSocket client library goes a step further to enable client-server communication using raw TCP.
The three client libraries—ServerSentEvents, WebSocket, and ByteSocket—can be thought of as foundational libraries that are used to implement all other protocols.
Overview of STOMP
STOMP (Simple Text Orientated Messaging Protocol) is a simple, yet effective protocol that provides an interoperable wire format that allows STOMP clients to communicate with almost every available message broker. Examples of message brokers that provide built-in support for STOMP are Apache ActiveMQ and RabbitMQ with the RabbitMQ STOMP Adapter. The example code in this tutorial accounts for the differences in how ActiveMQ and RabbitMQ identify content types. STOMP is language-agnostic, meaning clients and brokers developed in different languages can send and receive messages.
STOMP offers the following client commands:
- ABORT
- ACK
- BEGIN
- COMMIT
- CONNECT
- DISCONNECT
- SEND
- SUBSCRIBE
- UNSUBSCRIBE
STOMP offers the following server frames:
- ERROR
- MESSAGE
- RECEIPT
One important STOMP concept—the STOMP frame—deserves a little bit more explanation. A STOMP frame encapsulates the unit of communication between a client and a server. The following is an example of a STOMP CONNECT frame, which is used by the client to establish a connection to a back-end system (In this example, \n represents the newline character and ^@ represents the null character):
CONNECT\n login:\n passcode: \n \n ^@
As shown in the example, the frame starts with a STOMP command (CONNECT, in this case), followed by a newline character. Next are the headers in
Implementing a STOMP Protocol Client in JavaScript
In this tutorial you are going to build a JavaScript library that can be consumed in a Web browser via an HTML webpage.
Before You Start
Before you start writing a single line of code, you have to study the protocol for which you want to implement your client and consider some of the choices you have to make.
Study the Protocol
Before you get started, study the specification of the protocol you want to implement. You must fully understand the format of the client and server data frames. For example, are all client and server commands implemented using the same wire format in your protocol as with STOMP, or do different commands use different formats?
Binary versus Text
The WebSocket JavaScript API supports binary via ByteBuffer. STOMP can contain binary data in the message payload, so a protocol implementation for STOMP in JavaScript may be based on the WebSocket client library. Text-based protocols, like Jabber, can be based on the WebSocket protocol also.
Setting Up Your Development Environment
The project uses an HTML webpage, the custom JavaScript library you create, the Kaazing WebSocket Gateway and its JavaScript WebSocket.js library file.
Let’s set up the files and folders:
- Create a new folder named stomp.
- Download and extract Kaazing WebSocket Gateway as described in Setting Up the Gateway and Clients.
- Download the Kaazing WebSocket Gateway JavaScript WebSocket library (WebSocket.js) as described in Setting Up the Gateway and Clients.
- Copy the Kaazing WebSocket Gateway JavaScript WebSocket library (WebSocket.js) from the Kaazing WebSocket Gateway package at
CLIENT_HOME/.../WebSocket.jsinto your new stomp folder. - Add a new HTML file named stomp.html.
- Add a new JavaScript file named mystomp.js.
Now that you have your development environment setup, you can develop the user interface webpage for your JavaScript STOMP client.
Creating the User Interface for the STOMP Protocol Client
The user interface for the STOMP client is an HTML page that looks like this:
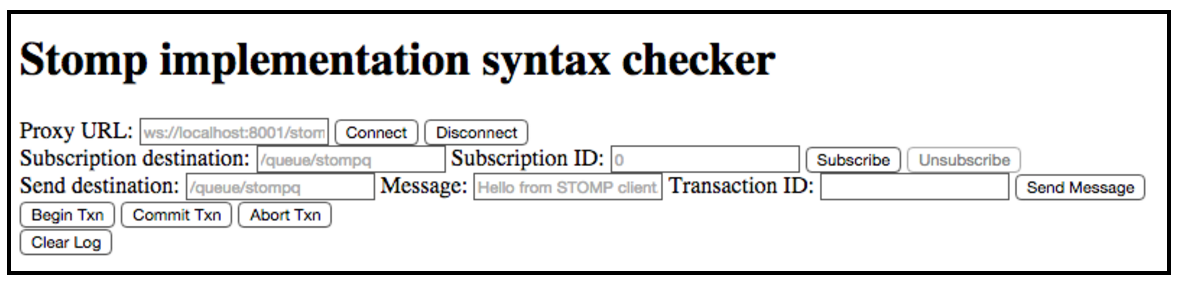
Use the following steps to create the HTML page for the STOMP Protocol Client:
- In a text editor, open the HTML file you created named stomp.html.
- Paste the following HTML into the file:
<!DOCTYPE html>
<title>Stomp implementation syntax checker</title>
<h1>Stomp implementation syntax checker</h1>

<div class="panel">
	<label for="url">Proxy URL:</label>
	<input type="text" id="url" placeholder="ws://localhost:8000/stompproxy">
	<button id="connectButton">Connect</button>
	<button id="disconnectButton">Disconnect</button>
</div>

<div class="panel">
	<label for="destination">Subscription destination:</label>
	<input type="text" id="destination" placeholder="/queue/stompq">
	<label for="subscriptionID">Subscription ID:</label>
	<input type="text" id="subscriptionID" placeholder="0">
	<button id="subscribeButton">Subscribe</button>
	<button id="unsubscribeButton">Unsubscribe</button>
</div>

<div class="panel">
	<label for="sendDestination">Send destination:</label>
	<input type="text" id="sendDestination" placeholder="/queue/stompq">
	<label for="message">Message:</label>
	<input type="text" id="message" placeholder="Hello from STOMP client.">
	<label for="txn">Transaction ID:</label>
	<input type="text" id="txn">
	<button id="sendButton">Send Message</button>
</div>

<div class="panel">
	<button id="beginTxn">Begin Txn</button>
	<button id="commitTxn">Commit Txn</button>
	<button id="abortTxn">Abort Txn</button>
</div>

<div class="panel">
	<button id="clearButton">Clear Log</button>
</div>


<div id="output"></div>

<script type="text/javascript" src="WebSocket.js"></script>
<script type="text/javascript" src="mystomp.js"></script>
Note the values for
idandfor. These values are referenced by the JavaScript code that you will add later in order to produce user events (such as buttons) or catch and process user events or response events from the broker (handler functions). Also, note the values forplaceholder. Those are default values provided for the user.Important: Note the two script tags at the bottom of the HTML. The Kaazing WebSocket Gateway JavaScript WebSocket library is added before your JavaScript STOMP client file. Always add the Kaazing WebSocket Gateway JavaScript WebSocket library before any additional libraries.
- Next, at the bottom of the file, add the following JavaScript to update the user interface in response to user events and log messages and exceptions:
<script>
setup();

var unsubscribeButton = document.getElementById("unsubscribeButton");
unsubscribeButton.disabled = true;

var subscribeButton = document.getElementById("subscribeButton");
subscribeButton.disabled = false;

subscribeButton.onclick = function()
{
    var destination = document.getElementById("destination");
	var destinationStr = destination.value || destination.placeholder;
	var subscriptionID = document.getElementById("subscriptionID");
	var subscriptionStr = subscriptionID.value || subscriptionID.placeholder;

	try
	{
		unsubscribeButton.disabled = false;
		subscribeButton.disabled = true;
		// We will acknowledge each received msg to avoid replays
		subscribe(destinationStr, "client-individual", subscriptionStr, null);
	}
	catch(e)
	{
		log(e);
		unsubscribeButton.disabled = true;
		subscribeButton.disabled = false;
	}
}

unsubscribeButton.onclick = function()
{
	var subscriptionID = document.getElementById("subscriptionID");
	var subscriptionStr = subscriptionID.value || subscriptionID.placeholder;

	try
	{
		unsubscribeButton.disabled = true;
		subscribeButton.disabled = false;
		// We will acknowledge each received msg to avoid replays
		unsubscribe(subscriptionStr, null);
	}
	catch(e)
	{
		log(e);
		unsubscribeButton.disabled = false;
		subscribeButton.disabled = true;
	}
}

var disconnectButton = document.getElementById("disconnectButton");
disconnect.disabled = true;

var connectButton = document.getElementById("connectButton");
connectButton.onclick = function()
{
    var urlField = document.getElementById("url");
	var urlString = urlField.value || urlField.placeholder;


	try
	{
		disconnectButton.disabled = false;
		connectButton.disabled = true;
		connect(urlString, null);
	}
	catch(e)
	{
		log(e);
		disconnectButton.disabled = true;
		connectButton.disabled = false;
	}
}

disconnectButton.onclick = function()
{
	try
	{
		disconnectButton.disabled = true;
		connectButton.disabled = false;
		disconnect();
	}
	catch(e)
	{
		log(e);
		disconnectButton.disabled = false;
		connectButton.disabled = true;
	}
}

var sendButton = document.getElementById("sendButton");
sendButton.onclick = function()
{
	try
	{
		var destination = document.getElementById("sendDestination");
		var destinationStr = destination.value || destination.placeholder;
		var msgBody = document.getElementById("message");
		var msgBodyStr = msgBody.value || msgBody.placeholder;
		var txn = document.getElementById("txn");
		var txnStr = txn.value;
		sendToDestination(msgBodyStr, destinationStr, txnStr);
	}
	catch(e)
	{
		log(e);
	}
}

var beginTxnButton = document.getElementById("beginTxn");
beginTxnButton.onclick = function()
{
	try
	{
		var txn = document.getElementById("txn");
		var txnStr = txn.value;
		begin(txnStr, null);
	}
	catch(e)
	{
		log(e);
	}
}

var commitTxnButton = document.getElementById("commitTxn");
commitTxnButton.onclick = function()
{
	try
	{
		var txn = document.getElementById("txn");
		var txnStr = txn.value;
		commit(txnStr, null);
	}
	catch(e)
	{
		log(e);
	}
}

var abortTxnButton = document.getElementById("abortTxn");
abortTxnButton.onclick = function()
{
	try
	{
		var txn = document.getElementById("txn");
		var txnStr = txn.value;
		abort(txnStr, null);
	}
	catch(e)
	{
		log(e);
	}
}

var clearButton = document.getElementById("clearButton");
clearButton.onclick = function()
{
	try
	{
		clearLog();
	}
	catch(e)
	{
		log(e);
	}
}
</script>
Carefully review how the user interface is updated in response to user events, messages, and exceptions. The nested functions
subscribe(),unsubscribe(),begin(),commit(),abort(), and so on call JavaScript functions in the JavaScript STOMP client library mystomp.js that you will create later. How these functions interact is described later in this document.Now that you have developed the user interface webpage you can code your JavaScript STOMP client.
Develop the STOMP Protocol Client in JavaScript
The following steps will take you through developing the custom JavaScript STOMP library. First, we’ll look at the entire JavaScript code for the client, and then we’ll carefully examine the three functions that deal with writing (writeFrame()), reading (readFragment()), and processing (processData()) data fragments and frames.
- In a text editor, open the JavaScript file you created named mystomp.js.
- Paste the following JavaScript code into the file.
/** * mystomp.js - Javascript STOMP client */ var socket; var output; var NULL_BYTE = 0x00; var LINEFEED_BYTE = 0x0a; var COLON_BYTE = 0x3a; var SPACE_BYTE = 0x20; /** * Confirm log output when the webpage loads. */ function setup () { output = document.getElementById("output"); log("Hello, World!"); }; /** * The onclose handler is called when the connection is terminated * by the user clicking the Disconnect button. */ function onclose(event) { log("Closing WebSocket connection. Code: " + event.code + " Reason: " + event.reason); e = event; }; /** * The connect function is called when the user clicks the Connect button. * The function sets up the event handlers for connection and message * management. */ function connect(location, credentials) { // We are not using any credentials. var username = ""; var password = ""; // create an instance of WebSocket by specifying the end-point. var wsf = new WebSocketFactory(); // creates a WebSocket to establish a full-duplex connection to the target location. socket = wsf.createWebSocket(location); socket.onopen = function() { // call the writeFrame function and pass it credentials writeFrame("CONNECT", {"login": username, "password": password}); log("Connected to " + location + " with u/p " + username + "," + password); }; // Event handler listening for incoming messages. socket.onmessage = function(event) { readFragment(event); }; // Event handler for close events. socket.onclose = function(event) { onclose(event); }; }; /** * The writeFrame function is called when the connection is opened, * and when the user clicks the Send button via the send() function. * The writeFrame function creates the WebSocket frame and before * writing the frame content in the buffer to the socket, * the buffer is flipped so that it can be read. */ function writeFrame(command, headers, body) { // create a new frame buffer var frame = new ByteBuffer(); log("Sending frame. Command: " + command + " headers: " + headerToString(headers) + " body: " + (body || "")); // build the command line frame.putString(command, Charset.UTF8); frame.put(LINEFEED_BYTE); // build the headers lines for (var key in headers) { var value = headers[key]; if (typeof(value) == "string") { var header = String(value); frame.putString(key, Charset.UTF8); frame.put(COLON_BYTE); frame.put(SPACE_BYTE); frame.putString(header, Charset.UTF8); frame.put(LINEFEED_BYTE); } } // add "content-length" header for binary content if (body instanceof ByteBuffer) { frame.putString("content-length", Charset.UTF8); frame.put(COLON_BYTE); frame.put(SPACE_BYTE); frame.putString(String(body.remaining()), Charset.UTF8); frame.put(LINEFEED_BYTE); } // empty line at end of headers frame.put(LINEFEED_BYTE); // add the body (if specified) switch (typeof(body)) { case "string": // add as text content frame.putString(body, Charset.UTF8); break; case "object": // add as binary content frame.putBuffer(body); break; } // null terminator byte frame.put(NULL_BYTE); // flip the frame buffer frame.flip(); // send the frame buffer socket.send(frame); } /* * The readFragment function is called by the connect() function. * readFragment reads data fragments of the ByteBuffer that is sent * from the server to the client. */ function readFragment(event) { // initialize read buffer buffer = new ByteBuffer(); var limit; // skip to the end of the buffer buffer.skip(buffer.remaining()); // append new data to the buffer var data = event.data; var size = data.size; // var str = BlobUtils.asBinaryString(function() {}, data); // var str = BlobUtils.asString(data, 0, size); var cb = function(result) { var buf = new ByteBuffer(result); buffer.putBuffer(buf); // prepare the buffer for reading buffer.flip(); outer: while (buffer.hasRemaining()) { // initialize frame we will build from data var frame = { headers : {} }; // Note: skip over empty line at start of frame // scenario can occur due to fragmentation // if Apache ActiveMQ STOMP end-of-frame newline // spills into the start of the next frame if (buffer.getAt(buffer.position) == LINEFEED_BYTE) { buffer.skip(1); // linefeed } // mark read progress buffer.mark(); // search for command var endOfCommandAt = buffer.indexOf(LINEFEED_BYTE); if (endOfCommandAt == -1) { // There is no command, so break out of the outer while. buffer.reset(); break; } // read command // Make sure we won't read beyond the command limit = buffer.limit; buffer.limit = endOfCommandAt; frame.command = buffer.getString(Charset.UTF8); buffer.limit = limit; // skip linefeed byte buffer.skip(1); while(true) { var result = processData(buffer, frame); if (!result) break outer; // Else, just continue. } // end inner while(true) } // end while(buffer.hasRemaining()) // compact the buffer buffer.compact(); }; var arr = BlobUtils.asNumberArray(cb, data); } /* * processData() is called by the readFragment() function to * process the incoming data frames and their headers and * then pass the frame to the corresponding handler such as * onmessage(). */ function processData(buffer, frame) { var endOfHeaderAt = buffer.indexOf(LINEFEED_BYTE); // detect incomplete frame if (endOfHeaderAt == -1) { // There are no headers; we're outta here. buffer.reset(); return false; } // detect header or end-of-headers if (endOfHeaderAt > buffer.position) { // non-empty line: header // Otherwise, the position would have been equal. limit = buffer.limit; buffer.limit = endOfHeaderAt; var header = buffer.getString(Charset.UTF8); buffer.limit = limit; // process header line var endOfName = header.search(":"); // Javascript: for a Map, a["b"] = "c" is equivalent to a = { "b" : "c" } // So this sets { header : value } in headers Map frame.headers[header.slice(0, endOfName)] = header.slice(endOfName + 1); // skip linefeed byte buffer.skip(1); } else { // skip linefeed byte buffer.skip(1); // empty line: end-of-headers var length = Number(frame.headers['content-length']); var pattern = /;\scharset=/; var contentType = String(frame.headers['content-type'] || ""); var contentTypeAndCharset = contentType.split(pattern); // RabbitMQ always sends content-length header, even for text payloads // but then also includes content-type header with value "text/plain" // ActiveMQ only sends content-length for binary payloads // Payload is binary if content-length header is sent, and content-type // header is not "text/plain" (may be undefined) // Added additional check to look for "text/plain" instead of the exact // match, as the content-type value can be like "text/plain; charset=UTF-8" // RabbitMQ sends content-length but no content-type for ERROR messages // so assume text content for ERROR messages // Therefore, // if command is not ERROR, and // length is a Number (i.e. was given), and // the first part of the content type is NOT "text/plain" if (frame.command != "ERROR" && !isNaN(length) && contentTypeAndCharset[0] != "text/plain") { // content-length specified, binary content // detect incomplete frame if (buffer.remaining() < length + 1) { // The indicated length is greater than the data we have. // Plus, an additional char for the terminating null(?). buffer.reset(); return false; } // extract the frame body as byte buffer limit = buffer.limit; // This sets the max we can read up to the end of our content length buffer.limit = buffer.position + length; frame.body = buffer.slice(); // Reset this buffer.limit = limit; // Since we have our content, skip over those buffer.skip(length); // skip null terminator, unless buffer already consumed if (buffer.hasRemaining()) { buffer.skip(1); } } else { // content-length not specified, text content // detect incomplete frame var endOfFrameAt = buffer.indexOf(NULL_BYTE); if (endOfFrameAt == -1) { // We didn't get a complete frame. buffer.reset(); return false; } // verify that UTF-8 charset is appropriate var charset = ((contentTypeAndCharset[1]) || "utf-8").toLowerCase(); if (charset != "utf-8" && charset != "us-ascii") { throw new Error("Unsupported character set: " + charset); } // extract the frame body as null-terminated string frame.body = buffer.getString(Charset.UTF8); } // invoke the corresponding handler switch (frame.command) { case "CONNECTED": onopen(frame); break; case "MESSAGE": onmessage(frame); break; case "RECEIPT": onreceipt(frame); break; case "ERROR": onerror(frame); break; default: throw new Error("Unrecognized STOMP command '" + frame.command + "'"); } // No longer needed? // break; } return true; } /** * Disconnects from the remote STOMP server. */ function disconnect() { if (socket.readyState === 1) { writeFrame("DISCONNECT", {}); } return true; } /** * Sends a message to a specific destination at the remote STOMP Server. * * @param body the message body * @param destination the message destination * @param txnID the transaction ID (optional) */ function sendToDestination(body, destination, txnID) { var headers = {}; headers["content-type"] = "text/plain"; var body = body || "This is a message for stompq"; headers["content-length"] = body.length; send(body, destination, txnID, null, headers); } /** * Sends a message to a specific destination at the remote STOMP Server. * * @param body the message body * @param destination the message destination * @param transactionId the transaction identifier * @param receiptId the message receipt identifier * @param headers the message headers */ function send(body, destination, transactionId, receiptId, headers) { transactionId = transactionId || ""; receiptId = receiptId || ""; header = headers || {}; headers["destination"] = destination; if (transactionId.length) headers["transaction"] = transactionId; if (receiptId.length) headers["receipt"] = receiptId; writeFrame("SEND", headers, body); } /** * Subscribes to receive messages delivered to a specific destination. * * @param destination the message destination * @param acknowledge the acknowledgment strategy * @param id the subscription ID * @param headers the subscribe headers */ function subscribe(destination, acknowledgement, id, headers) { acknowledgement = acknowledgement || ""; id = id || "0"; headers = headers || {}; headers["destination"] = destination; headers["ack"] = acknowledgement; headers["id"] = id; writeFrame("SUBSCRIBE", headers); } /** * Unsubscribes from receiving messages for a specific destination. * * @param id the subscription ID * @param headers the unsubscribe headers */ function unsubscribe(id, headers) { id = id || "0"; headers = headers || {}; headers["id"] = id; writeFrame("UNSUBSCRIBE", headers); } /** * Begins a new transaction. * * @param id the transaction identifier * @param headers the begin headers */ function begin(id, headers) { headers = headers || {}; headers["transaction"] = id; writeFrame("BEGIN", headers); } /** * Commits a new transaction. * * @param id the transaction identifier * @param headers the begin headers */ function commit(id, headers) { headers = headers || {}; headers["transaction"] = id; writeFrame("COMMIT", headers); } /** * Aborts a new transaction. * * @param id the transaction identifier * @param headers the begin headers */ function abort(id, headers) { headers = headers || {}; headers["transaction"] = id; writeFrame("ABORT", headers); } /** * Acknowledges a received message. * * @param messageId the message identifier * @param transactionId the transaction identifier * @param subscription the message subscriber identifier * @param headers the acknowledgment headers */ function ack(messageId, transactionId, subscription, headers) { transactionId = transactionId || ""; headers = headers || {}; headers["message-id"] = messageId; if (transactionId.length) headers["transaction"] = transactionId; headers["subscription"] = subscription; writeFrame("ACK", headers); } /** * The onopen handler is called when the connect handshake is completed. * * @param headers the connected message headers */ function onopen(frame) { logFrame(frame); }; /** * The onmessage handler is called when a message is delivered to a subscribed * destination. * * @param headers the message headers * @param body the message body */ var onmessage = function(frame) { logFrame(frame); // Acknowledge it. var msgId = frame.headers["message-id"]; var subscription = frame.headers["subscription"]; ack(msgId, null, subscription, null); }; /** * The onreceipt handler is called when a message receipt is received. * * @param headers the receipt message headers */ var onreceipt = function(frame) { logFrame(frame); }; /** * The onerror handler is called when an error message is received. * @param headers the error message headers * @param body the error message body */ var onerror = function(frame) { logFrame(frame); }; var logFrame = function(frame) { log("Received: " + frame.command); var headers = frame.headers || {}; if (!headers) return; log("Headers:") log(headerToString(headers)); log("Body: " + frame.body); } /** * Converts the header to string and returns it to the writeFrame() * function. */ var headerToString = function(headers) { str = null; for (var hdr in headers) { if (!str) str = ""; else str = str + ", "; str = str + hdr + " : " + (headers[hdr] || "<BLANK>"); } return str; } /** * Create the log in the user interface webpage. */ function log(s) { var p = document.createElement("p"); p.style.wordwrap = "break-word"; p.textContent = s; output.appendChild(p); var children = output.childNodes; while (children && children.length > 100) output.removeChild(children[0]); } function clearLog() { var children = output.childNodes; while (children && children.length > 0) output.removeChild(children[0]); } - Save the file. Next, let’s review the functions that manage data frames and messages.
- First, let’s look at how the JavaScript in the HTML page stomp.html calls the JavaScript in the mystomp.js client. For example, let’s look at what happens when the user clicks the Send button and the
sendButton()function in stomp.html is called:var sendButton = document.getElementById("sendButton"); sendButton.onclick = function() { try { var destination = document.getElementById("sendDestination"); var destinationStr = destination.value || destination.placeholder; var msgBody = document.getElementById("message"); var msgBodyStr = msgBody.value || msgBody.placeholder; var txn = document.getElementById("txn"); var txnStr = txn.value; sendToDestination(msgBodyStr, destinationStr, txnStr); } catch(e) { log(e); } }At the end of
sendButton()thesendToDestination()function is called and the message body, destination and transaction ID are passed to it. ThesendToDestination()function is in the mystomp.js client:function sendToDestination(body, destination, txnID) { var headers = {}; headers["content-type"] = "text/plain"; var body = body || "This is a message for stompq"; headers["content-length"] = body.length; send(body, destination, txnID, null, headers); }At the end of
sendToDestination()thesend()function is called and the message body, destination, transaction ID, and headers are passed to it:function send(body, destination, transactionId, receiptId, headers) { transactionId = transactionId || ""; receiptId = receiptId || ""; header = headers || {}; headers["destination"] = destination; if (transactionId.length) headers["transaction"] = transactionId; if (receiptId.length) headers["receipt"] = receiptId; writeFrame("SEND", headers, body); }Finally, the
send()function calls thewriteFrame()function and passes it the STOMP command, headers and body. ThewriteFrame()function will send the WebSocket frame and write the frame content in the buffer to the socket. ThewriteFrame()function is described later. Review the
connect()function.The
connect()function is used to initialize the communication with the back-end server. Theconnect()function takes two parameters: location, and a credentials object that contains the username and password. The location parameter is a string that contains the URL of the connection to the Gateway (for example,ws://example.com:8000/stompproxy).In the
connect()function you can see the following three callback handlers:onopen(),onmessage(), andonclose(). When the socket establishes a connection with the server, it triggers theonopen()callback function. This function starts the connect handshake by sending the CONNECT frame, using thewriteFrame()function, which is discussed in more detail in the next step. Any time the server sends data to the client it triggers theonmessage()callback function, which reads the data fragment using thereadFragment()function, which is discussed in more detail later. When the socket connection terminates (either gracefully or abruptly) then the socket triggers theonclose()callback function which calls the STOMP client'sonclose()callback function. The following example shows how you can add aconnect()function:function connect(location, credentials) { // We are not using any credentials. var username = ""; var password = ""; var wsf = new WebSocketFactory(); socket = wsf.createWebSocket(location); socket.onopen = function() { // call the writeFrame function and pass it credentials writeFrame("CONNECT", {"login": username, "password": password}); log("Connected to " + location + " with u/p " + username + "," + password); }; // Event handler listening for incoming messages. socket.onmessage = function(event) { readFragment(event); }; // Event handler for close events. socket.onclose = function(event) { onclose(event); }; };- Review the
writeFrame()function.The
writeFrame()function writes the frames in the way your protocol expects them. This is protocol-specific and requires that you have studied the protocol carefully. Some protocols have different frame formats for different commands, but in our STOMP example, all the frames (both client and server frames) use the same format, which makes it possible to use a singlewriteFrame()function to write all the command frames.To write a frame, you put bytes into a ByteBuffer (called frame in our example). A ByteBuffer is an array of byte-sized numbers. The ByteBuffer exposes information about the following:
- The position for the next write.
- The limit, or the location at which you cannot read anymore.
- The capacity, or the maximum number of bytes that can be written to the buffer.
- The order, or how numerical values are read from the ByteBuffer (either using the big-endian or little-endian byte order with big-endian being the default).
Just before writing the frame content in the buffer to the socket, the buffer is flipped so that it can be read. During the writing of the frames, the constants that were defined earlier are used for the special bytes. The following example shows how you can add the writeFrame function:
function writeFrame(command, headers, body)
{
	// create a new frame buffer
	var frame = new ByteBuffer();

	log("Sending frame. Command: " + command + " headers: " + headerToString(headers) + " body: " + (body || ""));
	// build the command line

	frame.putString(command, Charset.UTF8);
	frame.put(LINEFEED_BYTE);

	// build the headers lines
	for (var key in headers)
	{
		var value = headers[key];

		if (typeof(value) == "string")
		{
			var header = String(value);
			frame.putString(key, Charset.UTF8);
			frame.put(COLON_BYTE);
			frame.put(SPACE_BYTE);
			frame.putString(header, Charset.UTF8);
			frame.put(LINEFEED_BYTE);
		}
	  }

	  // add "content-length" header for binary content
	  if (body instanceof ByteBuffer)
	  {
			frame.putString("content-length", Charset.UTF8);
			frame.put(COLON_BYTE);
			frame.put(SPACE_BYTE);
			frame.putString(String(body.remaining()), Charset.UTF8);
			frame.put(LINEFEED_BYTE);
	  }

		// empty line at end of headers
		frame.put(LINEFEED_BYTE);

		// add the body (if specified)
		switch (typeof(body))
		{
			case "string":
				// add as text content
				frame.putString(body, Charset.UTF8);
				break;
			case "object":
				// add as binary content
				frame.putBuffer(body);
				break;
		}

	  // null terminator byte
	  frame.put(NULL_BYTE);

	  // flip the frame buffer
	  frame.flip();

	  // send the frame buffer
	  socket.send(frame);
}
Review the
readFragment()function.The
readFragment()function reads data fragments of the ByteBuffer that is sent from the server to the client.readFragment()tries to process a complete frame and retains incomplete frames in a read buffer until enough fragments arrive to form a complete frame. Once again, specific protocol knowledge is required to parse the incoming frames correctly. Since all the frames (both client and server frames) use the same format in STOMP, you can use a singlereadFragment()function to read all the server frames.The following example shows how you can add the
readFragment()function:function readFragment(event) { // initialize read buffer buffer = new ByteBuffer(); var limit; // skip to the end of the buffer buffer.skip(buffer.remaining()); // append new data to the buffer var data = event.data; var size = data.size; // var str = BlobUtils.asBinaryString(function() {}, data); // var str = BlobUtils.asString(data, 0, size); var cb = function(result) { var buf = new ByteBuffer(result); buffer.putBuffer(buf); // prepare the buffer for reading buffer.flip(); outer: while (buffer.hasRemaining()) { // initialize frame we will build from data var frame = { headers : {} }; // Note: skip over empty line at start of frame // scenario can occur due to fragmentation // if Apache ActiveMQ STOMP end-of-frame newline // spills into the start of the next frame if (buffer.getAt(buffer.position) == LINEFEED_BYTE) { buffer.skip(1); // linefeed } // mark read progress buffer.mark(); // search for command var endOfCommandAt = buffer.indexOf(LINEFEED_BYTE); if (endOfCommandAt == -1) { // There is no command, so break out of the outer while. buffer.reset(); break; } // read command // Make sure we won't read beyond the command limit = buffer.limit; buffer.limit = endOfCommandAt; frame.command = buffer.getString(Charset.UTF8); buffer.limit = limit; // skip linefeed byte buffer.skip(1); while(true) { var result = processData(buffer, frame); if (!result) break outer; // Else, just continue. } // end inner while(true) } // end while(buffer.hasRemaining()) // compact the buffer buffer.compact(); }; var arr = BlobUtils.asNumberArray(cb, data); }Review the
processData()function.The
processData()function is called by thereadFragment()function to process the incoming data frames and their headers and then pass the frame to the corresponding handler such asonmessage(). IfprocessData()detects any incomplete frames and missing headers it returns false toreadFragment(). Next, processData() orders the frames and extracts the frame body as a byte buffer. Finally, for each type of STOMP command (CONNECTED,MESSAGE,RECEIPT,ERROR) the frame is passed to the relevant event handler (onopen(),onmessage(),onreceipt(),onerror()) to be logged in the user interface. The following example shows how you can add theprocessData()function:function processData(buffer, frame) { var endOfHeaderAt = buffer.indexOf(LINEFEED_BYTE); // detect incomplete frame if (endOfHeaderAt == -1) { // There are no headers; we're outta here. buffer.reset(); return false; } // detect header or end-of-headers if (endOfHeaderAt > buffer.position) { // non-empty line: header // Otherwise, the position would have been equal. limit = buffer.limit; buffer.limit = endOfHeaderAt; var header = buffer.getString(Charset.UTF8); buffer.limit = limit; // process header line var endOfName = header.search(":"); // Javascript: for a Map, a["b"] = "c" is equivalent to a = { "b" : "c" } // So this sets { header : value } in headers Map frame.headers[header.slice(0, endOfName)] = header.slice(endOfName + 1); // skip linefeed byte buffer.skip(1); } else { // skip linefeed byte buffer.skip(1); // empty line: end-of-headers var length = Number(frame.headers['content-length']); var pattern = /;\scharset=/; var contentType = String(frame.headers['content-type'] || ""); var contentTypeAndCharset = contentType.split(pattern); // RabbitMQ always sends content-length header, even for text payloads // but then also includes content-type header with value "text/plain" // ActiveMQ only sends content-length for binary payloads // Payload is binary if content-length header is sent, and content-type // header is not "text/plain" (may be undefined) // Added additional check to look for "text/plain" instead of the exact // match, as the content-type value can be like "text/plain; charset=UTF-8" // RabbitMQ sends content-length but no content-type for ERROR messages // so assume text content for ERROR messages // Therefore, // if command is not ERROR, and // length is a Number (i.e. was given), and // the first part of the content type is NOT "text/plain" if (frame.command != "ERROR" && !isNaN(length) && contentTypeAndCharset[0] != "text/plain") { // content-length specified, binary content // detect incomplete frame if (buffer.remaining() < length + 1) { // The indicated length is greater than the data we have. // Plus, an additional char for the terminating null(?). buffer.reset(); return false; } // extract the frame body as byte buffer limit = buffer.limit; // This sets the max we can read up to the end of our content length buffer.limit = buffer.position + length; frame.body = buffer.slice(); // Reset this buffer.limit = limit; // Since we have our content, skip over those buffer.skip(length); // skip null terminator, unless buffer already consumed if (buffer.hasRemaining()) { buffer.skip(1); } } else { // content-length not specified, text content // detect incomplete frame var endOfFrameAt = buffer.indexOf(NULL_BYTE); if (endOfFrameAt == -1) { // We didn't get a complete frame. buffer.reset(); return false; } // verify that UTF-8 charset is appropriate var charset = ((contentTypeAndCharset[1]) || "utf-8").toLowerCase(); if (charset != "utf-8" && charset != "us-ascii") { throw new Error("Unsupported character set: " + charset); } // extract the frame body as null-terminated string frame.body = buffer.getString(Charset.UTF8); } // invoke the corresponding handler switch (frame.command) { case "CONNECTED": onopen(frame); break; case "MESSAGE": onmessage(frame); break; case "RECEIPT": onreceipt(frame); break; case "ERROR": onerror(frame); break; default: throw new Error("Unrecognized STOMP command '" + frame.command + "'"); } // No longer needed? // break; } return true; }- Lastly, let’s look at how the frame processed by the
processData()function is used by the event handlers. For example, the variable frame is passed from theprocessData()function to theonmessageevent handler:var onmessage = function(frame) { logFrame(frame); // Acknowledge it. var msgId = frame.headers["message-id"]; var subscription = frame.headers["subscription"]; ack(msgId, null, subscription, null); };onmessagecalls theack()function and passes it the message id and subscription information from the headers of the frame:function ack(messageId, transactionId, subscription, headers) { transactionId = transactionId || ""; headers = headers || {}; headers["message-id"] = messageId; if (transactionId.length) headers["transaction"] = transactionId; headers["subscription"] = subscription; writeFrame("ACK", headers); }The
ack()function calls writeFrame() and passes it theACKcommand and headers. As described earlier, thewriteFrame()function sends the frame over WebSocket to the STOMP server.
Testing the STOMP Protocol Client
To test the JavaScript STOMP client, you will need to run Apache ActiveMQ and the Gateway. Next, you will open the stomp.html file in a Web browser and connect to the Gateway running locally.
- Download and run the Gateway and ActiveMQ as described in Setting Up the Gateway and Clients. Next, you will configure the proxy service that the Gateway uses to connect clients to the STOMP back-end server.
- In a text editor, open the configuration file for the Gateway at
GATEWAY_HOME/conf/gateway-config.xmland add the following proxy service:<service> <name>Proxy</name> <description>Proxy Service</description> <accept>ws://localhost:8000/stompproxy</accept> <connect>tcp://localhost:61613</connect> <type>proxy</type> <cross-site-constraint> <allow-origin>*</allow-origin> </cross-site-constraint> </service>
- Save
gateway-config.xml. - Run the Gateway as described in Setting Up the Gateway and Clients.
- Load the HTML page stomp.html in a web browser. You can just drag the page into a web browser.
- In the web browser, note the URL in Proxy URL,
ws://localhost:8000/stompproxy. This is the same URL in the accept element of the proxy service you added. - Click Connect. In the log, you will see that the STOMP command has been sent and received by Apache ActiveMQ:
Sending frame. Command: CONNECT headers: login : <BLANK>, password : <BLANK> body:
Connected to ws://localhost:8000/stompproxy with u/p ,
Received: CONNECTED
- Click Subscribe. In the log, you will see that the SUBSCRIBE command is sent along with a destination:
Sending frame. Command: SUBSCRIBE headers: destination : /queue/stompq, ack : client-individual, id : 0 body:
- Click Send Message. In the log, you will see that the SEND command is sent along with the message body and headers. Also, you will see the ACK command acknowledging the receipt of the message as a result of the subscription:
Sending frame. Command: SEND headers: content-type : text/plain, content-length : 24, destination : /queue/stompq body: Hello from STOMP client.
Received: MESSAGE
Headers:
content-type : text/plain, message-id : ID:MacBook-Pro.local-64135-1455219512031-2:3:-1:1:1, destination : /queue/stompq, timestamp : 1455308737252, expires : 0, subscription : 0, priority : 4
Body: Hello from STOMP client.
Sending frame. Command: ACK headers: message-id : ID:MacBook-Pro.local-64135-1455219512031-2:3:-1:1:1, subscription : 0 body:
Congratulations. You have a fully functional JavaScript STOMP client.
See Also
- Kaazing WebSocket Gateway JavaScript JMS Client API.
- Build JavaScript JMS Clients
- Build JavaScript WebSocket Clients