Deploy WebRTC using the Gateway
Note: This document is for network administrators that are familiar with WebRTC and related protocols. For an introduction to WebRTC, see A Study of WebRTC Security and WebRTC in the real world: STUN, TURN and signaling. The Gateway is a very flexible and secure intermediary server for WebRTC that supports the techniques and protocols on top of which the WebRTC API rests (ICE, STUN, NAT, TURN, and SDP).WebRTC (Web Real-Time Communication) is an open framework, real-time communication standard that uses a collection of protocols and APIs to share audio/video and data without requiring the peers to use plug-ins. While the WebRTC standard defines APIs for browsers, network communication is not defined in the WebRTC standard and may be implemented in whatever way best suits the deployment. Kaazing WebSocket Gateway provides a secure, robust networking infrastructure that enables WebRTC communication between peers in all common WebRTC scenarios.
This document has the following sections:
- What’s Unique About WebRTC with the Gateway?
- WebRTC Gateway Topology and Components
- TURN Relay Address Masking
- Security in the WebRTC Session
- Deployment and Testing Process
- How WebRTC Works in the Gateway Deployment
- WebRTC Client Demo App
turn.rest and turn.proxy services, see turn.rest and turn.proxy.
What’s Unique About WebRTC with the Gateway?
Deploying WebRTC using the Gateway has the following benefits:
- The Gateway
turn.restservice is a REST-based SSO authentication service that ensures clients and peers have provided credentials before they are provided with the TURN server address. The same authentication credentials may be used for both the WebSocket and JMS connections. - The Gateway hosting the STUN/TURN proxy service
turn.proxyprovides firewall-level security by masking the TURN server address, eliminating internal network exposure. - Signalling is performed using WebSocket. Why us WebSocket for Signaling? A message service for signaling needs to be bidirectional and WebSocket is a perfect solution. All browsers that support WebRTC also support WebSocket, both on desktop and mobile. And WebSocket supports encryption via TLS/SSL known as WebSocket Secure (WSS).
WebRTC Gateway Topology and Components
You can deploy WebRTC in a number of ways, with clients on the same network or on different networks. For the purposes of this document, we will document an enterprise topology where client-to-peer connections are complicated by having a peer behind a corporate firewall and NAT. In this topology, the Kaazing client libraries and Gateway provide the following:
- Signaling is provided via a Gateway configured with a
jmsservice and peers and clients built using the Kaazing WebSocket JMS client libraries. WebRTC peers and clients use JMS queues and messages to exchange network interface and port information over WebSocket Secure. - A Gateway hosts a REST service for TURN discovery named
turn.rest. - A Gateway hosts a TURN server proxy service named
turn.proxy. This service proxies communication with the TURN server and mask TURN server and client/peer addresses.
Common Enterprise Topology
The following diagram shows an enterprise WebRTC topology using the Gateway for signaling via a JMS proxy, TURN discovery, and TURN proxying.
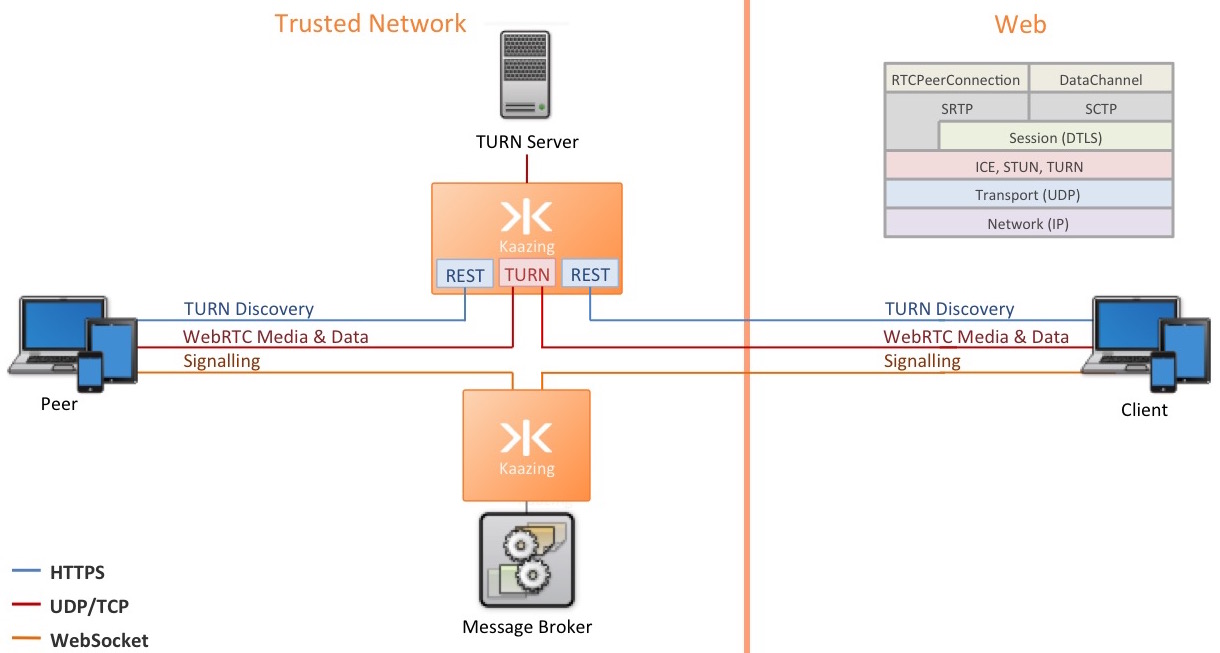
In this topology, two Gateways are used:
- A Gateway connecting clients to the JMS message broker for signaling.
- A Gateway hosting the
turn.restservice for TURN discovery and theturn.proxyservice for relaying data between client endpoints.
turn.proxy service hides the internal network information.
Topology Components
The following table lists the components involved in an enterprise WebRTC deployment.
Note: Wherever possible, the terminology from the TURN RFC and STUN RFC is used.| Component | Description |
|---|---|
| Client (Web app) | The Web customer app is a browser app that uses the Kaazing WebSocket and JMS client libraries and can be hosted by any Web server. The app uses the WebRTC standard API and JMS for signaling and media sharing. |
| Peer (Trusted network client app) | The Trusted network agent app is a browser app hosted by an internal Web server, such as the directory service on the Gateway. Programmatically, It is the same client app as the Web customer app: browser-based, and using the Kaazing WebSocket and JMS client libraries. |
| Gateway connecting to message broker | The clients apps use JMS queues, topics and messages for the signaling phase of setting up WebRTC, and so a Gateway hosting a jms service is used to enable the clients to communicate with the JMS server easily. |
| Message Broker | The JMS message broker is used by the agent and customer apps during the signaling phase of the WebRTC communication setup, where both clients exchange session control messages, media metadata, and key data for secure connections. |
Gateway hosting turn.rest and turn.proxy service |
A Gateway is used to host a turn.rest service that is used by both agent and client apps for TURN discovery. The apps then use the turn.proxy service on the Gateway to connect to the TURN server. |
| TURN server | The TURN server is used to relay audio/video/data streaming between peers. For this document, we are using the popular open source TURN server, coTURN. Information on installing and running coTURN is located at https://github.com/coturn/coturn/wiki/README. TURN is intended to be used only when a direct communication path between a client and peer cannot be found. As we are concerned with an enterprise deployment involving NAT and firewalls, TURN will be used. |
| Mapped Address (Reflexive Transport Address) | When there is a NAT between the client and the peer, the reflexive transport address represents the mapped address allocated to the client on the public side of the NAT. Reflexive transport addresses are learned from the mapped address attribute (MAPPED-ADDRESS or XOR-MAPPED-ADDRESS) in STUN responses. For more information, see RFC-5389. |
| Relay Address | The IP and port addresses provided by the TURN server to the client and peer for WebRTC communication. When a peer sends a packet to the relayed address, the TURN server relays the packet to the client. When the client sends a data packet to the TURN server, the server relays it to the appropriate peer using the relayed address as the source. |
| Masked Relay Address | The IP and port addresses provided by the turn.proxy service on the Gateway to the clients and peers involved in WebRTC. The Gateway masks the Relay Addresses provided by the TURN server to prevent exposure of private addresses. |
| Audio/visual and data media | Once a WebRTC connection is established, the agent and customer apps send audio/visual and data media. |
TURN Relay Address Masking
Once the client and peer have completed the signaling and TURN discovery phases, they contact the TURN server via the turn.proxy service hosted by the Gateway in order to receive a relay address. To prevent any exposure of an internal addresses outside of the network, the relay address is masked by the turn.proxy service.
To preserve the address mapping performed on the TURN server, on inbound connections the turn.proxy service reverses the relay address and masked relay address.
Here’s how the TURN server and turn.proxy service addressing works:
- The TURN server will attempt to establish the WebRTC connection between the client and peer by mapping client and peer addresses.
- Outbound connections:
- The TURN server sends the client the peer address as
192.169.1.7:9000. - The Gateway
turn.proxyservice sends the client the peer address masked as200.240.1.5:5000. - The TURN server sends the peer the client address as
192.169.1.5:5000. - The Gateway
turn.proxyservice sends the peer the client address masked as200.240.1.7:9000.
- The TURN server sends the client the peer address as
- Inbound connections:
- When the client and peer contact the TURN server with the masked addresses, the Gateway
turn.proxyservice reverses the masked addresses back into the relay addresses the TURN server issued and the TURN server’s mapping is preserved.
- When the client and peer contact the TURN server with the masked addresses, the Gateway
Security in the WebRTC Session
Security and authentication takes place at a number of points in the WebRTC deployment:
- Signaling, WSS, and JMS:
- When a client or peer initiates the signaling phase of WebRTC, it will contact the Gateway hosting the JMS service over WSS (WebSocket Secure). WSS is WebSocket over TLS and requires the use of certificates for encryption. The JMS service should be configured with a security realm and related login module to authenticate client connections. The Gateway will issue an authentication challenge to the client and the client app must provide credentials (third-party token, username and password, etc) to access the service.
- REST and TURN:
- The client attempts to connect to the
turn.restservice hosted on a Gateway over HTTPS (HTTP+TLS). Certificates are used for secure network connection. - The
turn.restservice hosted on the Gateway is secured by a login module and the client is prompted to provide credentials in order to authenticate with the Gateway. Credentials may be a third-party token, username and password, or the same credentials used for the login module of the JMS service. - The connection from the
turn.restservice to the TURN server uses one-time credentials (ephemeral credentials) as defined by the TURN REST API. These credentials are vended by turn.rest service over HTTP, and then supplied to and checked by the TURN server using the standard TURN protocol. The usage of these credentials ensures that access to the TURN server is controlled even if the credentials can be discovered by the user, as is the case in WebRTC where TURN credentials must be specified in Javascript.
- The client attempts to connect to the
For a detailed description of security in WebRTC communication, see webrtc-security.github.io.
Deployment and Testing Process
Deploying WebRTC using the Gateway involves developing client apps (Web or mobile) to handle WebRTC signaling, configuring a Gateway to manage the JMS messaging used for signaling, and configuring a Gateway to manage the ICE (Interactive Connectivity Establishment) framework followed for WebRTC peer connection setup.
Remember ICE: It is a good idea to keep the ICE framework in mind when performing the WebRTC setup. The ICE framework attempts all WebRTC connection methods in parallel to choose the most efficient and successful option.
- ICE first tries to make a connection using the host address obtained from a device's operating system and network card.
- If that method fails because the devices are behind NATs, ICE then obtains an external address using a STUN server.
- If that also fails because a STUN connection is not 100% successful, traffic falls back to routing via a TURN relay server.
To deploy WebRTC using the Gateway, follow this checklist:
| # | Step | Section |
|---|---|---|
| 1 | Develop your WebRTC client apps. | Develop the Client and Peer Apps |
| 2 | Set up a Gateway to manage the JMS traffic for signaling. | Configure a Message Broker Gateway |
| 3 | Set up your TURN server. | Configure the TURN Server |
| 4 | Set up a Gateway to host the turn.rest and turn.proxy services. |
Configure a Gateway for TURN and REST |
| 5 | Test your WebRTC deployment. | Test the WebRTC Deployment |
Develop the Client and Peer Apps
WebRTC is intended to enable mobile and Web applications from communicating in real-time without plug-ins. The client examples in this document are Web page apps built using HTML, JavaScript, and the Kaazing WebSocket and JMS client libraries.
To see the code for a full, working WebRTC client demo, go to WebRTC Client Demo App. Notes:- Before you build your WebRTC clients, review the steps involved in developing Kaazing JMS clients using the Kaazing JavaScript JMS SDK in Checklist: Build JavaScript JMS Clients.
- The Kaazing WebSocket and JMS client libraries are used during the signaling phase of WebRTC setup. You may choose to perform signaling without using Kaazing libraries, but you will need to perform client authentication with the Gateway using Java Authentication and Authorization Service (JAAS). The Kaazing WebSocket and JMS client libraries simplify authentication by enabling you to add Challenge Handlers to your client with only a few lines of code.
To configure clients for WebRTC with the Gateway, perform the following high-level steps:
- Determine if the Web browser or mobile client you are using for WebRTC supports the standard. To see what browsers support WebRTC, see http://caniuse.com/#search=webrtc.
- Download the Kaazing JavaScript Client SDK. For information on how to use the Kaazing JavaScript JMS client API, see Build JavaScript JMS Clients.
- Review the WebRTC API, specifically RTCPeerConnection.
- Develop your client app to perform the following functions. The following list omits steps for accessing the client app’s local audio/visual media or data. You can simply follow the standard WebRTC API for that functionality.
- Log into the Gateway hosting the JMS service and subscribe to the correct JMS queue. This functionality connects the app to the JMS message server via the JMS service hosted on the Gateway. You can choose to perform this operation when the client is loaded or when the user clicks a button. Here’s an example of a JavaScript function that connects to the JMS service acting as the signaling server:
function connectToSignallingJMS() { console.log("CONNECT: " + jmsServerURL); var jmsConnectionFactory = new JmsConnectionFactory(jmsServerURL); // setup challenge handler // setupSSO(jmsConnectionFactory.getWebSocketFactory()); try { var connectionFuture = //jmsConnectionFactory.createConnection(username.value, password.value, function () { jmsConnectionFactory.createConnection('', '', function() { if (!connectionFuture.exception) { try { conn = connectionFuture.getValue(); conn.setExceptionListener(handleException); console.log("CONNECTED"); session = conn.createSession(false, Session.AUTO_ACKNOWLEDGE); transactedSession = conn.createSession(true, Session.AUTO_ACKNOWLEDGE); conn.start(function() {}); } catch (e) { handleException(e); } } else { handleException(connectionFuture.exception); } }); } catch (e) { handleException(e); } } - Respond to the authentication challenge from the JMS service. How to develop a Challenge Handler for your client is document in Secure Your JavaScript Client.
- To begin the WebRTC offer, create a function that will send a JMS message containing the name of the current client as the message sender and place the name of the remote peer as the message receiver. This function will be used when sending an offer to the remote peer.
var name; // local username var connectedUser; // the remote username ... function send(message) { var dest = session.createTopic("/topic/" + connectedUser);; var producer = session.createProducer(dest); var textMsg = session.createTextMessage(message.type); message.sender = name; if (connectedUser) { message.receiver = connectedUser; } for (var key in message) { if (message.hasOwnProperty(key)) { console.log(key + " -> " + message[key]); if (key === "type") { continue } else { var property; if (message[key].toJSON !== undefined) { property = message[key].toJSON(); } else { property = message[key]; } textMsg.setStringProperty(key, JSON.stringify(property)); console.log("Setting " + key + " to value " + message[key]); } } } try { var future = producer.send(textMsg, function() { if (future.exception) { handleException(future.exception); } }); } catch (e) { handleException(e); } console.log("SEND TextMessage: \n\tDestination: " + dest + "\n\tMessage:" + JSON.stringify(message)); producer.close(); } - Include a text input where a user can enter the name or ID of the remote peer with which the user wants to establish a WebRTC session. Put that name of ID into a variable to be used in the signaling phase.
- Collect the remote user name from a form and then initiate a call (and make an offer) by sending a JMS message containing the WebRTC offer using the
RTCPeerConnection.createOffer()method of the WebRTC API.var callToUsernameInput = document.querySelector('#callToUsernameInput'); ... callBtn.addEventListener("click", function() { var callToUsername = callToUsernameInput.value; // put remote peer name into variable if (callToUsername.length > 0) { connectedUser = callToUsername; // set remote peer as message receiver // create an offer yourConn.createOffer(function(offer) { console.log("Creating offer : ", offer); // send an offer to remote peer send({ type: "offer", offer: offer }); yourConn.setLocalDescription(offer); }, function(error) { console.log("Error when creating an offer", error); }); } });The RTCPeerConnection object creates an SDP offer that includes information about any MediaStreamTracks already attached to the WebRTC session, codec and options supported by the browser, and any candidates already gathered by the ICE agent.
- Create a function to handle incoming JMS messages and route them to the appropriate method depending on what part of the signaling process they are for.
function handleMessage(message) { var data = {}; data.type = message.getText(); var props = message.getPropertyNames(); while (props.hasMoreElements()) { var propName = props.nextElement(); var propValue = message.getStringProperty(propName); data[propName] = JSON.parse(propValue); } console.log("RECEIVED data", data); switch (data.type) { case "login": handleLogin(data.success); break; //when somebody wants to call us case "offer": handleOffer(data.offer, data.sender); break; case "answer": handleAnswer(data.answer); break; //when a remote peer sends an ice candidate to us case "candidate": handleCandidate(data.candidate); break; case "leave": handleLeave(); break; default: break; } }; - Create functions to handle incoming messages for each of the signaling steps. Here are some examples.
- In response to a WebRTC offer:
function handleOffer(offer, sender) {
  connectedUser = sender;
  remoteVideo.src = null;
  startChat();
  // Add the remote description associated with the connection
  yourConn.setRemoteDescription(new RTCSessionDescription(offer));
  //create an answer to an offer
  yourConn.createAnswer(function(answer) {
    yourConn.setLocalDescription(answer);
    send({
      type: "answer",
      answer: answer
    });
  }, function(error) {
    console.log("Error when creating an answer", error);
  });
};
The message is sent when the app receives an offer message on the
queue queue/local_user_name. This queue is created upon login. The message will be placed in the queue/queue/caller_user_name. Thecaller_user_nameis received in the offer message. - Handle an answer from a remote user and set the answer as the the remote description associated with the connection:
function handleAnswer(answer) { console.log("Entering handleAnswwer"); yourConn.setRemoteDescription(new RTCSessionDescription(answer)); console.log("Exiting handleAnswer"); }; - Add a new ICE candidate from the remote peer and deliver it to the browser's ICE agent by calling RTCPeerConnection.addIceCandidate().
function handleCandidate(candidate) { console.log("Entering handleCandidate", candidate); yourConn.addIceCandidate(new RTCIceCandidate(candidate)); console.log("Exiting handleCandidate"); }; - The app should include a function for leaving the WebRTC session.
// hang up
hangUpBtn.addEventListener("click", function() {
  send({
    type: "leave"
  });
  handleLeave();
});

function handleLeave() {
  connectedUser = null;
  remoteVideo.src = null;

  yourConn.close();
  yourConn.onicecandidate = null;
  yourConn.onaddstream = null;
  startChat();
};
- Log into the Gateway hosting the JMS service and subscribe to the correct JMS queue. This functionality connects the app to the JMS message server via the JMS service hosted on the Gateway. You can choose to perform this operation when the client is loaded or when the user clicks a button. Here’s an example of a JavaScript function that connects to the JMS service acting as the signaling server:
- Once signaling has been taken care of, you can add code to handle the audio/video or data stream and to start the WebRTC chat.
- The chat function is called when the user clicks a login button that creates a JMS topic with their username and subscribes to that topic, or in response to an offer from a peer. The function creates an Ajax object for the Web page. The Ajax object calls the
turn.restservice on the Gateway, authenticates with it, and requests the list of ICE servers (TURN servers). It then takes the response from theturn.restservice and populates thehandleVideo.iceConfigvariable with the list. The list will be used by thehandleVideo()function to configure the RTCPeerConnection.function startChat() { // get the username and password entered by the user username = usernameInput.value; password = passwordInput.value; // request the list of ICE servers from the turn.rest service $.ajax({ type: "GET", url: "https://gateway.auth.test:18032/turn.rest?service=turn", dataType: 'json', async: true, headers: { // Authenticate with the turn.rest service "Authorization": "Basic " + btoa(username + ":" + password) }, success: function(response) { // get the list of ICE servers from the response from turn.rest // and put it in a variable for the handleVideo() function handleVideo.iceConfig = response; loginPage.style.display = "none"; errMessage.style.display = "none"; callPage.style.display = "block"; //********************** //Starting a peer connection //********************** //getting local video stream if (navigator.mediaDevices.getUserMedia) { navigator.mediaDevices.getUserMedia({ video: true, audio: true }, handleVideo, function(error) { console.log("1", error); }); } else { navigator.kaazGetUserMedia({ video: true, audio: true }, handleVideo, function(error) { console.log("1", error); }); } }, error: function() { errMessage.style.display = "block"; } }); }; - Write the function to handle the video stream. Also, the function provides the ICE information required by RTCPeerConnection. The
iceTransportPolicyis set to relay, one of the three options defined by theRTCIceTransportPolicyenum. The relay setting tells the browser that only ICE candidates whose IP addresses are being relayed, such as those being passed through a TURN server, will be considered. TheiceServersconfiguration object is also set using the list received from the turn.rest service instartChat(). At the end of the function, theonicecandidateEventHandler is set with a function to send the ICE candidate to the peer. The function also handles the display of the streaming audio/visual media. Thepeerconvariable definition is included to identify where theRTCPeerConnectionconstructor is used.var peercon; // browser-specific variable for RTCPeerConnection if (window.mozRTCPeerConnection) { peercon = mozRTCPeerConnection; } else if (window.webkitRTCPeerConnection) { peercon = webkitRTCPeerConnection; } else if (window.msRTCPeerConnection) { peercon = msRTCPeerConnection; } ... function handleVideo(myStream) { stream = myStream; console.log("debug : 1"); //displaying local video stream on the page if (window.URL) { localVideo.src = window.URL.createObjectURL(stream); } else { localVideo.src = stream; } // Define the ICE configuration var configuration = { // set the ICE policy to a TURN server "iceTransportPolicy": "relay", // use the ICE servers list defined in startChat() "iceServers": handleVideo.iceConfig }; console.log("debug : 2"); // use configuration for RTCPeerConnection yourConn = new peercon(configuration); console.log("debug : 3"); // setup stream listening yourConn.addStream(stream); //when a remote user adds stream to the peer connection, we display it yourConn.onaddstream = function(e) { console.log("Adding stream "); if (window.URL) { remoteVideo.src = window.URL.createObjectURL(e.stream); } else { remoteVideo.src = e.stream; } }; // Send the ICE candidate to the peer yourConn.onicecandidate = function(event) { if (event.candidate) { if (event.candidate.candidate.indexOf("relay") > 0) { send({ type: "candidate", candidate: new RTCIceCandidate(event.candidate) }); } } }; }
- The chat function is called when the user clicks a login button that creates a JMS topic with their username and subscribes to that topic, or in response to an offer from a peer. The function creates an Ajax object for the Web page. The Ajax object calls the
The remainder of the WebRTC activity is managed by the Web browser.
If you want to host your WebRTC app using the directory service of the Gateway, do the following:
- Download and install the Kaazing WebSocket Gateway on the server.
- Open the
gateway-config.xmlfile located inGATEWAY_HOME/conf/. - Add a directory service that points to the folder where your HTML page is located, for example:
<service> <name>webrtc</name> <description>Directory service for WebRTC</description> <accept>https://${gateway.hostname}:${gateway.port}</accept> <type>directory</type> <properties> <directory>/webrtc</directory> <welcome-file>index.html</welcome-file> <error-pages-directory>/error-pages</error-pages-directory> <options>indexes</options> <location> <patterns>**/*</patterns> <cache-control>max-age=0</cache-control> </location> </properties> <cross-site-constraint> <allow-origin>*</allow-origin> </cross-site-constraint> </service> - Save the config file and start the Gateway as described in Setting Up the Gateway and Clients.
Configure a Message Broker Gateway
The Gateway hosting the JMS service must perform the following:
- Proxy JMS traffic to the JMS message broker. In the enterprise scenario discussed in this document, traffic will be coming from both inside and outside of the corporate network.
- Authenticate clients connecting to the JMS message broker via a login module.
To configure the JMS service on the Gateway, do the following:
- Download and install the Kaazing WebSocket Gateway on the server.
- Open the
gateway-config.xmlfile located inGATEWAY_HOME/conf/. - Revise the JMS service in the config file for the client connections and JMS proxying:
<service> <name>JMS Service</name> <accept>wss://${gateway.hostname}:${gateway.port}/jms</accept> <type>jms</type> <properties> <connection.factory.name>ConnectionFactory</connection.factory.name> <context.lookup.topic.format>dynamicTopics/%s</context.lookup.topic.format> <context.lookup.queue.format>dynamicQueues/%s</context.lookup.queue.format> <env.java.naming.factory.initial>org.apache.activemq.jndi.ActiveMQInitialContextFactory</env.java.naming.factory.initial> <env.java.naming.provider.url>tcp://broker:61616</env.java.naming.provider.url> </properties> <realm-name>demo</realm-name> <cross-site-constraint> <allow-origin>*</allow-origin> </cross-site-constraint> </service> - Prepare the Gateway to establish WebSocket Secure by following the steps in Secure Network Traffic with the Gateway. For testing, you can follow the steps in Secure the Gateway Using Self-Signed Certificates, but for production, you should use trusted certificates as described in Secure the Gateway Using Trusted Certificates.
- Ensure a
realm-nameis configured in the JMS service. In the example above, therealm-nameisdemo. - In the security section of the configuration file, create a
realmwith the same name asrealm-name. Thelogin-modulein your realm can use a number of different authentication methods. For testing, a file-based method is adequate:<security> <keystore> <type>JCEKS</type> <file>keystore.db</file> <password-file>keystore.pw</password-file> </keystore> <truststore> <file>truststore.db</file> </truststore> <realm> <name>demo</name> <description>Sample realm for file-based authentication</description> <authentication> <http-challenge-scheme>Application Basic</http-challenge-scheme> <login-modules> <login-module> <type>file</type> <success>required</success> <options> <file>jaas-config.xml</file> </options> </login-module> </login-modules> </authentication> </realm> </security> - Save the config file and start the Gateway and pre-packaged JMS message broker:
./bin/gateway.start --broker jms(Linux/Mac), or./bin/gateway.start.bat --broker jms(Windows)
Configure the TURN Server
The TURN server used in this document is coTURN. The Gateway WebRTC deployment only requires a few coTURN parameters be configured. Here is an example of a script used to configure the coTURN parameters required for the Gateway WebRTC deployment:
"/usr/bin/turnserver", "-n", "-a", "--use-auth-secret", "--realm=real_name", "--static-auth-secret=shared_key", "--rest-api-separator=:"
For information about each parameter, see the coTURN documentation.
Configure a Gateway for TURN and REST
The Gateway hosting the turn.rest and turn.proxy services must perform the following:
- Respond to client requests for ICE candidates via REST.
- Authenticate clients connecting to the turn.rest service using a login module.
- Proxy TURN traffic for a TURN server.
- Mask TURN relay addresses.
To configure the turn.rest and turn.proxy services on the Gateway, do the following:
- Download and install the Kaazing WebSocket Gateway on the server.
- Configure the Gateway with a certificate for HTTPS using the keytool command-line tool. Prepare the Gateway to establish HTTPS by following the steps in Secure Network Traffic with the Gateway. For testing, you can follow the steps in Secure the Gateway Using Self-Signed Certificates, but for production, you should use trusted certificates as described in Secure the Gateway Using Trusted Certificates.
- Configure the Gateway with an alias and password for the TURN server using the keytool command-line tool. The
turn.restservice needs a shared key with the TURN server to generate credentials. When you set up coTURN, the shared key is specified with the--static-auth-secret secretcommand. This process is documented in the TURN REST API. The password for the shared key is kept in the keystore used by the Gateway.- You can add the alias and password by running the
keystore -importpasswordcommand in theGATEWAY_HOME/conffolder, for example:keytool -importpassword -storetype JCEKS -alias turn_shared_secret -keystore GATEWAY_HOME\conf\keystore.db -keypass passwordThe keytool app will prompt you for the password to store for the alias you entered.
- Enter the password and press Enter.
- Next, you are prompted for an additional password to store the password. Do not enter any password, just press Enter.
- You can add the alias and password by running the
- Open the gateway-config.xml file located in
GATEWAY_HOME/conf. - Add a
turn.restservice. Here is a sampleturn.restservice configuration with comments:<service> <name>turn.rest</name> <description>TURN Rest Service</description> <!-- ensure that HTTPS and the turn.rest suffix are used --> <accept>https://${gateway.hostname}:18032/turn.rest</accept> <type>turn.rest</type> <properties> <!-- the alias used when adding the shared key password to the keystore --> <key.alias>turnshared</key.alias> <!-- enter the algorithm used to encrypt the credentials --> <key.algorithm>HmacSHA1</key.algorithm> <!-- enter the credential generator class used to generate the credentials --> <credentials.generator>class:org.kaazing.gateway.service.turn.rest.DefaultCredentialsGenerator</credentials.generator> <!-- enter the time the credentials are valid for --> <credentials.ttl>22400</credentials.ttl> <!-- enter the username separator used in the credentials --> <username.separator>:</username.separator> <!-- enter the hostname and port from the turn.proxy service accept URI, And specify the transport suffix as tcp or udp. If you omit the transport suffix, the Gateway will try both protocols --> <url>turn:${gateway.hostname}:22000?transport=tcp</url> </properties> <!-- specify a real name for the security realm used --> <realm-name>demo</realm-name> <!-- restrict cross site constraints before running in production --> <authorization-constraint> <require-role>AUTHORIZED</require-role> </authorization-constraint> <!-- for testing, allow any origin --> <cross-site-constraint> <allow-origin>*</allow-origin> </cross-site-constraint> </service> - Ensure the
turn.restservice meets the following requirements:- The
turn.restservice accepts client connections over HTTPS and therefore theacceptURI must usehttps://. - The accept URI must include the
turn.restsuffix, for examplehttps://${gateway.hostname}:18032/turn.rest.
- The
- Configure the required properties as described in turn.rest.
- Ensure a
realm-nameis configured in theturn.restservice. In the example above, therealm-nameisdemo. - In the security section of the configuration file, create a
realmwith the same name asrealm-name. Thelogin-modulein yourrealmcan use a number of different authentication methods. For testing, a file-based method is adequate:<security> <keystore> <type>JCEKS</type> <file>keystore.db</file> <password-file>keystore.pw</password-file> </keystore> <truststore> <file>truststore.db</file> </truststore> <realm> <name>demo</name> <description>Sample realm for file-based authentication</description> <authentication> <http-challenge-scheme>Basic</http-challenge-scheme> <login-modules> <login-module> <type>file</type> <success>required</success> <options> <file>jaas-config.xml</file> </options> </login-module> </login-modules> </authentication> </realm> </security> - Add a
turn.proxyservice. Here is a sampleturn.proxyservice configuration with comments:<service> <name>turn.proxy</name> <description>TURN Proxy Service</description> <!-- enter the hostname and port from the url property in turn.rest, without the transport suffix --> <accept>tcp://${gateway.hostname}:22000</accept> <!-- enter the URI for the TURN server --> <connect>tcp://coturn:3478</connect> <type>turn.proxy</type> <properties> <!-- the alias used when adding the shared key password to the keystore --> <key.alias>turnshared</key.alias> <!-- the mapped.address used by STUN --> <mapped.address>192.0.2.15:3478</mapped.address> </properties> </service> - Save the gateway-config.xml file.
- Start the Gateway as described in Setting Up the Gateway and Clients.
Test the WebRTC Deployment
When testing your WebRTC deployment, there are a number of tools to help you view WebRTC session statistics:
- Chrome: chrome://webrtc-internals
- Opera: opera://webrtc-internals
- Firefox: about:webrtc
How WebRTC Works in the Gateway Deployment
The following procedure describes how a WebRTC Gateway production set up establishes communication:
- Signaling, SSO, and REST.
- The client initiates the WebRTC connection by beginning the signaling phase.
- The client attempts to connect to the JMS service hosted by the Gateway over the WebSocket Secure protocol
wss://. A secure network connection is established. - The JMS service hosted on the Gateway also uses a login module to authenticate the client. It challenges the client for credentials, the client provides the credentials, and the JMS connection is established.
- The client posts a JMS message on a JMS queue/topic subscribed to by the peer. The message contains the WebRTC offer needed by the peer to begin the communication. The peer responds with an WebRTC answer by posting a JMS message on a JMS queue/topic subscribed to by the client. The message indicates that the peer accepts the client’s offer to establish a WebRTC session.
- The client attempts to connect to URI of the
turn.restservice hosted by the Gateway. The URI of theturn.restservice hosted by the Gateway is hardcoded in both apps. - The client attempts to connect to the
turn.restservice hosted on the REST Gateway over HTTPS (HTTP+TLS). A secure network connection is established. - The turn.rest service hosted on the REST Gateway is secured by a login module and the client is prompted to provide credentials in order to authenticate with the REST Gateway. Credentials may be a third-party token, username and password, or the same credentials used for the login module of the JMS service.
- The client authenticates with the
turn.restservice successfully.
- TURN Discovery. Once authenticated, the client connected to the
turn.restservice receives a JSON object with the TURN proxy URI and one time credentials for the TURN server. The client no longer uses REST. This process is part of RTCConfiguration and the JSON object may also include STUN URLs. - STUN and TURN Relay.
- The client connects to the
turn.proxyservice on the Gateway over TCP. Theturn.proxyservice proxies the connections to the TURN server, for example, coTURN. - coTURN requires authentication, so the client submits the credentials provided by the
turn.restservice to the TURN server via the Gateway and authenticates with the TURN server. - Once the client is authenticated, the TURN server issues a STUN response via the Gateway. The
turn.proxyservice corrects the Relay Address (external client IP) in the STUN response (alternatively, theturn.proxywill hide the STUN address), and provides the TURN Masked Address which the client will use. - The Gateway sends the client a TURN Masked Address for communication.
- The client connects to the
- The peer follows the same process as the client to receive a Masked Relay Address for communication with the client.
- WebRTC Media and Data Communication.
- The client and peer browsers follow the WebRTC API establish a secure connection with each other, ensuring that their communication is encrypted and cannot be viewed by the TURN server.
- Now that client and peer are proxied to TURN server via the
turn.proxyservice on the Gateway, and secured according to the WebRTC API, they share their conversation ID and begin their WebRTC session.
WebRTC Client Demo App
The following WebRTC demo application shows you how to create a simple WebRTC client/peer interface with the typical controls for connecting to the JMS server, and turn.rest and turn.proxy services hosted by the Gateway.
The JavaScript code shows how to use the Kaazing WebSocket and JMS JavaScript API for the signaling phase of WebRTC. It also demonstrates the necessary event handlers and WebRTC, ICE, REST API and TURN protocol steps for the WebRTC client/peer app.
In this example, the HTML file, named index.html, and the JavaScript file, named client.js, are located in the same folder. The Kaazing JavaScript SDK is loaded using a content delivery network.
Note: The demo application uses jQuery and Bootstrap for interface and programming components.HTML
The HTML code is available online at: https://github.com/kaazing/webrtc/blob/develop/gateway/webrtc/index.html
JavaScript
The JavaScript code is available online at: https://github.com/kaazing/webrtc/blob/develop/gateway/webrtc/client.js