Use the Kaazing Gateway Android JMS Client API
In this procedure, you will learn how to create an Android JMS Client using the Kaazing Enterprise Android JMS Client API. You will learn how to create an Android Studio project and add the necessary Java classes in order to use the Android JMS Client API. You will learn how to implement the Android JMS Client API methods to enable your Android client to send and receive messages to a JMS broker via a local or publicly available Gateway.
The Android JMS Client API is nearly identical to the Java JMS Client API. You can review an overview of the Java JMS Client API connection, session, message producer, and message consumer code in Use the Kaazing Gateway Java JMS Client Library. For information about using durable subscribers, see Durable Subscribers.
Note: For this how-to, we describe how to use both a local and a publicly available Gateway and JMS broker. The public address is wss://demos.kaazing.com/jms. Locally, you can use any JMS-compliant message broker. By default, the Gateway is configured to connect to the broker on tcp://localhost:61613. You can configure the connect URL in the file GATEWAY_HOME/conf/gateway-config.xml. See About Integrating Kaazing Gateway and JMS-Compliant Message Brokers for more information.
Before You Begin
This procedure is part of Checklist: Build Android JMS Clients.
Note: Learn about supported browsers, operating systems, and platform versions in the Release Notes.
To Use the Kaazing Android or Java JMS API
- Add the necessary import statements:
// Security-related imports
import com.kaazing.gateway.jms.client.demo.LoginDialogFragment.LoginDialogListener;
import com.kaazing.net.auth.BasicChallengeHandler;
import com.kaazing.net.auth.ChallengeHandler;
import com.kaazing.net.auth.LoginHandler;
// JMS-related imports
import com.kaazing.gateway.jms.client.ConnectionDisconnectedException;
import com.kaazing.gateway.jms.client.JmsConnectionFactory;
import com.kaazing.net.ws.WebSocketFactory;
- Create a JMS connection object and connect to the Gateway:
private JmsConnectionFactory connectionFactory; ... connectionFactory = JmsConnectionFactory.createConnectionFactory(); WebSocketFactory webSocketFactory = connectionFactory.getWebSocketFactory(); onnectionFactory.setGatewayLocation("wss://demos.kaazing.com/jms"); connection = connectionFactory.createConnection(); connection.start(); - To send messages, add a
MessageProducerobject. The following example responds to when a user clicks a Send button. It uses a try/catch statement to send the message, and an if/else statement to send either binary or text messages. You will also note that this function uses ansynchronous dispatch,dispatchQueue.dispatchAsync(new Runnable(), defined in a separate file named DispatchQueue.java.sendBtn.setOnClickListener(new OnClickListener() { public void onClick(View v) { hideKeyboard(); // hide the keyboard final boolean sendBinary = sendBinaryCheckBox.isChecked(); // check if Binary checkbox selected final String text = messageText.getText().toString(); // get the message enter by user logMessage("SEND: " + text); // log the message text dispatchQueue.dispatchAsync(new Runnable() { // run as a separate, ansynchronous thread public void run() { try { String destinationName = destinationText.getText().toString(); // get the destination submitted by user // create a MessageProducer to send messages to the specified destination MessageProducer producer = session.createProducer(getDestination(destinationName)); Message message; if (sendBinary) { // construct binary message BytesMessage bytesMessage = session.createBytesMessage(); bytesMessage.writeUTF(text); message = bytesMessage; } else { // use text message message = session.createTextMessage(text); } producer.send(message); // send the message to the destination for the producer producer.close(); // close the message producer when not needed } catch (JMSException e) { // catch and write exceptions to the log console e.printStackTrace(); logMessage(e.getMessage()); } } }); } }); - To receive or consume messages, add a
MessageListenerobject. The function manages both text and binary messages, and instances of MapMessage (used to send a set of name-value pairs).
private class DestinationMessageListener implements MessageListener {

  public void onMessage(Message message) { //respond when a message is received
    try {
      if (message instanceof TextMessage) { // log test messages in the UI console
        logMessage("RECEIVED TextMessage: " + ((TextMessage)message).getText());
      }
      else if (message instanceof BytesMessage) { // manage binary using BytesMessage
        BytesMessage bytesMessage = (BytesMessage)message;

        long len = bytesMessage.getBodyLength(); // order the binary and display hex in console
        byte b[] = new byte[(int)len];
        bytesMessage.readBytes(b);

        logMessage("RECEIVED BytesMessage: " + hexDump(b)); // see this function below
      }
      else if (message instanceof MapMessage) { // manage MapMessage pairs, text or binary
        MapMessage mapMessage = (MapMessage)message;
        Enumeration mapNames = mapMessage.getMapNames();
        while (mapNames.hasMoreElements()) {
          String key = (String)mapNames.nextElement();
          Object value = mapMessage.getObject(key);

          if (value == null) {
            logMessage(key + ": null");
          } else if (value instanceof byte[]) {
            byte[] arr = (byte[])value;
            StringBuilder s = new StringBuilder(); // see this function below
            s.append("[");
            for (int i = 0; i < arr.length; i++) {
              if (i > 0) {
                s.append(",");
              }
              s.append(arr[i]);
            }
            s.append("]");
            logMessage(key + ": "+ s.toString() + " (Byte[])"); // display binary name and value pairs
          } else {
            logMessage(key + ": " + value.toString() + " (" + value.getClass().getSimpleName() + ")"); // display text name and value pairs
          }
        }
        logMessage("RECEIVED MapMessage: ");
      }
      else {
        logMessage("UNKNOWN MESSAGE TYPE: "+message.getClass().getSimpleName());
      }

    }
    catch (Exception ex) { // handle exceptions
      ex.printStackTrace();
      logMessage("EXCEPTION: " + ex.getMessage());
    }
  }

  private String hexDump(byte[] b) { // convert the binary to hexadecimal and return
    if (b.length == 0) {
      return "empty";
    }

    StringBuilder out = new StringBuilder(); // convert MapMessage binary to hexadecimal pairs and return
    for (int i=0; i < b.length; i++) {
      out.append(Integer.toHexString(b[i])).append(' ');
    }
    return out.toString();
  }

}
Build the Kaazing Android JMS Messaging Tutorial App
Note: This procedure teaches you the Kaazing Android JMS API by building the tutorial app that is available on Github. To look at the completed tutorial app, download or clone the Android Demo project from https://github.com/kaazing/java.client.tutorials/tree/develop/android/jms. Once the project is extracted, you can build the JMS tutorial app by following the steps here: https://github.com/kaazing/java.client.tutorials/blob/develop/android/jms/README.md.In this procedure you will do the following major steps (these step numbers do not correspond to the procedure step numbers directly):
- Install the Kaazing Enterprise Android Client SDK.
- Set up an Android project in Android Studio.
- Import the Kaazing Gateway Android and JMS API libraries.
- Create the Android client Touch User Interface (TUI).
- Add a dispatch queue class to the Android client.
- Add the import statements for the common Java and Android classes.
- Add the import statements for the Kaazing Gateway Android JMS Client API classes.
- Add the variables for the program.
- Add the onCreate() method with event listeners.
- Add the connect() and disconnect() methods.
- Add the getDestination() method for creating topics and queues.
- Add the ConnectionExceptionListener class to handle when a JMS provider detects an exception.
- Add the DestinationMessageListener class and onMessage() method to manage messages.
- Add the methods for when the client is paused, resumes, and when the client is closed.
- Add the methods for updating the Connect and Disconnect buttons.
- Run the Android client in the Android Emulator.
- Test the Android client in the Android Emulator.
- Install the Kaazing Enterprise Android Client SDK. Download the Kaazing Enterprise Android Client SDK as described in Setting Up the Gateway and Clients.
- Download and install Android Studio and the Android SDK from https://developer.android.com/studio/index.html.
- Set up an Android project in Android Studio.
- Launch Android Studio.
- Click Start a New Android Studio Project.
- In Configure your new project, in Application Name, name the project jms.
- In Company Name, enter mycompany.example.com.
- In Package Name, click Edit, enter com.kaazing.gateway.jms.client.demo, and click Done.
- In Project location, enter or browse to a location for your project. The location path cannot contain spaces.
- Click Next.
- In Select the form factors your app will run on, enable Phone and Tablet.
- In Minimum SDK, choose API 19: Android 4.4 (KitKat) and click Next.
- On Add an Activity to Mobile, click Empty Activity, and click Next.
- In Customize the Activity, in Activity Name, enter JMSDemoActivity.
- In Layout Name enter main (ensure that the Activity Name is still JMSDemoActivity) and click Finish. If there are dependencies that you need to install, the Finish button is not available. The new project is generated.
- Import the Kaazing Android SDK libraries. You can import the libraries in a number ways, such as using a .zip or Maven, as described on kaazing.com/download. Follow the steps for the method you want to use.
Here is an example app/build.gradle configuration:
apply plugin: 'com.android.application' repositories { mavenCentral() maven { url "https://repository.kaazing.com/maven/" } } android { compileSdkVersion 19 buildToolsVersion "23.0.2" defaultConfig { applicationId "com.kaazing.gateway.jms.client.demo" minSdkVersion 19 targetSdkVersion 19 multiDexEnabled true } lintOptions { abortOnError false } buildTypes { release { minifyEnabled false proguardFiles getDefaultProguardFile('proguard-android.txt'), 'proguard-rules.txt' } } } dependencies { compile group: 'com.kaazing', name: 'enterprise.android.client.all', version: '4.1.0' compile 'org.apache.geronimo.specs:geronimo-jms_1.1_spec:1.1.1' compile 'com.google.android:support-v4:r7' } - Update the AndroidManifest.xml file. Open the AndroidManifest.xml file in
app/src/main/AndroidManifest.xmland replace its contents with the following (the code is available here also):<?xml version="1.0" encoding="utf-8"?> <manifest xmlns:android="http://schemas.android.com/apk/res/android" package="com.kaazing.gateway.jms.client.demo" android:versionCode="1" android:versionName="4.0"> <application android:icon="@drawable/icon" android:label="@string/app_name_short"> <activity android:name=".JMSDemoActivity" android:configChanges="orientation" android:windowSoftInputMode="stateHidden"> <intent-filter> <action android:name="android.intent.action.MAIN" /> <category android:name="android.intent.category.LAUNCHER" /> </intent-filter> </activity> </application> <uses-permission android:name="android.permission.INTERNET"/> </manifest> - Add the icon for the app. This is the icon that appears on the home screen of the device. Drag the icon from the Android demo folder
java.client.tutorials/android/jms/res/drawable-hdpi/icon.pngto the drawable-hdpi folder in your project atapp/src/main/res/drawable-hdpi. - Delete the automatically generated styles.xml file in your project at
app/src/main/res/values. This file isn't needed in the project and can cause errors. - Create the Android client Touch User Interface (TUI). Next you will add the text strings and layout for the Android client TUI. When you are finished, the Android client will look like this:
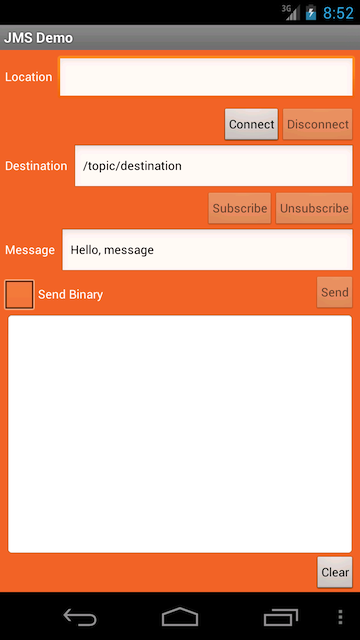
Figure: Android JMS Client TUI - Open the strings.xml file located at jms/res/values/strings.xml and replace its contents with the following:
<?xml version="1.0" encoding="utf-8"?>
<resources>
    <string name="app_name_short">JMS Demo</string>
    <string name="app_name">JMS Messaging Demo</string>
    <string name="location_label">Location</string>
    <string name="connectBtn_label">Connect</string>
    <string name="disconnectBtn_label">Disconnect</string>
    <string name="destination_label">Destination</string>
    <string name="destination_default">/topic/destination</string>
    <string name="location_default">ws://10.0.2.2:8001/jms</string>
    <string name="subscribe_label">Subscribe</string>
    <string name="unsubscribe_label">Unsubscribe</string>
    <string name="message_label">Message</string>
    <string name="message_default">Hello, message</string>
    <string name="send_label">Send</string>
    <string name="clear_label">Clear</string>
    <string name="username_hint">Username</string>
    <string name="password_hint">Password</string>
    <string name="ok_label">OK</string>
    <string name="cancel_label">Cancel</string>
    <string name="sendBinary_label">Send Binary</string>
</resources>
Important: When pasting text into Android Studio, whitespace will likely be included and cause errors in your project. To avoid this problem, you can paste text into a text editor first, copy it from there, and paste it into Android Studio. Alternatively, you can copy the text from the files stored in Github here: https://github.com/kaazing/java.client.tutorials/tree/develop/android/jms. - Open the dimens.xml file from
app/src/main/res/values/dimens.xmland replace its contents with the following:<resources> <dimen name="edit_text_size">12dp</dimen> </resources> - Open the main.xml file located at jms/res/layout/main.xml and replace its contents with the following:
<?xml version="1.0" encoding="utf-8"?> <RelativeLayout xmlns:android="http://schemas.android.com/apk/res/android" android:id="@+id/RelativeLayout1" android:layout_width="fill_parent" android:layout_height="fill_parent" android:background="#F27A31"> <LinearLayout android:id="@+id/linearLayout1" android:layout_width="match_parent" android:layout_height="wrap_content" android:layout_alignParentTop="true" android:layout_centerHorizontal="true" android:layout_margin="5dp" > <TextView android:id="@+id/textView1" android:layout_width="wrap_content" android:layout_height="wrap_content" android:text="@string/location_label" android:textAppearance="?android:attr/textAppearanceMedium" android:textSize="@dimen/edit_text_size" /> <EditText android:id="@+id/locationText" android:layout_width="0dp" android:layout_height="wrap_content" android:layout_marginLeft="5dp" android:layout_weight="1" android:ems="10" android:text="@string/location_default" android:textSize="@dimen/edit_text_size" > <requestFocus /> </EditText> </LinearLayout> <Button android:id="@+id/disconnectBtn" style="?android:attr/buttonStyleSmall" android:layout_width="wrap_content" android:layout_height="wrap_content" android:layout_alignParentRight="true" android:layout_below="@+id/linearLayout1" android:layout_marginRight="5dp" android:enabled="false" android:text="@string/disconnectBtn_label" android:textSize="@dimen/edit_text_size" /> <Button android:id="@+id/connectBtn" style="?android:attr/buttonStyleSmall" android:layout_width="wrap_content" android:layout_height="wrap_content" android:layout_alignBaseline="@+id/disconnectBtn" android:layout_alignBottom="@+id/disconnectBtn" android:layout_toLeftOf="@+id/disconnectBtn" android:text="@string/connectBtn_label" android:textSize="@dimen/edit_text_size" /> <LinearLayout android:id="@+id/linearLayout2" android:layout_width="match_parent" android:layout_height="wrap_content" android:layout_alignParentLeft="true" android:layout_below="@+id/connectBtn" android:layout_marginLeft="5dp" android:layout_marginRight="5dp" > <TextView android:id="@+id/textView2" android:layout_width="wrap_content" android:layout_height="wrap_content" android:text="@string/destination_label" android:textAppearance="?android:attr/textAppearanceMedium" android:textSize="@dimen/edit_text_size" /> <EditText android:id="@+id/destinationText" android:layout_width="0dp" android:layout_height="wrap_content" android:layout_marginLeft="5dp" android:layout_weight="1" android:ems="10" android:text="@string/destination_default" android:textSize="@dimen/edit_text_size" > </EditText> </LinearLayout> <Button android:id="@+id/subscribeBtn" style="?android:attr/buttonStyleSmall" android:layout_width="wrap_content" android:layout_height="wrap_content" android:layout_alignBaseline="@+id/unsubscribeBtn" android:layout_alignBottom="@+id/unsubscribeBtn" android:layout_below="@+id/linearLayout2" android:layout_toLeftOf="@+id/unsubscribeBtn" android:enabled="false" android:text="@string/subscribe_label" android:textSize="@dimen/edit_text_size" /> <Button android:id="@+id/unsubscribeBtn" style="?android:attr/buttonStyleSmall" android:layout_width="wrap_content" android:layout_height="wrap_content" android:layout_alignParentRight="true" android:layout_below="@+id/linearLayout2" android:layout_marginRight="5dp" android:enabled="false" android:text="@string/unsubscribe_label" android:textSize="@dimen/edit_text_size" /> <LinearLayout android:id="@+id/linearLayout3" android:layout_width="match_parent" android:layout_height="wrap_content" android:layout_alignParentLeft="true" android:layout_below="@+id/subscribeBtn" android:layout_marginLeft="5dp" android:layout_marginRight="5dp" > <TextView android:id="@+id/textView3" android:layout_width="wrap_content" android:layout_height="wrap_content" android:text="@string/message_label" android:textAppearance="?android:attr/textAppearanceMedium" android:textSize="@dimen/edit_text_size" /> <EditText android:id="@+id/messageText" android:layout_width="0dp" android:layout_height="wrap_content" android:layout_marginLeft="5dp" android:layout_weight="1" android:ems="10" android:text="@string/message_default" android:textSize="@dimen/edit_text_size" > </EditText> </LinearLayout> <Button android:id="@+id/sendBtn" style="?android:attr/buttonStyleSmall" android:layout_width="wrap_content" android:layout_height="wrap_content" android:layout_alignParentRight="true" android:layout_below="@+id/linearLayout3" android:layout_marginRight="5dp" android:enabled="false" android:text="@string/send_label" android:textSize="@dimen/edit_text_size" /> <CheckBox android:id="@+id/sendBinaryCheckBox" android:layout_width="wrap_content" android:layout_height="wrap_content" android:layout_alignBottom="@+id/sendBtn" android:layout_alignParentLeft="true" android:layout_below="@id/linearLayout3" android:text="@string/sendBinary_label" android:textSize="@dimen/edit_text_size" /> <LinearLayout android:id="@+id/logContainer" android:layout_width="match_parent" android:layout_height="fill_parent" android:orientation="vertical" android:layout_below="@+id/sendBtn"> <TextView android:id="@+id/logView" android:layout_width="fill_parent" android:layout_height="0dp" android:layout_marginLeft="5dp" android:layout_marginRight="5dp" android:layout_weight="1" android:background="@android:drawable/editbox_background" android:scrollbars="horizontal|vertical" android:textColor="#000000" android:maxLines="80" android:textSize="@dimen/edit_text_size" /> <Button android:id="@+id/clearBtn" style="?android:attr/buttonStyleSmall" android:layout_width="wrap_content" android:layout_height="wrap_content" android:layout_gravity="right" android:layout_marginRight="5dp" android:text="@string/clear_label" android:textSize="@dimen/edit_text_size" /> </LinearLayout> </RelativeLayout> - Add a dispatch queue class to the Android client. A dispatch queue class is used to run tasks in a separate thread from the main thread (to run some tasks asynchronously). The dispatch queue class is used to add Runnable in a queue. Runnable will be run in a first-in first-out basis. All of the blocking calls of the Android client will be run in a background thread so that the TUI is not blocked and can remain responsive.
- Right-click the package com.kaazing.gateway.client.demo, click New, and click Class.
- In Name enter DispatchQueue and click Finish. The new DispatchQueue.java class is added to the src folder.
- Double-click DispatchQueue.java.
- Replace the contents with the following code:
package com.kaazing.gateway.jms.client.demo;

import android.os.Handler;
import android.os.HandlerThread;

/**
 * The class is used to add Runnable in a queue and the runnable added to the queue
 * will be run in a first in first out basis. This class is useful to run a series of tasks
 * sequentially in a separate thread from the main thread.
 *
 */
public class DispatchQueue extends HandlerThread {

	private Handler handler;

	public DispatchQueue(String name) {
		super(name);
	}

	/**
	 * The message blocks until the thread is started. This should be called
	 * after call to start() to ensure the thread is ready.
	 */
	public void waitUntilReady() {
		handler = new Handler(getLooper());
	}

	/**
	 * Adds the Runnable to the message queue which will be run on the thread.
	 * The runnable will be run in a first in first out basis.
	 */
	public void dispatchAsync(Runnable task) {
		handler.post(task);
	}

	public void removePendingJobs() {
		handler.removeCallbacksAndMessages(null);
	}

}
- Modify the main class for the Android client. In the src folder for the project, under com.kaazing.gateway.jms.client.demo, double-click JMSDemoActivity.java. You will add the main Java code for the Android client in this file.
- Delete all of the contents except the com.kaazing.gateway.jms.client.demo package declaration and the JMSDemoActivity class declaration:
package com.kaazing.gateway.jms.client.demo; // Import statements will go here public class JMSDemoActivity extends FragmentActivity { // the remaining code will go here } - Add the import statements for the common Java and Android classes. Add the statements directly after the package com.kaazing.gateway.jms.client.demo package declaration:
// General classes used for the program
import java.net.PasswordAuthentication;
import java.net.URI;
import java.util.ArrayDeque;
import java.util.Enumeration;
import java.util.HashMap;
import java.util.concurrent.Semaphore;
import java.util.logging.Level;
import java.util.logging.Logger;

// These classes are used for JMS connections and messages
import javax.jms.BytesMessage;
import javax.jms.Connection;
import javax.jms.Destination;
import javax.jms.ExceptionListener;
import javax.jms.JMSException;
import javax.jms.MapMessage;
import javax.jms.Message;
import javax.jms.MessageConsumer;
import javax.jms.MessageListener;
import javax.jms.MessageProducer;
import javax.jms.Session;
import javax.jms.TextMessage;

// These classes are used for the TUI
import android.os.Bundle;
import android.support.v4.app.FragmentActivity;
import android.text.method.ScrollingMovementMethod;
import android.util.Log;
import android.view.View;
import android.view.View.OnClickListener;
import android.widget.Button;
import android.widget.CheckBox;
import android.widget.EditText;
import android.widget.TextView;
- Add the import statements for the Kaazing Gateway Android JMS Client API classes.
// Include these statements with any client
import com.kaazing.net.ws.WebSocketFactory; // WebSocket
import com.kaazing.gateway.jms.client.JmsConnectionFactory; // JMS
import com.kaazing.gateway.jms.client.ConnectionDisconnectedException; // Exceptions
import com.kaazing.gateway.jms.client.util.Tracer; // Logging

// Include these statements when a client must authenticate with the Gateway
import com.kaazing.net.auth.BasicChallengeHandler;
import com.kaazing.net.auth.ChallengeHandler;
import com.kaazing.net.auth.LoginHandler;
- Under the
// the remaining code will go herecomment, add the variables for the program, and a method for hiding the keyboard since the app will be pre-loaded with a URL.public class JMSDemoActivity extends FragmentActivity { // Log API for send output to the log private static String TAG = "com.kaazing.gateway.jms.client.android.demo"; // Button variables private Button connectBtn; private Button disconnectBtn; private Button subscribeBtn; private Button unsubscribeBtn; private Button sendBtn; private Button clearBtn; private CheckBox sendBinaryCheckBox; // Text variables private EditText locationText; private EditText destinationText; private EditText messageText; private TextView logTextView; // Connection variables private JmsConnectionFactory connectionFactory; private Connection connection; private Session session; // Dispatch queue private DispatchQueue dispatchQueue; // Hash map holds active consumer instances created with destination string as a key private HashMap<String, ArrayDeque<MessageConsumer>> consumers = new HashMap<String, ArrayDeque<MessageConsumer>>(); // Hide keyboard private void hideKeyboard() { InputMethodManager imm = (InputMethodManager) getSystemService(Activity.INPUT_METHOD_SERVICE); imm.toggleSoftInput(InputMethodManager.HIDE_IMPLICIT_ONLY, 0); }The hash map uses an array deque for the MessageConsumer object. Array deques hold multiple elements prior to processing (deques) and have no capacity restrictions; they grow as necessary to support usage.
Add the onCreate() method with event listeners.
The onCreate() method is called when the activity is first created. This is a long method that includes event listeners for user actions in the TUI. The method also contains the JmsConnectionFactory() API call. The JmsConnectionFactory() is the JMS client implementation of ConnectionFactory. JmsConnectionFactory() is used to create a connection with a JMS provider via a WebSocket connection. JmsConnectionFactory() provides the ability to set the Gateway location dynamically.
@Override public void onCreate(Bundle savedInstanceState) { super.onCreate(savedInstanceState); Log.i(TAG, "onCreate"); setContentView(R.layout.main); // Create variables for the TUI elements connectBtn = (Button)findViewById(R.id.connectBtn); disconnectBtn = (Button)findViewById(R.id.disconnectBtn); subscribeBtn = (Button)findViewById(R.id.subscribeBtn); unsubscribeBtn = (Button)findViewById(R.id.unsubscribeBtn); sendBtn = (Button)findViewById(R.id.sendBtn); clearBtn = (Button)findViewById(R.id.clearBtn); sendBinaryCheckBox = (CheckBox)findViewById(R.id.sendBinaryCheckBox); locationText = (EditText)findViewById(R.id.locationText); destinationText = (EditText)findViewById(R.id.destinationText); messageText = (EditText)findViewById(R.id.messageText); logTextView = (TextView)findViewById(R.id.logView); logTextView.setMovementMethod(new ScrollingMovementMethod()); // Create the JMS connection factory and the underlying WebSocket factory // to create and establish WebSocket connection to send and receive // JMS data over a WebSocket connection. if (connectionFactory == null) { try { connectionFactory = JmsConnectionFactory.createConnectionFactory(); WebSocketFactory webSocketFactory = connectionFactory.getWebSocketFactory(); // setDefaultFollowRedirect() sets the default HttpRedirectPolicy that is // inherited by all the WebSockets created using this factory instance. webSocketFactory.setDefaultFollowRedirect(HttpRedirectPolicy.SAME_DOMAIN); } catch (JMSException e) { e.printStackTrace(); logMessage("EXCEPTION: " + e.getMessage()); } } // Run when Connect button is clicked connectBtn.setOnClickListener(new OnClickListener() { public void onClick(View v) { connectBtn.setEnabled(false); dispatchQueue = new DispatchQueue("DispatchQueue"); dispatchQueue.start(); dispatchQueue.waitUntilReady(); // Call the connect() method defined later in this code connect(); } }); // Run when Disconnect button is clicked disconnectBtn.setOnClickListener(new OnClickListener() { public void onClick(View v) { // Call the disconnect() method defined later in this code disconnect(); } }); // Run when Subscribe button is clicked subscribeBtn.setOnClickListener(new OnClickListener() { public void onClick(View v) { // Get the destination name entered by the user final String destinationName = destinationText.getText().toString(); logMessage("SUBSCRIBE - " + destinationName); dispatchQueue.dispatchAsync(new Runnable() { public void run() { try { Destination destination = getDestination(destinationName); if (destination == null) { return; } // Create a consumer using the destination MessageConsumer consumer = session.createConsumer(destination); // Create an array deque mapping consumers to the destination ArrayDeque<MessageConsumer> consumersToDestination = consumers.get(destinationName); // If there is no consumers to destination map, add this new map if (consumersToDestination == null) { consumersToDestination = new ArrayDeque<MessageConsumer>(); consumers.put(destinationName, consumersToDestination); } // If there is a map, update it with the new consumer consumersToDestination.add(consumer); // Set a message listener in the DestinationMessageListener() method consumer.setMessageListener(new DestinationMessageListener()); } catch (JMSException e) { e.printStackTrace(); logMessage("EXCEPTION: " + e.getMessage()); } } }); } }); // Run when Unsubscribe button is clicked unsubscribeBtn.setOnClickListener(new OnClickListener() { public void onClick(View v) { // Clear the queue created in subscribeBtn.setOnClickListener() String destinationName = destinationText.getText().toString(); logMessage("UNSUBSCRIBE - " + destinationName); ArrayDeque<MessageConsumer> consumersToDestination = consumers.get(destinationName); if (consumersToDestination == null) { return; } // Make MessageConsumer equal to the first element in the array deque final MessageConsumer consumer = consumersToDestination.poll(); if (consumer == null) { return; } dispatchQueue.dispatchAsync(new Runnable() { public void run() { try { // Close the consumer consumer.close(); } catch (JMSException e) { e.printStackTrace(); logMessage(e.getMessage()); } } }); } }); // Run when Send button is clicked sendBtn.setOnClickListener(new OnClickListener() { public void onClick(View v) { // Get the message text final boolean sendBinary = sendBinaryCheckBox.isChecked(); final String message = messageText.getText().toString(); logMessage("SEND: " + message); dispatchQueue.dispatchAsync(new Runnable() { public void run() { try { // Get the destination for the message String destinationName = destinationText.getText().toString(); // Create a MessageProducer to send messages to the destination MessageProducer producer = session.createProducer(getDestination(destinationName)); // Add the message Message message; // Determine if the message is binary or text if (sendBinary) { BytesMessage bytesMessage = session.createBytesMessage(); bytesMessage.writeUTF(text); message = bytesMessage; } else { message = session.createTextMessage(text); } // Send the message producer.send(message); // Close the producer producer.close(); } catch (JMSException e) { e.printStackTrace(); logMessage(e.getMessage()); } } }); } }); // Run when Clear button is clicked clearBtn.setOnClickListener(new OnClickListener() { public void onClick(View v) { // Clear the log logTextView.setText(""); } }); }- Add the connect() and disconnect() methods for connecting to the Gateway and updating the TUI.
private void connect() {
  logMessage("CONNECTING");

  // Since createConnection() is a blocking method that does not return until
  // the connection is established or fails, it is a good practice to
  // establish the connection on a separate thread and prevent the TUI from being blocked.
  dispatchQueue.dispatchAsync(new Runnable() {
    public void run() {
      try {
        // Get the location entered by the user
        String location = locationText.getText().toString();
        // Set the target Gateway location
        connectionFactory.setGatewayLocation(URI.create(location));
        // Create the connection to the Gateway
        connection = connectionFactory.createConnection();
        // Connect to the Gateway
        connection.start();

        // Create a Session object and set the client to
        // acknowledge any messages it receives automatically
        session = connection.createSession(false, Session.AUTO_ACKNOWLEDGE);
        logMessage("CONNECTED");
        // Set an exception listener for the client
        connection.setExceptionListener(new ConnectionExceptionListener());
        // Update the TUI
        updateButtonsForConnected();
      } catch (Exception e) {
        updateButtonsForDisconnected();
        e.printStackTrace();
        logMessage("EXCEPTION: " + e.getMessage());
      }
    }
  });
}

private void disconnect() {
  logMessage("DISCONNECTING");

  // Clear the queue of any pending messages
  dispatchQueue.removePendingJobs();
  dispatchQueue.quit();
  new Thread(new Runnable() {
    public void run() {
      try {
        // Close the connection
        connection.close();
        logMessage("DISCONNECTED");
      } catch (JMSException e) {
        e.printStackTrace();
        logMessage("EXCEPTION: " + e.getMessage());
      }
      finally {
        connection = null;
        // Update the TUI with the connection status
        updateButtonsForDisconnected();
      }
    }
  }).start();
}
For more information on sessions and exception listeners, see the Java Connection interface.
- Add the getDestination() method for creating topics and queues.
private Destination getDestination(String destinationName) throws JMSException {
  Destination destination;
  // Create the topic using the destination name entered by the user
  if (destinationName.startsWith("/topic/")) {
    destination = session.createTopic(destinationName);
  }
  // Create the queue using the destination name entered by the user
  else if (destinationName.startsWith("/queue/")) {
    destination = session.createQueue(destinationName);
  }
  else {
    logMessage("Invalid destination name: " + destinationName);
    return null;
  }
  return destination;
}
Notes:
- When setting up your message consumers and producers, you must use the format "/topic/" for regular topics.
- The Kaazing Gateway Java JMS Client API supports the Java Naming and Directory Interface (JNDI), but the Kaazing Gateway Android JMS Client API does not.
- Add the ConnectionExceptionListener class to handle when a JMS provider detects a serious problem with a connection object.
private class ConnectionExceptionListener implements ExceptionListener {

  public void onException(final JMSException exception) {
    logMessage(exception.getMessage());
    if (exception instanceof ConnectionDisconnectedException) {
      updateButtonsForDisconnected();
    }
  }
}
For more information, see the Java ExceptionListener interface.
- Add the DestinationMessageListener class and onMessage() method to manage messages. For more information, see the Java MessageListener interface.
private class DestinationMessageListener implements MessageListener {

  // Run when a message is received
  public void onMessage(Message message) {
    // This try block is used to handle both text and binary messages
    try {
      if (message instanceof TextMessage) {
        logMessage("RECEIVED TextMessage: " + ((TextMessage)message).getText());
      }
      else if (message instanceof BytesMessage) {
        BytesMessage bytesMessage = (BytesMessage)message;
        long len = bytesMessage.getBodyLength();
        byte b[] = new byte[(int)len];
        // Read a portion of the bytes message stream equal to its length
        bytesMessage.readBytes(b);
        // Send the bytes to the hexDump() method and display the string returned
        logMessage("RECEIVED BytesMessage: " + hexDump(b));
      }

      // This condition provides support for the Java MapMessage interface.
      // This client receives MapMessage messages, but it does not send them.
      // Review the Android JMS API for information on reading MapMessage messages.
      else if (message instanceof MapMessage) {
        MapMessage mapMessage = (MapMessage)message;
        Enumeration mapNames = mapMessage.getMapNames();
        while (mapNames.hasMoreElements()) {
          String key = (String)mapNames.nextElement();
          Object value = mapMessage.getObject(key);

          if (value == null) {
            logMessage(key + ": null");
          } else if (value instanceof byte[]) {
            byte[] arr = (byte[])value;
            StringBuilder s = new StringBuilder();
            s.append("[");
            for (int i = 0; i < arr.length; i++) {
              if (i > 0) {
                s.append(",");
              }
              s.append(arr[i]);
            }
            s.append("]");
            logMessage(key + ": "+ s.toString() + " (Byte[])");
          } else {
            logMessage(key + ": " + value.toString() +
              " (" + value.getClass().getSimpleName() + ")");
          }
        }
        logMessage("RECEIVED MapMessage: ");
      }
      else {
        logMessage("UNKNOWN MESSAGE TYPE: "+message.getClass().getSimpleName());
      }
    }
    catch (Exception ex) {
      ex.printStackTrace();
      logMessage("EXCEPTION: " + ex.getMessage());
    }
  }

  // Return a string representation of the bytes received
  private String hexDump(byte[] b) {
    if (b.length == 0) {
      return "empty";
    }
    StringBuilder out = new StringBuilder();
    for (int i=0; i < b.length; i++) {
      out.append(Integer.toHexString(b[i])).append(' ');
    }
    return out.toString();
  }
}
For more information on byte streams, see the Java BytesMessage interface. For more information on MapMessage, see the Java MapMessage interface.
- Add the methods for when the client is paused, resumes, and when the client is closed.
// Run when the client is paused public void onPause() { if (connection != null) { // Stop the connection in a separate thread dispatchQueue.dispatchAsync(new Runnable() { @Override public void run() { try { connection.stop(); } catch (JMSException e) { e.printStackTrace(); } } }); } super.onPause(); } // Restart the connection when the client resumes activity public void onResume() { if (connection != null) { dispatchQueue.dispatchAsync(new Runnable() { @Override public void run() { try { connection.start(); } catch (JMSException e) { e.printStackTrace(); } } }); } super.onResume(); } // Disconnect with the client is shutdown public void onDestroy() { if (connection != null) { disconnect(); } super.onDestroy(); } - Add the methods for updating the Connect and Disconnect buttons according to the state of the WebSocket connection.
// Run when the client is connected private void updateButtonsForConnected() { runOnUiThread(new Runnable() { public void run() { connectBtn.setEnabled(false); disconnectBtn.setEnabled(true); subscribeBtn.setEnabled(true); unsubscribeBtn.setEnabled(true); sendBtn.setEnabled(true); } }); } // Run when the client is disconnected private void updateButtonsForDisconnected() { runOnUiThread(new Runnable() { public void run() { connectBtn.setEnabled(true); disconnectBtn.setEnabled(false); subscribeBtn.setEnabled(false); sendBtn.setEnabled(false); unsubscribeBtn.setEnabled(false); } }); } - Add the logMessage() method for the Log area displayed in the client. This method keeps the log to a 100 line maximum.
private void logMessage(final String message) { runOnUiThread(new Runnable() { public void run() { // Clear log after 100 messages if (logTextView.getLineCount() > 100) { logTextView.setText(message); } else { logTextView.setText(message + "\n" + logTextView.getText()); } } }); } - If you are using a local Gateway to test your Android JMS client, update the jms service on the Gateway configuration file to accept on your local IP address. If you are using the publicly available Gateway and JMS broker at
wss://demos.kaazing.com/jms, you can skip this step.- Open the Gateway configuration file located at GATEWAY_HOME/conf/gateway-config.xml.
- Modify the jms service to accept connections containing your local IP address (replace local-ip-address with your IP address):
<service> <name>JMS Service</name> <description>JMS service to JMS server</description> <accept>ws://build-macmini3.kaazing.test:${gateway.extras.port}/jms</accept> <accept>ws://local-ip-address:${gateway.extras.port}/jms</accept> <type>jms</type> <properties> <connection.factory.name>ConnectionFactory</connection.factory.name> <context.lookup.topic.format>dynamicTopics/%s</context.lookup.topic.format> <context.lookup.queue.format>dynamicQueues/%s</context.lookup.queue.format> <env.java.naming.factory.initial> org.apache.activemq.jndi.ActiveMQInitialContextFactory </env.java.naming.factory.initial> <env.java.naming.provider.url> tcp://localhost:61616 </env.java.naming.provider.url> </properties> <realm-name>demo</realm-name> <cross-site-constraint> <allow-origin>http://build-macmini3.kaazing.test:${gateway.extras.port}</allow-origin> </cross-site-constraint> </service> - Save the file, then restart the Gateway by following the steps in Setting Up the Gateway and Clients.
- If you are using a local broker, then start the broker. For the Apache ActiveMQ broker provided by Kaazing, see Setting Up the Gateway and Clients.
- Run the Android client in the Android Emulator. Click the Run arrow, select or create a Deployment Target (with a minimum API 19: Android 4.4), and click OK. The Android emulator launches.
Note: The Android Emulator can be slow and resource intensive. Another option for running Android apps on your computer is Genymotion.
Figure: Android JMS Client in the Android Emulator - Test the Android client in the Android Emulator.
- In the Location field, enter either the URI used by the publicly available Gateway and JMS broker provided by Kaazing,
wss://demos.kaazing.com/jms, or enter the local address ws://local-ip-address:8001/jms using your local IP address. For example, ws://192.168.0.103:8001/jms. - Click Connect. The messages CONNECTING and then CONNECTED appear. The WebSocket connection to the Gateway and JMS broker was successful.
- Click Subscribe. The message SUBSCRIBE - /topic/destination appears. You have subscribed to the destination.
- Click Send. The following messages appear:
RECEIVED TextMessage: Hello, message
SEND: Hello, messageYou sent a message Hello, message to the destination and received the same message because you are subscribed to that destination.
- Click the Send Binary checkbox and click Send again. The following messages appear:
SEND BytesMessage: Hello, message
RECEIVED BytesMessage: 0,14,72,101,108,108,111,44,32,109,101,115,115,97,103,101 - Click Disconnect to end the session.
- In the Location field, enter either the URI used by the publicly available Gateway and JMS broker provided by Kaazing,