Use the Kaazing Gateway Objective-C WebSocket Client API
In this procedure, you will learn how to create an iOS client using the Kaazing Objective-C WebSocket Client API. You will learn how to create an Xcode project and add the necessary frameworks in order to use the Objective-C WebSocket Client API, and implement the Objective-C WebSocket Client API methods to enable your client to send and receive Echo messages with the Echo service running on a public Gateway.
For information about deploying your Objective-C (iOS) client on devices with the arm64 architecture, see Convert Your Objective-C (iOS) Client to a 64-Bit Runtime Environment.
In this procedure you will do the following:
- Set up your development environment using the Kaazing Enterprise Objective-C SDK and Xcode 4.4 or later.
- Review the components that will be used to create the Objective-C client.
- Create a new Xcode project.
- Add the Kaazing Objective-C framework.
- Add CFNetwork.framework to the project.
- Add the -ObjC value to the Other Linker Flags build setting.
- Build the interface for the client using MainStoryboard.storyboard.
- Add the actions for the buttons to the view controller header file KGViewController.h.
- Import the WebSocket header into the KGViewController.m implementation file.
- Create the WebSocket factory and WebSocket.
- Add event listeners to manage WebSocket connection events, incoming WebSocket messages, and any errors returned, and write event status to the log.
- Modify the Send Message method for both text and binary messages.
- Modify the Connect and Close methods for connecting and closing WebSocket connections.
- Add a method to update the UI in response to the connection events.
- Add methods for managing the WebSocket connection when the application is sent to the background or returns to the foreground.
- Add the remaining methods to control the interface of the client, such as when the client loads and unloads on the device.
- Build and run the client in the iPhone Simulator.
For information about the Kaazing Objective-C WebSocket Client API, see Objective-C WebSocket Client API.
Notes:- The code used in this procedure is taken from the Kaazing Objective-C WebSocket tutorial app that is available at https://github.com/kaazing/ios.client.tutorials. The demo is located in
ws/src. - This procedure assumes that you are familiar with Objective-C programming and are an advanced user of the Xcode IDE for creating native iOS clients. If you are new to Objective-C and Xcode, see Write Objective-C Code and the tutorial Your First iOS App. An excellent video tutorial is Objective-C by thenewboston.org. A very brief overview of Objective-C is Learn Objective-C from Learn Cocoa.
- This procedure assumes that you have the required iOS Developer Program credentials.
- The Xcode project created in this procedure uses features available in Xcode 4.1 or later and iOS SDK 5.0 and later.
Before You Begin
This procedure is part of Checklist: Build Objective-C (iOS) Clients Using Kaazing Gateway:
- Use the Kaazing Gateway Objective-C WebSocket Client API
- Secure Your Objective-C Client
- Display Logs for the Objective-C Client
- Troubleshoot Your Objective-C Client
Note: Learn about supported browsers, operating systems, and platform versions in the Release Notes.
To Use the Kaazing Gateway Objective-C WebSocket Client API
- Set up your development environment using the following:
- Download and install the Kaazing Enterprise Objective-C Client SDK, as described in Setting Up the Gateway and Clients.
- Download and install Apple Xcode 4.4 or later (requires Mac OS X 10.7.4 or later). The Xcode bundle includes the iOS SDK.
Review the components that will be used to create the Objective-C client. A quick review of these components will give you an overview of how the client is constructed.
Component Description KGWebSocket.framework Kaazing Objective-C WebSocket framework CFNetwork.framework Core Foundation framework that provides a library of abstractions for network protocols. For more information on CFNetwork, see Introduction to CFNetwork Programming Guide. MainStoryboard.storyboard The storyboard for the user interface look and feel and the interactive controls. KGViewController.h The header file that contains the target-action mechanism: how the user interface elements send an action message to an object that knows how to perform the corresponding action method (defined in KGViewController.m). In this file, user interface objects and outlet connections (connections between user interface objects and custom controller objects) are defined for the user interface controls. For more information, see Outlets. KGViewController.m The implementation file (sometimes called a source file) where the architecture of the client is defined, including how the client responds to different events. KGWebSocket class Provides the API for creating and managing a WebSocket connection, as well as sending and receiving data on the connection. KGWebSocketFactory class An instance of KGWebSocket is created using KGWebSocketFactory. This establishes a full-duplex connection to the target location. WebSocket Listeners These are the methods used to handle WebSocket events such as: connection open, message received, error received, connection closed. WebSocket Send Message method This method is used to send messages as text or binary. - Launch Xcode.
Create a new Xcode project.
- Click File, then New, and then Project.
- Under iOS, click Application, and click Single View Application. Click Next. The project options page appears.
- Enter the name WebSocketDemo in Product Name, and the class prefix KG in Class Prefix. Xcode uses the product name you entered to name your project and the client, and the class prefix to name the classes and files it generates for you.
- In Company Identifier, enter the name of your company.
- In Devices, make sure that iPhone is selected.
- Make sure that the Use Storyboards and Use Automatic Reference Counting options are selected and that the Include Unit Tests option is unselected.
- Click Next.
- Specify a location for your project (leave the Source Control option unselected) and then click Create. The new project is created along with the default files.
Add the Kaazing Objective-C WebSocket framework to the project.
Navigate to the location of the Kaazing Objective-C WebSocket framework in the Kaazing Enterprise Objective-C Client SDK:
KGWebSocket.framework- Drag the KGWebSocket.framework file into the Frameworks folder in the Xcode project navigator.
In the Choose options for adding these files dialog that appears, enable the Copy items into destination group’s folder checkbox, select your project in Add to targets, and click Finish.
Xcode adds the framework to the project navigator, updates the Framework Search Paths setting in Build Settings with the path to the framework, and updates the Link Binary With Libraries settings in Build Phases automatically.
Add CFNetwork.framework to the project. CFNetwork is a framework in the iOS Core Services framework that provides a library of abstractions for network protocols.
- In the project navigator, select the target to which you want to add a library or framework. In this example, WebSocketDemo.
- Click Build Phases at the top of the project editor.
- Open the Link Binary With Libraries section.
- Click the Add (+) button to add a library or framework.
- Enter CFNetwork.framework in the search field, select CFNetwork.framework in the results, and click Add. The CFNetwork.framework is now listed in the Frameworks folder in the project navigator.
Add the -ObjC value to the Other Linker Flags build setting because the Kaazing Gateway Objective-C API code you add links against an Objective-C static library that contains categories. You must add this value to prevent a runtime exception of "selector not recognized". For more information, see Building Objective-C static libraries with categories.
- In the project navigator, select the target to which you want to add a library or framework. In this example, WebSocketDemo.
- Click the Build Settings tab and scroll down to the Linking section.
- In Other Linker Flags, add the value -ObjC.
Build the interface for the client using MainStoryboard.storyboard and the View Controller.
- Click MainStoryboard.storyboard in the project navigator. A blank scene appears.
- Expand View Controller in the editor area and click View.
- Click the Utility view to display the Utility area.
- Show the Object Library, and choose Controls from the pop-up menu.
Drag the following controls into the scene, and give them the values listed in the following table. You might want to add a background color to the scene in order to display controls clearly.
Control Purpose Value Label URI text label URI: Text Field Field where users enter a WebSocket address ws://localhost:8001/echo(or public addresswss://demos.kaazing.com/echo)Button Connect button Connect Text Field Field where users enter a message Hello, WebSocket Label Message text label Message: Button Send button Send Button Close button Close Text View Area where the connection state is displayed, and where sent and received messages are displayed No value Button Clear button Clear Switch Switch between text and binary messages No value. Set State to On. Label Binary text label Binary
When you are finished, the scene should look like the following:
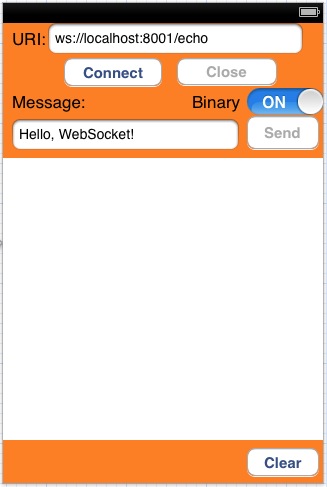
Figure: Completed View Controller Scene Add the actions for the buttons to the view controller header file. In our example, the file is named KGViewController.h.
Control-drag the UI controls into the KGViewController class in KGViewController.h to create actions and outlet connections (an outlet describes a connection between two objects). Configure the actions and outlet connections so that KGViewController.h appears as follows:
#import <UIKit/UIKit.h>

@interface KGViewController : UIViewController<UITextFieldDelegate>
// Connection: Action
// Type: id
// Event: Touch Up Inside
// Arguments: Sender
- (IBAction)connectButton:(id)sender;
- (IBAction)sendMessage:(id)sender;
- (IBAction)closeButton:(id)sender;
- (IBAction)clearLog:(id)sender;
// These methods will be defined later
- (void)applicationDidEnterBackground;
- (void)applicationWillEnterForeground;

// Connection: Outlet
@property (weak, nonatomic) IBOutlet UITextField *uriTextField;
@property (weak, nonatomic) IBOutlet UITextField *messageTextField;

@property (weak, nonatomic) IBOutlet UIButton *closeButton;
@property (weak, nonatomic) IBOutlet UIButton *connectButton;
@property (weak, nonatomic) IBOutlet UIButton *sendButton;
@property (weak, nonatomic) IBOutlet UITextView *textView;
@property (weak, nonatomic) IBOutlet UISwitch *binarySwitch;

@end
When you Control-drag the UI controls in the KGViewController, the popover control appears:
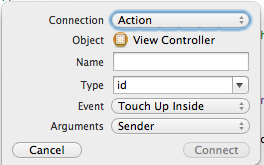
Figure: The Xcode popover control For action method declarations (IBAction), choose Action in the the Connection drop-down. For outlet connections (IBOutlet), choose Outlet in the Connection drop-down. This is a common Xcode procedure. If you are unfamiliar with this procedure, review the Configuring the View step in Your First iOS App.
Notes:- For all of the buttons, ensure that Touch Up Inside is selected in the Sent Events section of the Connections Inspector. Xcode will likely configure this automatically.
- While you can paste the above code into your header file, if you control-drag the UI elements into the code from the scene (press and hold the Control key while you drag the button to the implementation file in the assistant editor pane) and use the popover control to specify the outlet connections, you can ensure that you have all the settings correct.
- When you add the action methods, corresponding stub methods are added to the KGViewController.m implementation file automatically. You will update these methods in KGViewController.m with the Kaazing Gateway Objective-C API in later steps.
- Some iOS clients define the interface in the implementation file instead of the header file. The client in this procedure defines the interface in the header file and the implementation methods in the implementation file.
- Import the WebSocket header into the KGViewController.m implementation file:
#import "KGViewController.h"
#import <KGWebSocket/WebSocket.h>
The remaining code for this client is contained withIn the implementation for the KGViewController class:
@implementation KGViewController { . . . @end - Declare variables for the WebSocket and WebSocket Factory objects:
@implementation KGViewController { KGWebSocket *_websocket; // WebSocket class KGWebSocketFactory *_factory; // WebSocketFactory class BOOL _reconnect; // Boolean variable for reconnecting } - Generate the methods for the interface properties you defined in KGViewController.h:
@synthesize uriTextField;
@synthesize messageTextField;
@synthesize connectButton;
@synthesize closeButton;
@synthesize sendButton;
@synthesize textView;
@synthesize binarySwitch;
- Add the createAndEstablishWebSocketConnection method to create the WebSocket factory and WebSocket:
- (void) createAndEstablishWebSocketConnection { @try { NSString *location = self.uriTextField.text; [self log:[@"CONNECT: " stringByAppendingString:location]]; // Create KGWebSocketFactory _factory = [KGWebSocketFactory createFactory]; // Create KGWebSocket from the KGWebSocketFactory NSURL *url = [NSURL URLWithString:location]; _websocket = [_factory createWebSocket:url]; /* Add KGRevalidateExtension's name as an enabled extension to the KGWebSocket created earlier. The extension will be negotiated during handshake. */ NSString *extensionName = [[KGRevalidateExtension revalidateExtension] name]; [_websocket setEnabledExtensions:[NSArray arrayWithObjects:extensionName, nil]]; /* Set up WebSocket listeners using block based approach The application developer can use a delegate based approach as well. */ [self setupWebSocketListeners]; // Connect to the Gateway over WebSocket [_websocket connect]; } @catch (NSException *exception) { [self log:[exception reason]]; } } - Add the setupWebSocketListeners method to manage WebSocket connection events, incoming WebSocket messages, and any errors returned, and write event status to the log:
- (void) setupWebSocketListeners { KGViewController* ref = self; /* Attach a block to execute when WebSocket connection is established. This indicates that the connection is ready to send and receive data. */ _websocket.didOpen = ^(KGWebSocket* webSocket) { dispatch_async(dispatch_get_main_queue(), ^{ [ref log:@"CONNECTED"]; [ref updateUIcomponents:YES]; }); }; /* The block to execute when a message is received from the Gateway. The data is either UTF8-String (type: NSString) or binary (type: NSData) */ _websocket.didReceiveMessage = ^(KGWebSocket* webSocket, id data) { dispatch_async(dispatch_get_main_queue(), ^{ [ref log:[NSString stringWithFormat:@"MESSAGE: %@", data]]; }); }; // The block to execute when an error occurs. _websocket.didReceiveError = ^(KGWebSocket* webSocket, NSError *error) { dispatch_async(dispatch_get_main_queue(), ^{ [ref log:[NSString stringWithFormat:@"MESSAGE: %@", [error localizedFailureReason]]]; }); }; // The block to execute when the connection is closed _websocket.didClose = ^(KGWebSocket* websocket, NSInteger code, NSString* reason, BOOL wasClean) { dispatch_async(dispatch_get_main_queue(), ^{ [ref log:[@"CLOSED" stringByAppendingFormat:@"(%i)", code]]; [ref updateUIcomponents:NO]; }); }; } - Binary messages are received as NSData. For more information, see Introduction to Binary Data Programming Guide for Cocoa from Apple. Text messages are received as NSString.
- Modify the sendMessage: method for both text and binary messages. The sendMessage method was generated automatically when you added the action to the Send button, but the method needs to be modified to call the WebSocket object and use its send: method for transmitting data to the Gateway over the WebSocket connection:
- (IBAction)sendMessage:(id)sender {
    @try {
        if ([binarySwitch isOn]) {                     // Send binary messages
            NSData *data = [self.messageTextField.text
                            dataUsingEncoding:NSUTF8StringEncoding];
            [self log:[NSString stringWithFormat:@"SEND: %@", data]];

            // Use the send: method from the KGWebSocket class
            [_websocket send:data];
        }
        else {
            NSString *msg = self.messageTextField.text;    // Send text messages
            [self log:[@"SEND: " stringByAppendingString:msg]];

            [_websocket send:msg];
        }
    }
    @catch (NSException *exception) {
        [self log:[exception reason]];
    }
}
Binary messages are sent using NSData.
- Modify the connectButton: method. The connectButton: method was generated automatically when you added the action to the Connect button, but the method needs to be modified to call the method for creating the WebSocket connection and updating the UI:
- (IBAction)connectButton:(id)sender { // Call the method for creating the WebSocket connect [self createAndEstablishWebSocketConnection]; // Disable the URI field self.uriTextField.enabled = NO; // Change the URI field’s background color self.uriTextField.backgroundColor = [UIColor lightGrayColor]; } - Modify the closeButton: method to close the WebSocket connection and catch any exceptions:
- (IBAction)closeButton:(id)sender { [self log:@"CLOSE"]; @try { [_websocket close]; } @catch (NSException *exception) { [self log:[exception reason]]; } } - Add the log log: that is used by the other event methods:
- (void) log:(NSString *)msg { NSString *oldText = [textView text]; NSString *msgWithNewline = [msg stringByAppendingString:@"\n"]; NSString *newText = [oldText stringByAppendingString:msgWithNewline]; [textView setText:newText]; [textView flashScrollIndicators]; } - Modify the clearLog: method to clear the text area:
- (IBAction)clearLog:(id)sender { [textView setText:@""]; } - Add the updateUIcomponents: method to update the UI in response to the connection event:
- (void) updateUIcomponents:(BOOL)isConnected { self.uriTextField.enabled = !isConnected; self.uriTextField.backgroundColor = isConnected?[UIColor lightGrayColor]: [UIColor whiteColor]; self.messageTextField.enabled = isConnected; self.messageTextField.backgroundColor = isConnected? [UIColor whiteColor]: [UIColor lightGrayColor]; self.sendButton.enabled = isConnected; self.connectButton.enabled = !isConnected; self.closeButton.enabled = isConnected; } - Add the applicationDidEnterBackground and applicationWillEnterForeground methods for managing the WebSocket connection when the application is sent to the background or returns to the foreground:
- (void)applicationDidEnterBackground {
    // when application moves to background,
    // close the open websocket connection, set reconnect to true
    if (_websocket != nil && [_websocket readyState] == KGReadyState_OPEN) {
        [_websocket close];
        _reconnect = YES;
    }
    else {
        _reconnect = NO;
    }
}

- (void)applicationWillEnterForeground {
    //if reconnect equals to true, reconnect the websocket
    if (_websocket != nil && [_websocket readyState] == KGReadyState_OPEN) {
        [self updateUIcomponents:YES];
    }
    else {
        [self updateUIcomponents:NO];
        if (_reconnect) {
            //connection was open when application enter background, reconnect
            [self createAndEstablishWebSocketConnection];

        }
    }
}
The methods use the readyState property to determine the current state of the connection. readyState can have the values 0 (CONNECTING), 1 (OPEN), 2 (CLOSING), 3 (CLOSED). These are the ready state codes defined in the WebSocket API.
The remaining methods are used to control the interface of the client and are not WebSocket-related.
- Add the remaining methods to control the interface of the client.
- Add the textFieldShouldReturn: method to set the text field as first responder and keep this status to receive keyboard input:
- (BOOL)textFieldShouldReturn:(UITextField *)theTextField { if (theTextField == self.messageTextField || theTextField == self.uriTextField) { [theTextField resignFirstResponder]; } return YES; } - Modify the viewDidLoad method to set up the view:
- (void)viewDidLoad {
    [super viewDidLoad];
    // Do any additional setup after loading the view, typically from a nib.
}
Note: viewDidload is deprecated in iOS 6.0, as are some of the other methods in this demo. The demo is intended to work on iOS 5.1+ and iOS 6.0+, so these deprecated methods are used. If you are developing for iOS 6.0+ only, review Deprecated UIViewController Methods from Apple. - Add a viewDidUnload method for when the client unloads after the viewDidLoad method that is automatically added by Xcode.
- (void)viewDidUnload { [self setUriTextField:nil]; [self setMessageTextField:nil]; [self setSendButton:nil]; [self setConnectButton:nil]; [self setCloseButton:nil]; [self setTextView:nil]; [self setBinarySwitch:nil]; [super viewDidUnload]; // Release any retained subviews of the main view. } - Add a method for managing the UI orientation:
- (BOOL)shouldAutorotateToInterfaceOrientation:
        (UIInterfaceOrientation)interfaceOrientation
{
    return (interfaceOrientation != UIInterfaceOrientationPortraitUpsideDown);
}
- Add the textFieldShouldReturn: method to set the text field as first responder and keep this status to receive keyboard input:
- Ensure that the KGViewController implementation class ends with its @end statement.
- If you are testing your client with a local Gateway, start the Gateway as described in Setting Up the Gateway and Clients.
- Build and run the client in the iPhone Simulator.
- In the Scheme menu, select iPhone 5.1 Simulator or iPhone 6.1 Simulator.
- Click Run.
The iPhone Simulator displays the client.
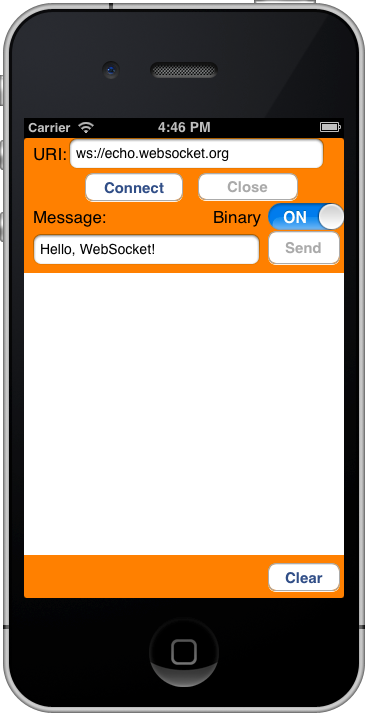
Figure: Your WebSocket Demo client on the iPhone Simulator - In URI, enter
ws://localhost:8001/echo(or public addresswss://demos.kaazing.com/echo). - Click Connect. The client connects to the Echo service hosted by the Gateway over WebSocket. The log displays: CONNECT: wss://demos.kaazing.com/echo CONNECTED
- Click Send. The text message is sent to the Gateway as binary. The log displays the sent binary message and the Echo service response from the Gateway: SEND: <48656c6c 6f2c2057 6562536f 636b6574 21> MESSAGE: <48656c6c 6f2c2057 6562536f 636b6574 21>
- Switch the Binary switch to OFF and click Send. The log displays the sent text message and the Echo service response from the Gateway: SEND: Hello, WebSocket! MESSAGE: Hello, WebSocket!
- Click Close to close the WebSocket connection and end the session.
Convert Your Objective-C (iOS) Client to a 64-Bit Runtime Environment
iPhone 5s, iPad Air and iPad mini (2nd generation) both run on a completely new processor architecture: arm64. arm64 is the standard, 64-Bit architecture in Xcode 5.0.1. You can use Xcode 5.0.1 to update your Objective-C (iOS) client to support arm64. For more information, see Converting Your App to a 64-Bit Binary.
To update your Objective-C (iOS) client to support arm64:
- Install Xcode 5.0.1 or later from the Mac App Store.
- Open your Objective-C (iOS) client project. Xcode prompts you to modernize your project. Modernizing the project adds new warnings and errors that are important when compiling your app for 64-bit.
- Update your project settings to support iOS 5.1.1 or later. You cannot build a 64-bit project if it targets an iOS version earlier than iOS 5.1. Change the Architectures build setting in your project to Standard Architectures (including 64-bit). Set the Deployment Target to 7.1. For more information, see Converting Your App to a 64-Bit Binary.