Houston Garbage Disposal Repair: Leak Detection and Fixes
Garbage disposals are the unsung workhorses of Houston kitchens. They grind through crawfish shells after a backyard boil, citrus peels from Sunday prep, and the occasional rice that slipped from the colander. When they start leaking, the mess shows up fast. Drips soak the cabinet floor, water wicks into particleboard, and a damp, musty smell settles in by the end of the day. Fixing a leaky disposal is usually straightforward if you know where to look and what type of leak you have. When it is not, good judgment can keep you from throwing good money after bad.
I have repaired and replaced hundreds of units across older bungalows in the Heights, slab-on-grade homes in Alief, and new builds west of the Beltway. The patterns repeat, but the details matter. This guide walks through practical leak detection and fixes, what to expect from a tech visit, and how to make the call between repair and replacement. It also outlines how Houston’s water chemistry and installation quirks influence failure points, so you can approach garbage disposal repair with realistic expectations.
How to tell the difference between a leak and condensation
The first thing I ask a homeowner is when the cabinet gets wet. A steady drip that continues hours after use points to a fixture-level leak. Moisture that shows up only during heavy grinding and hot water use, then dries within an hour, can be condensation or splashback. Houston’s summer humidity pushes indoor relative humidity into the 60 to 70 percent range even with air conditioning. A cold metal disposal housing under a sink full of chilled rinse water can bead condensation, which then drips and mimics a leak.
Set a dry paper towel under the disposal and run only cold water without turning on the unit. If the towel stays dry, fill the sink halfway, then pull the stopper to let water surge through the drain without the motor running. Finally, try a normal grind cycle with hot water. Observing when moisture appears helps isolate the source and prevents chasing ghost problems.
The three leak zones and what they mean
A garbage disposal has only a handful of ways to leak. Once you know where the water comes from, the fix becomes straightforward.
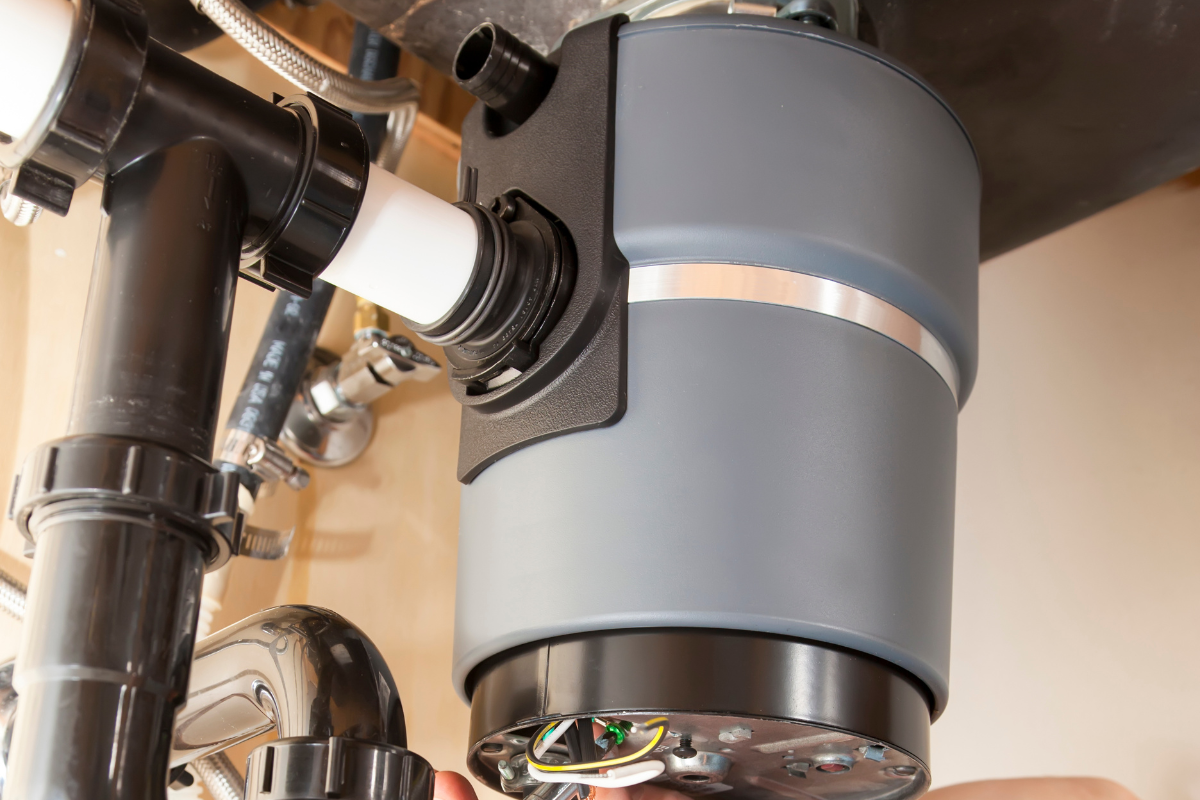
At the top, leaks show at the sink flange. That is the ring set into the sink drain where the disposal mounts. If you see water pooling at the rim of the drain or seeping from the top of the gasket, the putty seal or flange gasket failed. In Houston, I often find no putty at all, just a plastic gasket on stainless sinks. That can work, but slight sink warping or over-tightening can leave a hairline gap that shows up only under a sinkful of standing water.
At the side, leaks come from dishwasher inlet or discharge connections. If your dishwasher ties into the disposal, there is a small rubber hose attached to a nipple on the side of the unit. Cracks in that hose, loose clamps, or a forgotten knockout plug in a new installation create leaks or backups. The larger discharge elbow that carries ground wastewater to the P-trap can also seep if the gasket is pinched or the elbow is misaligned.
At the bottom, leaks exit the housing. This is the leak most people dread. If water drips from the belly or through the reset button area, the internal seal at the motor shaft has failed or the grinding chamber has corroded. You can tighten clamps all day and it will still drip. Bottom leaks usually justify replacement unless the unit is nearly new and under warranty.
Diagnosing with touch, light, and a mirror
I keep a small LED headlamp and a compact inspection mirror in my service bag for a reason. Under a sink, you are working in tight quarters with dark corners. Wipe every visible seam dry, run the test sequences, then trace with a fingertip. Water will track along the underside and drip from the lowest point, which can mislead you. Feel for the source at the highest wet line. A mirror helps you see around the back of the flange or the far side of the discharge elbow without disassembling everything first.
If the leak only appears with a full sink of standing water, suspect the flange. If it appears when you run the dishwasher, suspect the dishwasher inlet hose or a clogged disposal causing backflow. If it appears only under motor load, the vibration may be shaking a loose slip nut on the discharge elbow or flexing a brittle hose.
Fixing a leaky sink flange
The flange seal is a putty job, not a torque job. Over-tightening the mounting ring can bow the flange and squeeze out too much putty, leaving gaps. I prefer an old-school plumber’s putty for stainless sinks and a silicone sealant ring for composite or natural stone if the manufacturer calls for it. Houston homes vary widely in sink material, and some undermount granite installs leak because the flange was set with hardening epoxy that cracked over time.
Here is the short method I use:
- Back off the three mounting screws, rotate the locking ring, and support the disposal from below while you drop it off the flange. Remove the snap ring, then pull the old flange.
- Clean the sink opening down to bare metal or stone. Any old putty, sealant, or debris will cause a new leak.
- Roll a rope of plumber’s putty about the thickness of your pinky and seat it under the new or cleaned flange. Press evenly into the drain opening, then install the upper trim ring.
- Reassemble the mounting hardware and hand-snug the screws evenly in a star pattern. Excess putty will squeeze out. Trim it clean.
- Rehang the disposal, reconnect electrical and drain, then fill the sink and check for seepage.
This repair usually runs fast when the mounting hardware cooperates. Corroded rings on older units may need replacement parts. If your flange or mounting ring is badly pitted, replace the kit instead of trying to polish a lost cause.
Securing dishwasher and discharge connections
Side leaks are forgiving. They rarely require a new unit. For the dishwasher inlet, replace brittle rubber hose and use proper worm-drive clamps. If a new disposal was installed and the dishwasher line was connected without removing the internal knockout plug, you will have a dishwasher that cannot drain and leaks around the clamp. Pop the plug with a screwdriver and retrieve the disc from inside the grinding chamber before it finds the impeller.
On the discharge elbow, a mis-seated fiber or rubber gasket is the usual culprit. Remove the elbow, inspect the gasket, and reinstall with the elbow aligned straight to the trap arm. I see many elbows clocked slightly upward or outward to meet a fixed trap, which strains the joint. Better to loosen the trap slip nut and realign the trap to the disposal than force the elbow. Hand-tight plus a quarter turn on slip nuts is enough. Cranking down with pliers can warp the plastic and create a new drip.
Bottom leaks and when to replace
If the leak is from the bottom of the housing, you are dealing with a failed internal seal or a crack in the grinding chamber. It happens more often on units over seven years old, which is a common lifespan for builder-grade disposals around Houston. Hard water minerals and fine sand that ride in on produce or rinse water will wear a groove in the seal over time. Once that seal goes, water follows the motor shaft and drips from the belly. There is no reliable field rebuild for these in residential units.
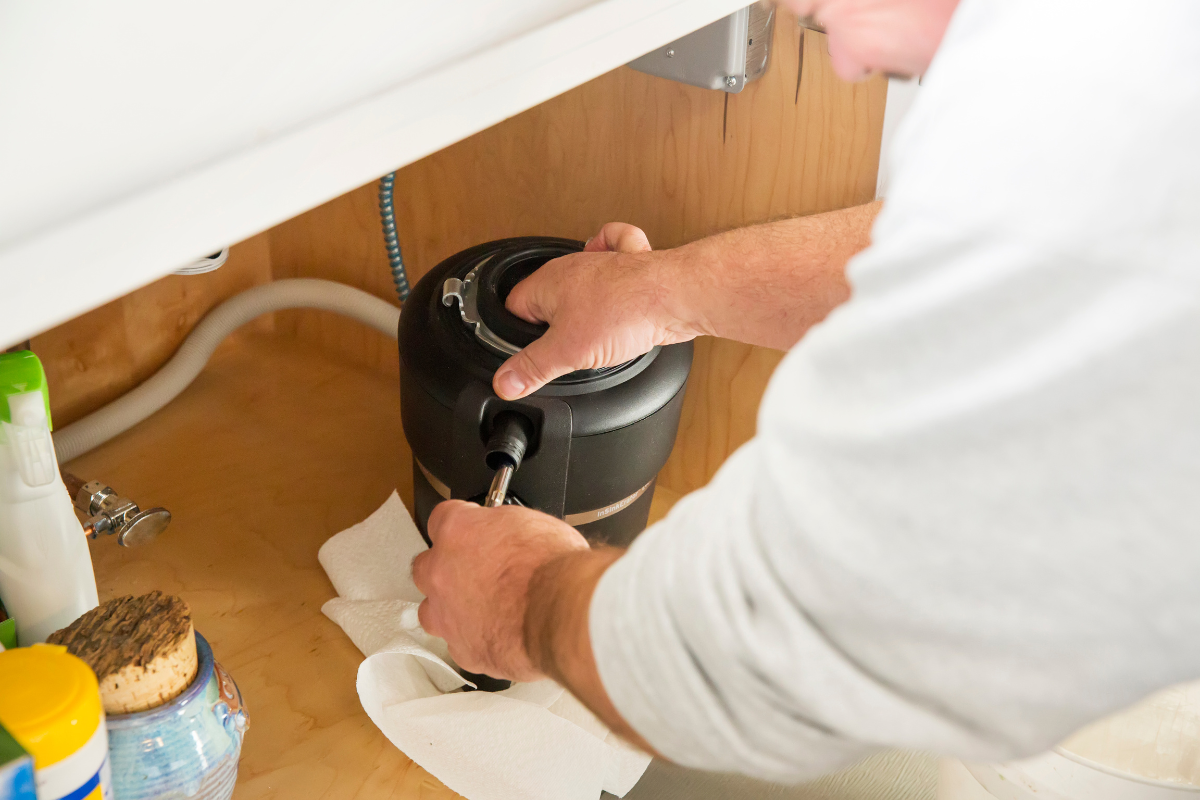
At that point, replacement is the sensible move. If you have a high-end unit under a current parts warranty, you can weigh the time and potential shipping delays against the cost of a new midrange unit. Most homeowners prefer a same-day swap. A professional can usually perform a like-for-like replacement in about an hour if the electrical outlet and drain alignment are standard.
Choosing a replacement that suits Houston kitchens
When you move from repair to replacement, think about the work you ask the unit to do. A 1/3 horsepower unit will technically run, but it bogs under fibrous waste like celery and tends to jam on heavier loads. In Houston kitchens where barbecues and seafood boils are common, 1/2 to 3/4 horsepower units strike a better balance. The jump from 1/2 to 3/4 horsepower often buys you better sound insulation and stainless grinding components that hold up to occasional shells. If you host often or have a big family, a 1 horsepower unit handles abuse, but it also takes more cabinet space and costs more.
Look for stainless steel grind chambers rather than galvanized when possible. Galvanized interiors corrode faster in the presence of salt and acid from citrus. Stainless costs more, but the service life often stretches several years longer. Sound packages vary wildly between brands. A thicker, insulated housing helps in open-concept homes where a roaring disposal competes with conversation and TV.
For Garbage disposal installation Houston homeowners usually face two site conditions: a dedicated outlet under the sink controlled by a wall switch, or a hardwired connection in older homes. Swapping a corded unit for a hardwired one or vice versa affects cost and code requirements. If there is no grounded receptacle, plan for an electrician to add one. Running a unit on an ungrounded circuit invites nuisance trips and safety issues.
Repair costs, replacement economics, and what “affordable” really means
Affordable garbage disposal repair is not the same as the lowest upfront number. A $140 flange reseal that holds for years is a bargain. A $90 patch on a bottom-leaking unit that fails again in two weeks is not. For most common repairs in Houston, expect ballpark labor costs in the 120 to 220 range plus parts that run 5 to 40 for gaskets, hoses, and mounting hardware. Emergency or after-hours service runs higher, especially during holiday weeks when disposals get hammered.
Replacement costs hinge on unit choice and the condition of your plumbing. A basic 1/2 horsepower unit installed might fall in the 275 to 450 range. Step up to a quieter 3/4 horsepower with stainless internals and you are in the 400 to 650 range. Complications such as reworking the trap, adding an outlet, or dealing with a corroded basket strainer can add 75 to 250. Get a complete written estimate before work begins.
When homeowners search for Garbage disposal repair or Kitchen disposal repair Houston, the top results tend to push rock-bottom promos. Read the fine print. Some quotes cover only labor if you provide the unit, others include a generic disposal that may not suit your usage. You will also see language like “free service call with repair,” which usually means the diagnostic fee is waived if you approve the work. That is normal. Just ask what the final number will be if the technician finds a bottom leak and recommends replacement instead of repair.
Preventing the next leak
Disposals do not ask for much, but they do benefit from a few habits. Rinse with a full flow of cold water before, during, and after use. Cold water keeps fats solid so they grind and wash away instead of melting and coating the chamber. Avoid dumping bacon grease or used fry oil down the drain entirely. If you need to process fibrous scraps like corn husks, chop them into shorter lengths before feeding them gradually. Citrus peels are fine in moderation, but do not expect them to “clean” the unit. The pleasant smell leaves behind pulp that can stick under the splash guard.
If you have a dishwasher connected to the disposal, run the disposal briefly before starting the dishwasher. A partially clogged disposal can push dirty water into the dishwasher during drain cycles, which shows up as a leak at the hose connection and sometimes as residue on dishes. Periodically check under the sink for dampness, especially after hosting. Catching a minor seep early saves the cabinet floor.
Houston’s water can be moderately hard depending on neighborhood and supply source. Over time, mineral scale builds around the splash guard and under the flange. A monthly flush with hot water and a small amount of dish soap keeps the guard flexible and the opening cleaner. If the splash guard becomes stiff or cracked, replace it. A warped guard can trap water and channel it outside the rim, mimicking a flange leak.
Special considerations in older Houston homes
Pre-war bungalows and mid-century homes often have shallower sink basins and tighter cabinet clearances. The wrong disposal can sit too low, leaving little fall to the trap and inviting clogs. Measure from the /2 HP disposal upgrade center of the sink drain to the top of the trap arm, then compare to the discharge height on unit spec sheets. If the discharge is at or below the trap arm, plan to adjust the trap or choose a shorter unit.
Galvanized drain stacks still exist in some older kitchens. They corrode inside, shedding flakes that clog the trap and disposal elbow. If you are dealing with recurring discharge leaks or backups and see dull gray metal on the drain stub, consider replacing the horizontal section with PVC and a proper trap adapter. It is a modest add-on that reduces headaches.
Safety basics that keep you out of trouble
Always kill power to the disposal before you put hands or tools near the grinding chamber. A wall switch is not enough if you have curious kids or a faulty switch. Unplug the cord from the outlet under the sink. If the unit is hardwired, shut off the circuit at the breaker panel. For jam clearing, use the hex wrench in the bottom of the unit to free the impeller. Avoid wooden spoons and improvised pry bars that can snap and lodge inside.
If you see signs of electrical trouble, like the unit tripping the breaker under light load or humming without spinning even after clearing jams, stop and diagnose electrical supply and capacitor condition. Running a struggling motor accelerates seal failure and can turn a minor issue into a replacement job.
What to expect from a professional service visit
A good technician starts with diagnostics, not assumptions. They will confirm the leak source, test the unit under load, and inspect connectors. If you are after affordable garbage disposal repair, ask the tech to price both the immediate fix and any recommended preventive measures, then choose what fits your budget and tolerance for risk. For example, they may offer a flange reseal plus a new splash guard now, and note that the discharge elbow shows hairline cracks that can wait unless you want it done while the unit is off.
If you need same-day Garbage disposal installation Houston residents can usually get it with a stocked work van. Standard units, gaskets, clamps, and cords tend to be on hand. Specialty models or rare power cord configurations may require a parts run. During busy holiday weeks, calling early helps, since afternoon slots fill fast.
Houston-specific patterns that create repeat leaks
Over-insulated sink cabinets in new construction trap moisture. Builders often line the cabinet with sound-deadening mats around farm sinks. That is great for noise but bad for drying. A tiny seep can keep the cabinet damp. I recommend a small louvered panel or leaving the doors cracked after heavy sink use, especially if you run a dehumidifier or the AC fan on auto mode that cycles off frequently.
Undermount sinks installed with silicone-only can shift slightly over time, breaking the bond at the drain flange. If your flange reseal does not hold, check the sink mounting rails and clips. You may need to reset the sink first. Stone countertops in Houston humidity also expand and contract slightly. Flexible sealant at the flange base, as specified by the sink manufacturer, handles that movement better than brittle epoxy.
Storm-related power blips can leave motors stalled mid-cycle. After a lightning-heavy night, I get calls about humming units that trip after a few seconds. Clearing the jam with the hex wrench and power cycling often restores function, but if that happens repeatedly, the motor windings or capacitor are weakening. Weak motors run hotter and push water past the bottom seal sooner.
When a repair is not worth it
There are repair scenarios where the dollars do not make sense:
- Bottom leak on a unit older than six years with galvanized internals, especially if it has jammed frequently.
- Cracked housing from impact, often caused by storing heavy bottles or a water filter under the sink that slammed into the unit.
- Repeated side-leak failures on brittle, mismatched hoses that point to a misaligned trap and a disposal that sits too low for the plumbing geometry.
In these cases, replacement saves future service calls. It also opens the chance to reconfigure the trap and hoses so you are not fighting the same misalignment every six months.
A quick word on compatibility with under-sink systems
If you have a reverse osmosis unit, a large under-sink filter, or a pull-out trash bin, space becomes a constraint. Check disposal body diameter and height against your layout. Choose a compact-body 3/4 horsepower if you need power in a tight space. Make sure the air gap or RO drain saddle is positioned so the disposal discharge does not backflow into the RO tube. A poorly placed saddle can spur intermittent leaks that look like they come from the disposal elbow.
Deodorizing without creating leaks
People love the lemon trick. The scent is pleasant, but citrus alone does not clean accumulated film. I prefer a practical approach. Once a month, with the unit off, pull the splash guard and scrub it in the sink with dish soap. Wipe the underside of the sink rim, then reinsert the guard firmly. With the guard back in place, run warm water, add a teaspoon of dish soap, and grind a handful of ice. The ice scours the chamber gently. Avoid heavy baking soda and vinegar volcanoes. The foam does not scrub, and excessive fizzing can push slurry past a tired bottom seal.
What an honest quote for Kitchen disposal repair Houston should include
Ask for a breakdown of:
- Diagnostic fee, and whether it is credited toward repair.
- Labor estimate, with time window and whether it changes if additional parts are needed.
- Parts pricing for gaskets, hoses, flanges, and, if applicable, the disposal model and warranty term.
Clear line items help you compare bids fairly. If a quote seems extremely low, confirm it includes reconnecting the dishwasher, aligning the trap, and disposing of the old unit. Those “extras” can appear later on the invoice if not specified.
A brief checklist to prevent leaks after a new installation
- Verify the dishwasher knockout plug is removed and the disc retrieved from the chamber.
- Check that the discharge elbow aligns naturally to the trap without upward stress.
- Fill the sink completely and hold water for three minutes before draining to test the flange seal.
- With the cabinet lights off, run a bright flashlight around all seams to spot micro-seepage.
- Revisit the cabinet floor after an hour for any delayed drips.
Final thoughts from the field
Most leaks are solved without drama: a properly set flange, a fresh gasket, a new hose, or an alignment fix. The tricky ones tend to trace back to poor original installation or units working beyond their design, such as small disposals grinding large, fibrous loads daily. In Houston, where humidity and high-use kitchens are the norm, a little preventive attention pays off. When you do need help, look for technicians who prioritize diagnosis over upsells and who will explain the why behind the repair. That approach keeps your sink dry, your cabinet intact, and your budget focused on fixes that last.
DYZ Plumbing, LLC
Address: 1220 Blalock Rd, Houston, TX 77055
Phone: (832) 877-9600