**Administration Manual for CLC Genomics Cloud Engine v22.0.1**

Administration Manual for CLC Genomics Cloud Engine
Wed Mar 23 2022
QIAGEN Aarhus A/S
Silkeborgvej 2
Prismet
DK-8000 Aarhus C
Denmark
# Introduction
## General overview
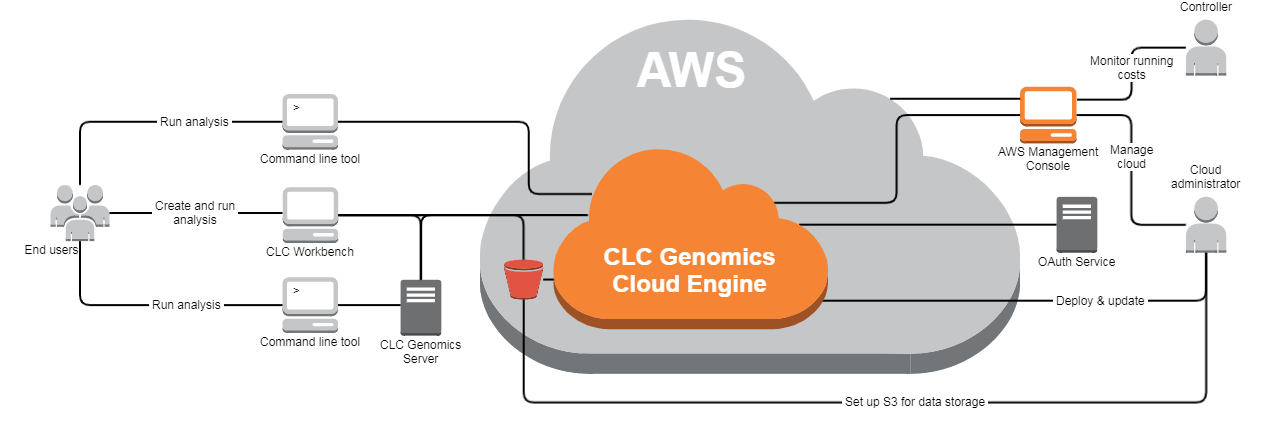
The QIAGEN CLC Genomics Cloud Engine (GCE) uses a range of Amazon AWS services in combination with QIAGEN CLC bioinformatics software to provide a secure, reliable, cloud-based bioinformatics analysis platform. Execution takes place on Amazon EC2 instances, scaling to meet analysis demand, with data storage on AWS S3.
Analyses are defined in CLC workflows, which are submitted to GCE from
[client software](#gceclientsoftware). Results can be downloaded from S3 immediately, or downloaded selectively at a later time.
The progress and status of jobs sent to GCE can be followed in several ways:
- Referring to a web page where summary information is provided
- Requesting information from the Job Manager service via client software
- Subscribing to status events pushed by the Amazon SNS service
The GCE service is:
* Secure: Encrypted data at rest and encrypted data in transit from client to end-point
* Fault-tolerant: Redundancy and loose coupling provides for a fault-tolerant system
* Cost effective: No ‘idle’ execution nodes, and AWS S3 used for data storage
* Straight forward deployment and monitoring: Deployment scripts are supplied, and GCE can be managed and monitored using standard AWS administration tools.
QIAGEN does not own, administer or have access to your GCE setup. The AWS account, and facilities associated with it, are set up, owned, and administered by you, with access, limits, and other aspects of the system fully controllable by you, the GCE administrator.
Please refer to the list of [prerequisites in chapter 2](#gceprerequisites) before installing GCE.
## Client software
The following software can be used to submit workflows for execution on GCE:
- CLC Genomics Workbench with the Cloud Plugin installed
- CLC Main Workbench with the Cloud Plugin installed
- CLC Genomics Server with the Cloud Server Plugin installed
- CLC Genomics Cloud Engine Command Line Tools (GCE CLT)
- Custom software, making use of the GCE REST API. For more on this topic, see the Integration manual, linked on the [release webpage](../../install-page/index.html).
CLC Genomics Workbench, CLC Main Workbench and CLC Genomics Server are individually licensed QIAGEN products. At least one CLC Workbench is needed to create and configure workflows. To include tools for high throughput sequencing analysis, a CLC Genomics Workbench will be needed.
Information about creating CLC workflows can be found in the [CLC Genomics Workbench manual](https://resources.qiagenbioinformatics.com/manuals/clcgenomicsworkbench/current/index.php?manual=Workflows.html) and information about running workflows on GCE can be found in the [Cloud Plugin manual](https://resources.qiagenbioinformatics.com/manuals/cloudplugin/current/index.php?manual=Running_workflows_on_CLC_Genomics_Cloud_Engine.html).
To include third party tools in CLC workflows, a CLC Genomics Server is needed. Configuring such tools as external applications for inclusion in workflows is described in the [CLC Server administration manual](https://resources.qiagenbioinformatics.com/manuals/clcserver/current/admin/index.php?manual=External_applications.html) and the [Cloud Plugin manual](https://resources.qiagenbioinformatics.com/manuals/cloudplugin/current/index.php?manual=External_applications_in_cloud.html).
## Supported AWS Regions
The following regions are supported by default. To request support for other regions, please email [QIAGEN Digital Insights Support](mailto:ts-bioinformatics@qiagen.com).
| Name | Code |
|---------------|----------------|
| N. Virginia | us-east-1 |
| Ohio | us-east-2 |
| N. California | us-west-1 |
| Oregon | us-west-2 |
| Frankfurt | eu-central-1 |
| Stockholm | eu-north-1 |
| Ireland | eu-west-1 |
| Tokyo | ap-northeast-1 |
| Seoul | ap-northeast-2 |
| Sydney | ap-southeast-2 |
| Mumbai | ap-south-1 |
| GovCloud (US-East) | us-gov-east-1 |
| GovCloud (US-West) | us-gov-west-1 |
## Architecture and security overview
The QIAGEN CLC Genomics Cloud Engine solution uses a range of Amazon AWS services, with the most important dependencies shown in the figure below. Other AWS services are also used for monitoring, configuring, deploying and scaling.
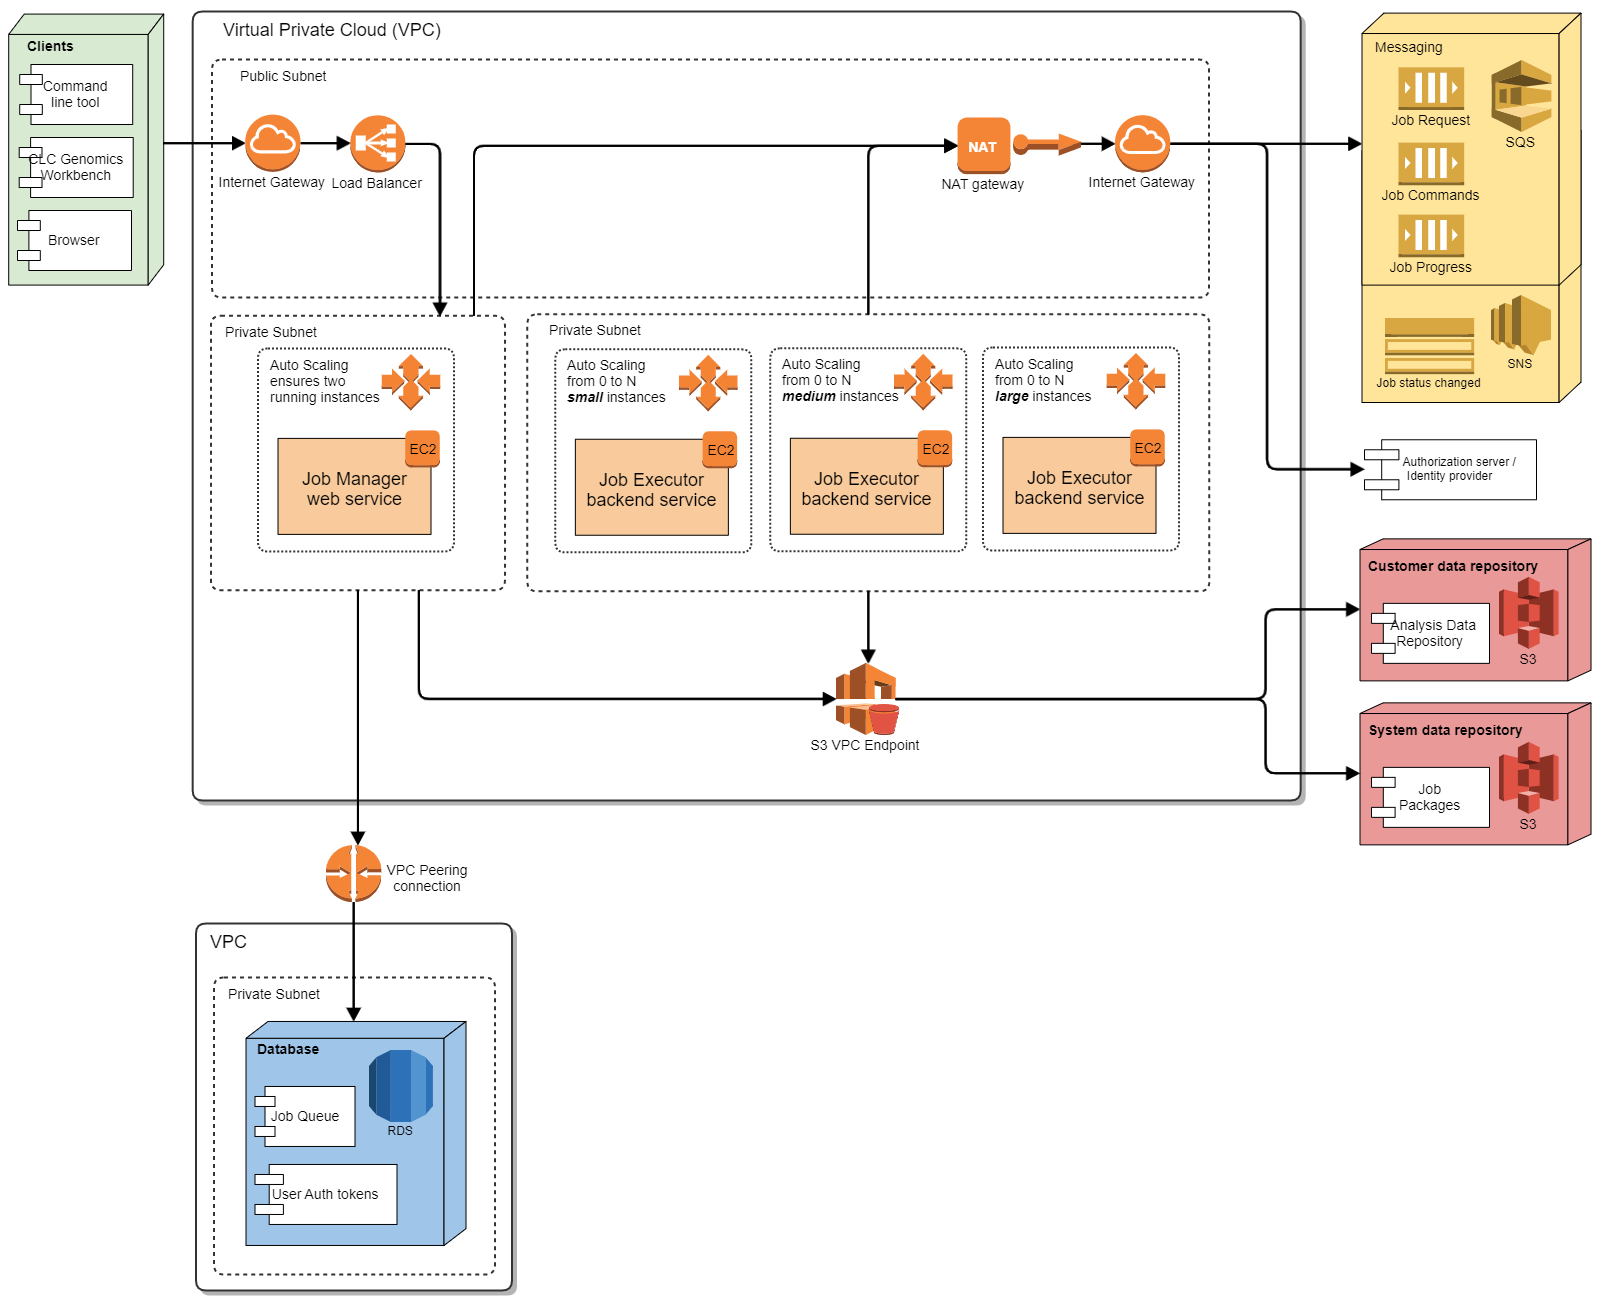
The GCE solution architecture provides a high level of security, keeping data safe and unexposed to the internet.
Most communication with Amazon services flows through a NAT gateway, with communication with S3 flowing through a VPC endpoint.
Interaction between client software and the GCE system uses authentication based on OAuth2 using AWS Cognito.
There are two virtual private networks (see image above): a VPC for most of the GCE system and a VPC for the RDS database. This division supports more flexible upgrades, as it allows a new GCE stack to be created that will run with an existing database.
The main VPC contains 2 private subnets and a public subnet. In one private subnet is the Job Manager, which has the services that serve client software (e.g. CLC Workbenches, GCE CLT, etc.). It is deployed on two server instances, with a load balancer distributing requests between them. The load balancer is placed in the public subnet and is attached to an Internet Gateway. All HTTPS traffic is forwarded to Job Manager servers by the load balancer, which in practice makes them available from the internet. However, more restrictive IP filtering can be applied.
The second private subnet contains the Job Executors, as illustrated above. This subnet also includes the License Manager (not included in the diagram). Job Executors are deployed in a number of of autoscaling groups, where each autoscaling group launches different EC2 instance types, and is used to scale up that instance type as needed, according to the current job queue. Job Executors can access the internet through a NAT gateway, but they cannot be addressed from outside the subnet. The only means of communicating with them is through SQS messaging (an AWS service), which requires AWS authentication via IAM.
## Overview of GCE core components
The QIAGEN CLC Genomics Cloud Engine solution consists of three core components deployed on three server clusters placed in private subnets, the Job Manager, the Job Executor and the License Manager.
### Job Manager
The Job Manager service receives and handles job submissions and cancellations sent from client software. This service distributes jobs to the Job Executors. At least one instance of the Job Manager must be running for the GCE solution to be available to accept jobs.
Metrics published by the Job Manager are used to facilitate autoscaling.
The Job Manager is not a demanding service. It can be run on inexpensive instances with modest hardware specifications.
### Job Executor
Each Job Executor is responsible for picking up jobs that the Job Manager has sent a message about. When it has retrieved a job, it downloads the specified data files, starts the execution of the workflow, and then uploads analysis results when the job is finished. During job execution, it sends messages about progress and state information, which the Job Manager service picks up.
The Job Executor uses a CLC Genomics Server in “Single server” mode to execute workflows.
The hardware requirements for the Job Executor service are based on the requirements of the analyses being carried out by the workflow (eg. disk space, memory and number of CPU cores).
### License Manager
The License Manager service provides the licenses needed by the Job Executors. If the License Manager cannot provide a valid license, the CLC Server will not run. This component is also responsible for monitoring license usage and expiration.
# Installation
At a high level, installing the QIAGEN CLC Genomics Cloud Engine involves the following steps:
1. Get the [prerequisites](#gceprerequisites)
2. [Start an administration host on Amazon EC2, and configure and use the scripts provided there to install the GCE service](#gceinstallationdetails)
3. Test the installation by [installing the Cloud Plugin on a CLC Workbench](https://resources.qiagenbioinformatics.com/manuals/cloudplugin/current/index.php?manual=Installing_uninstalling_Workbench_plugins.html)
, [configuring access to GCE](https://resources.qiagenbioinformatics.com/manuals/cloudplugin/current/index.php?manual=Configuring_cloud_connection.html),
and [submiting a workflow](https://resources.qiagenbioinformatics.com/manuals/cloudplugin/current/index.php?manual=Running_workflows_on_CLC_Genomics_Cloud_Engine.html).
The remainder of this chapter provides details about items 1 and 2, so that you are ready to start using your GCE setup.
To upgrade an existing installation, see [chapter 3](#upgradegce).
To uninstall GCE, see [appendix 3](#gceuninstall-appendix).
## Prerequisites for the CLC Genomics Cloud Engine
You will need the following prior to installing GCE:
1. [An AWS account](#customerawsaccount)
2. [An EC2 key pair](#awskeypair)
3. [An AWS S3 bucket for the installation](#awss3installationbucket)
4. [AWS IAM users for those accessing S3 from client software](#awsiamusers)
5. [CLC licenses for GCE](#clclicenses)
6. [A CLC Workbench for creating workflows](#clcworkbenchforworkflows)
7. [An SSH client on your local machine](#sshclientlocal)
8. Recommended: [A trusted server certificate](#trustededcert)
### AWS account for GCE
A customer-owned AWS account is necessary before GCE can be installed.
A dedicated account for this purpose is recommended. This makes it simple to identify resources related to GCE and can help with keeping track of costs related to running GCE.
If an existing account is used, please verify that there is a default subnet defined for each availability zone of the AWS region that will be installed to.
### AWS key pair for SSH access to the GCE admnistration host
An AWS key pair is required for authentication. This is used when logging into the GCE administration host using SSH.
Information is provided below, but any Amazon mechanism for registering or producing a key pair can be used.
#### Option 1: Generate key pair in the AWS console
Amazon can generate key pairs for you as described in the [Amazon documentation](http://docs.aws.amazon.com/AWSEC2/latest/UserGuide/ec2-key-pairs.html#having-ec2-create-your-key-pair). Note that the AWS region must be set to the target region for the GCE deployment _before_ generating the key pair.
The key pair should be kept as it may be necessary to access the administration host again later (e.g. future installations or upgrades).
#### Option 2: Import existing key pair
To import the public key from an existing key pair, please follow the instructions in the [Amazon documentation](http://docs.aws.amazon.com/AWSEC2/latest/UserGuide/ec2-key-pairs.html#how-to-generate-your-own-key-and-import-it-to-aws). This provides guidance on how the public key must be formatted
and outlines requirements for the key.
**Note:**
- Only RSA keys of sufficient length are supported.
- The AWS region must be set to the target region for the GCE deployment _before_ importing the key.
### AWS S3 bucket for the GCE installation
An AWS S3 bucket is needed for the GCE installation. Certain files used during installation and upgrades are stored here. This S3 bucket is also used as a working area, where information about running jobs is stored.
We recommend a dedicated S3 bucket with default server side encryption for this purpose. This can be created as follows:
1. Go to the [AWS Console Login](https://console.aws.amazon.com/console/home) webpage and log into the AWS account where you wish to install GCE.
2. Select the S3 service.
3. Press the _Create bucket_ button.
4. Enter a name in the field labeled _Bucket name_. The name you provide must be unique across the whole of AWS, for example `mycompany-genomicscloudengine-install-eu-west1`. Further naming restrictions and guidelines are provided in the
AWS [documentation](http://docs.aws.amazon.com/AmazonS3/latest/dev/BucketRestrictions.html).
5. In the region field select the region where GCE should be running. Supported regions are listed in [the Supported AWS Regions section](#supportedregions).
6. In the _Default encryption_ section, choose the _Enable_ option.
7. Press the _Create bucket_ button.
The S3 bucket is now created and can be inspected in the S3 console. Take note of the bucket name. It is needed when installing the GCE administration host.
### AWS IAM users for access to S3 from client software
GCE reads input data from and writes results to AWS S3, so each person submitting workflows to GCE will need an IAM user with read and write permissions for AWS S3.
Those connecting to GCE from a CLC Workbench additionally need an IAM user with read access to the AWS Resource Groups service so they can see the [GCE cache bucket](#createcachebuckets). This access can be granted by using the managed policy called "AWSResourceGroupsReadOnlyAccess".
When first setting up GCE, a single user is enough for testing purposes. Additional users can be added at any time.
### CLC Licenses
A valid GCE license is required for running analyses on GCE. A separate software license is needed for CLC Workbenches and for the CLC Genomics Server.
License are ordered from QIAGEN, and are delivered in the form of a license order ID. That ID is used to download a valid license file, which will be bound to a specific GCE installation.
Some steps of the installatino can proceed with having your license order ID, but the installation cannot be completed without it.
### CLC Workbench
A CLC Workbench is required for creating workflows that will be submitted to GCE. To include tools for high throughput sequencing analysis, a CLC Genomics Workbench will be needed.
Workflows can be submitted directly from a CLC Workbench to GCE for analysis, and this is usually the easiest method to test a new GCE setup.
CLC Workbench software can be downloaded via the [product download page](https://digitalinsights.qiagen.com/downloads/product-downloads/).
[Evaluation licenses](https://resources.qiagenbioinformatics.com/manuals/clcgenomicsworkbench/current/index.php?manual=Request_evaluation_license.html) are available.
### An SSH client on your local machine
You need an SSH client on your local machine to enable you to log into the GCE administration host.
### A server certificate
Having a trusted certificate obtained from a certificate authority is recommended. To use this certifcate for GCE, it must be uploaded to AWS. You will need the Amazon Resource Name (ARN) for the certificate.
A self-signed certificate can be used.
Further instructions relating to certificates is provided in [later sections](#installstep3).
## Install the CLC Genomics Cloud Engine
A detailed outline of the steps involved in setting up GCE:
1. [Create the GCE administration host](#installstep1) (AWS Console)
2. [Log into the administration host](#installstep2) (ssh from terminal)
On the administration host:
3. [Configure the setup script with key information](#installstep3)
4. [Transfer installation files from the release repository](#installstep4)
5. [Configure authentication for GCE access](#installstep5)
6. [Install the GCE service](#installstep6)
7. [Get and install the GCE license file](#installstep7)
8. [Configure executor types and autoscaling](#configure-autoscaling)
In the AWS Console:
9. [Determine the GCE URL](#installstep8)
10. [Check the GCE installation is ready for use](#validate-installation)
11. [Set up S3 cache buckets for CLC Workbench or CLC Server client software](#createcachebuckets)
Using a GCE client:
12. [Test the GCE setup](#testgceinstallation)
### Create the GCE administration host
In this step, a _GCE administration host_ is set up on Amazon EC2. Scripts provided with the administration host are used for installing the GCE service.
For this step, you need the following information:
- The **AWS administration host URL**. This is provided in the top section of the [release webpage](../../install-page/index.html).
- The name of the S3 installation bucket ([a prerequiste described above](#awss3installationbucket))
- The IP address or address range that access to the administration host should be restricted to. This will often be the IP address you are currently using.
To create the administration host:
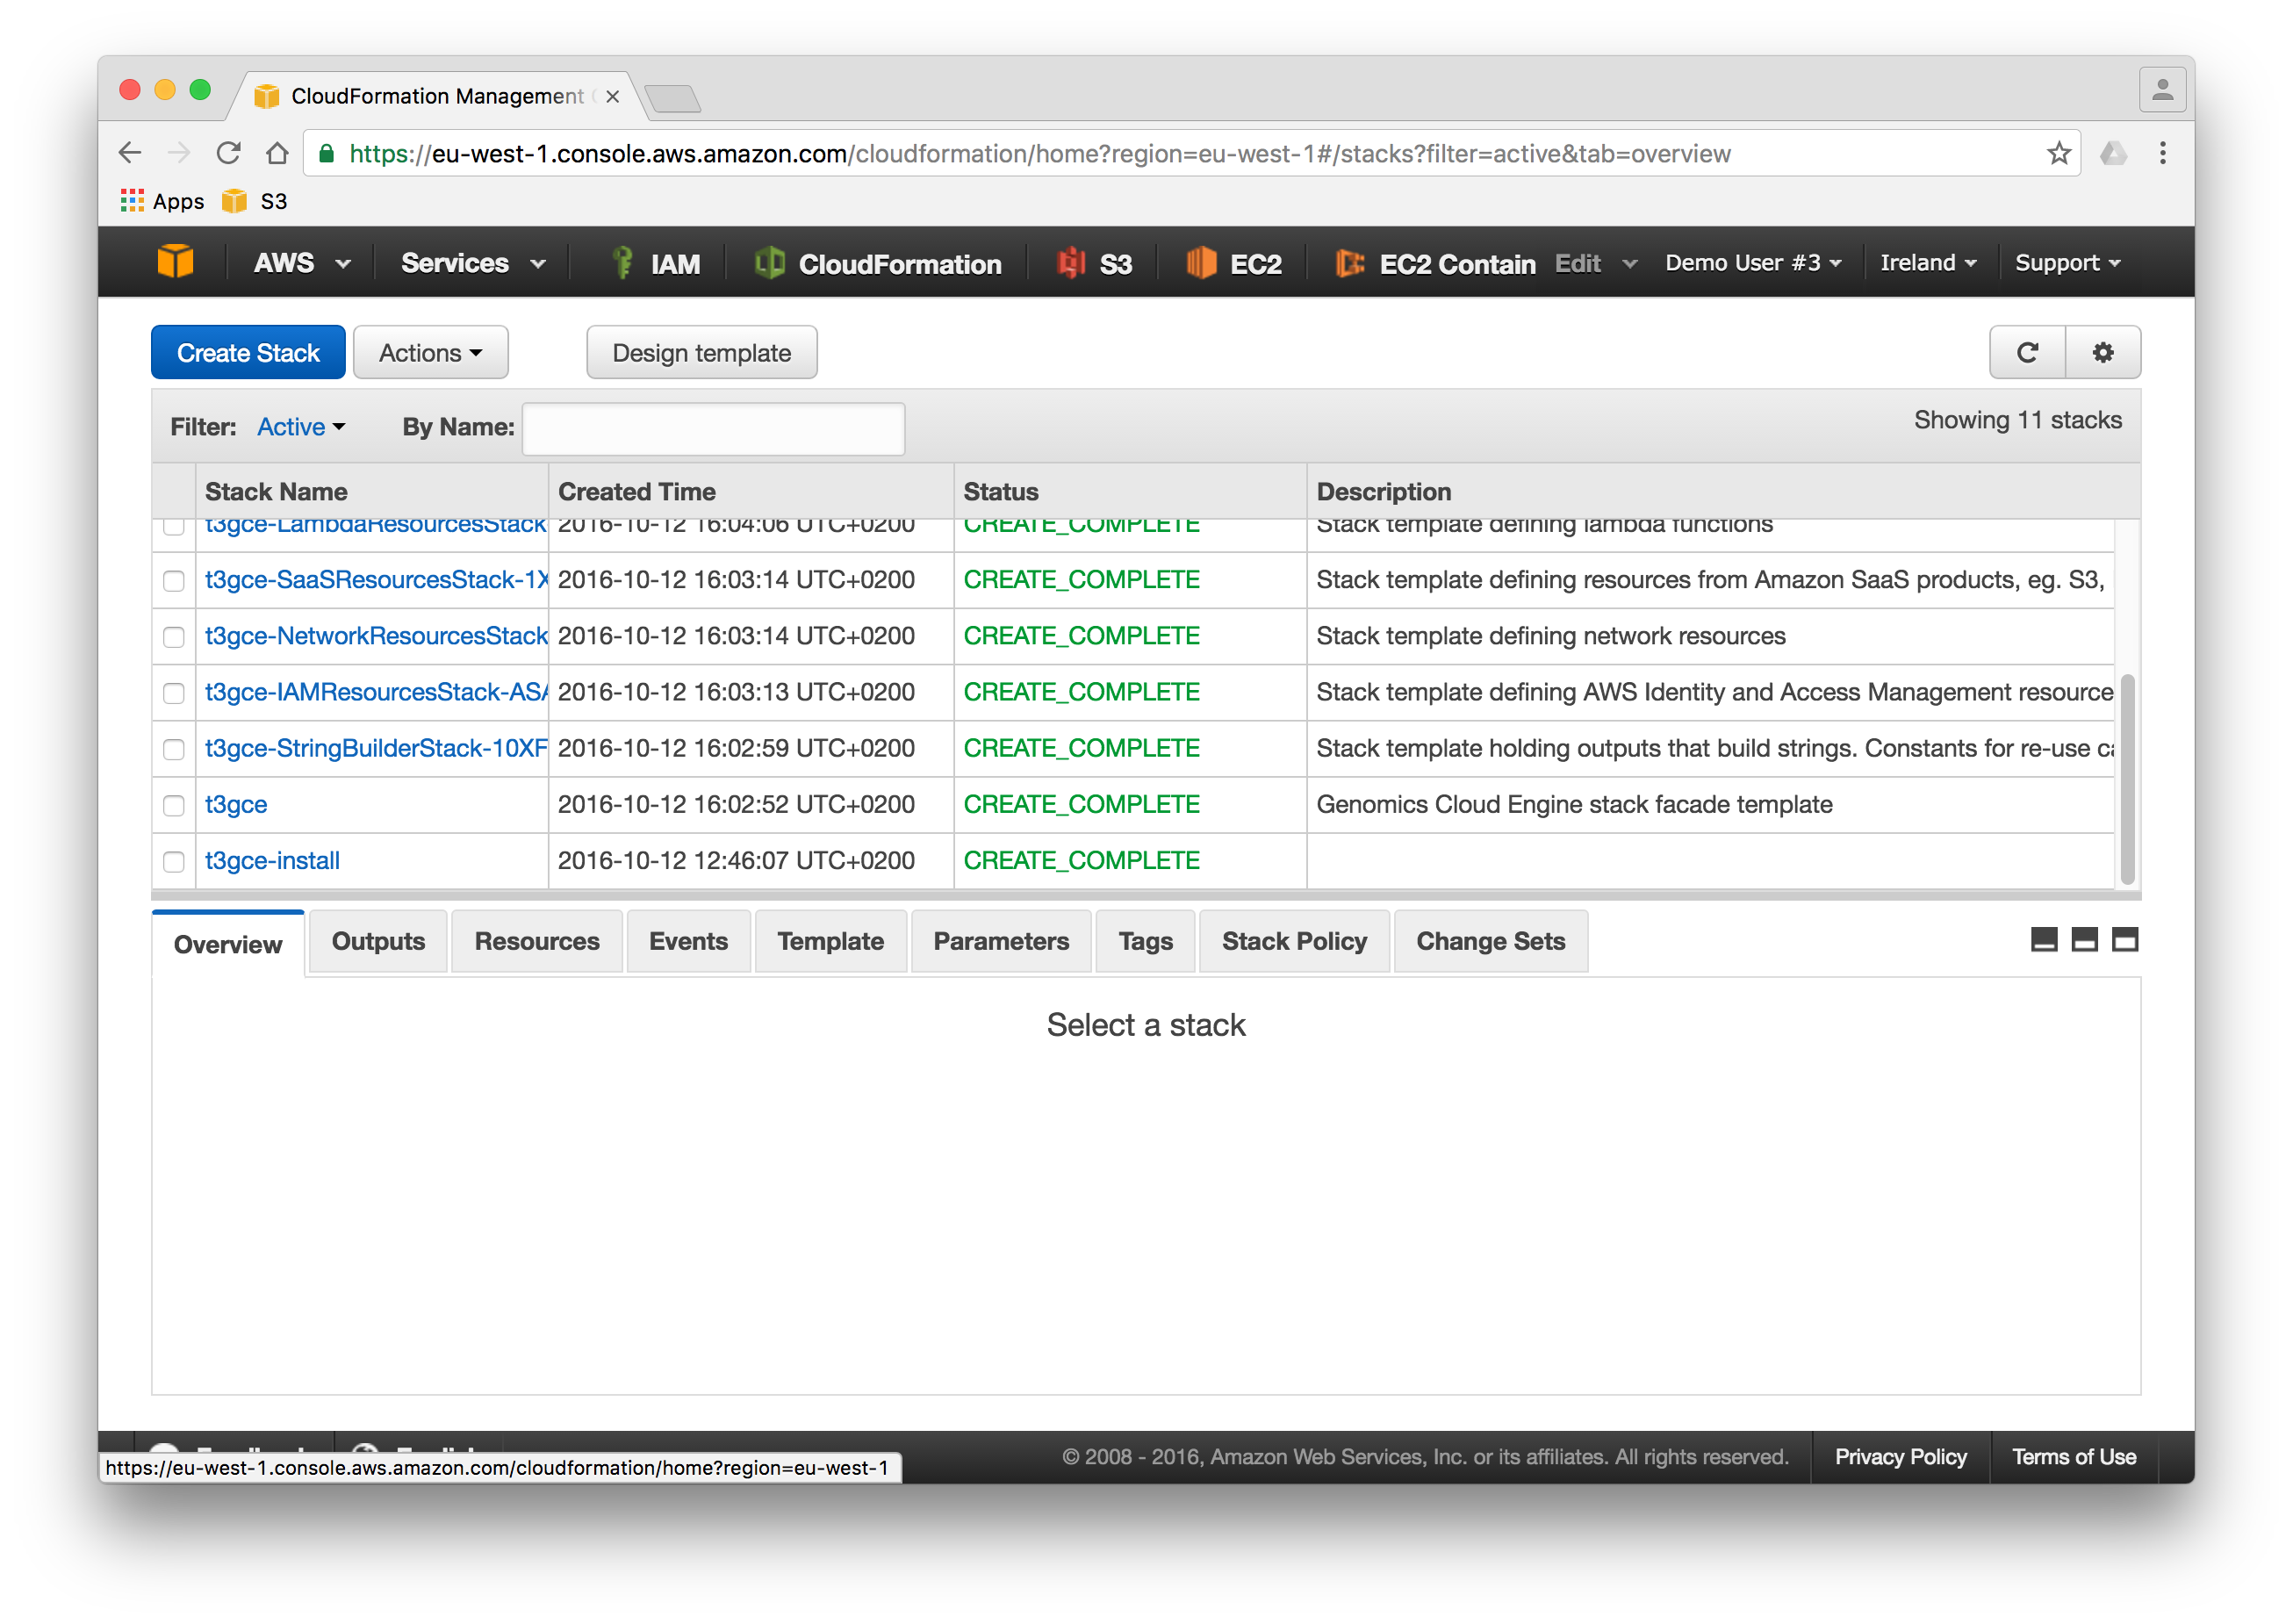
1. Log into the AWS Console and select the CloudFormation service.
2. Check the desired region is selected in the top, right side of the console.
3. Press the _Create Stack_ button and select the "With new resources (standard)" option..
4. Keep the option "Template is ready" selected in the Prepare template area.
5. In the _Specify template_ area, select the _Amazon S3 URL_ option. In the field below that, enter the **AWS administration host URL**.
6. In the next step, specify a _Stack name_. This name must use only lower case characters, and be 25 or fewer characters in length), e.g. 'gce-admin'. This name is for the administration host, _not_ the GCE service.
7. In the _AccessLimitedTo_ field, specify the IP address or range that access to the administration host should be limited to. Use CIDR notation by writing the IP address followed by "/32" eg. "7.178.84.22/32". The CIDR notation can also be used to allow access from a range of IP addresses.
8. In the _GCEInstallFileS3Bucket_ field, enter the full name of the S3 installation bucket, replacing any text already in that field.
9. In the _SshKey_ field, select the SSH key pair to be used. If you do not see your key pair in the drop-down list, check that you are in the correct AWS region. If you are not, switch region and start at step 1 of this section again.
10. Settings in the _Configure stack options_ page can be ignored. E.g. _Tags_, _Permissions_, _Advanced options_, etc.
11. In the final step, review the details for your administration host, and then check the box beside the text "_I acknowledge that AWS CloudFormation might create IAM resources_" at the bottom of the page.
10. Click on the _Create stack_ button.
The progress of the GCE admin host creation is reported in the _Status_ column in the Events tab. When it is ready, the status for the row where the name you provided is listed in the Logical ID column will contain the message _CREATE_COMPLETE_.
Use the refresh button in the top, right side of the Events pane to see the latest status messages.
### Log into the administration host
Log into the administration host when it is ready using SSH.
Log in as the user `install-user`, and specify the same key pair selected when configuring the administration host.
The administration host's IP address is provided under the Output tab near the top of the AWS Console, in the row with the key `IPAddress`.
Using the openssh client, the command would take this form:
```none
ssh install-user@ -i .pem
```
For example:
```none
ssh install-user@52.89.60.37 -i ~/.ssh/t3key.pem
```
After logging in, you will see a bash prompt:
```none
[root@GCE-adminhost] ~ #
```
You are now logged in as root on the administration host instance on Amazon EC2.
The administration host contains configuration files and scripts for setting up the GCE service. Working with these is described in the following steps. An overview of the scripts provided can be found in the [installation details appendix](#installation-appendix).
Scripts and configuration files can be edited using `nano` or `vim`, which are bundled with the administration host.
### Configure the setup script with key information
The relevant administration scripts are configured using the _setup.sh_ script, found at `/root/config/setup.sh`.
Fields in this script that are not mentioned below can be left as they are.
#### Configure the name of the GCE environment
In the field `STACK_NAME=<your stack name>` replace the text after the equals sign with the permanent name for your GCE service.
This name must be between 4 and 20 lower case letters and be unique within the AWS region your GCE setup is in.
The GCE service endpoint (URL) will be based on this name, with a region descriptor and other information appended. For example, with the name _mygce_ and the setup was in Europe (Ireland) region, the endpoint(URL) would be: `https://mygce.eu-west-1.elasticbeanstalk.com`.
#### Configure the SSL certification ARN
In the field `SSL_CERTIFICATE_ARN=<aws arn for your certificate>` the Amazon Resource Name (ARN) for an SSL certificate must be supplied.
When using an existing server certificate, obtained from a certificate authority, that has been uploaded to AWS, you must edit the `/root/config/setup.sh` script yourself with the relevant ARN.
If using a self-signed certificate using the instructions provided below, the ARN will be entered into the `setup.sh` script for you, so you do not need to edit the file yourself in this case.
##### Using an existing certificate
For productions systems, we recommend that a server certificate obtained from a certificate authority (CA) is uploaded. This involves uploading the certificate and certificate chain to ACM, as described in the
[AWS Documentation](http://docs.aws.amazon.com/IAM/latest/UserGuide/id_credentials_server-certs_manage.html#UploadSignedCert).
In the `SSL_CERTIFICATE_ARN`field, replace the text after the equals sign with the ARN of the certificate in ACM:
* `SSL_CERTIFICATE_ARN=<aws arn for your certificate>`
##### Creating and using a self-signed certificate
The administration host provides a script for creating a self-signed certificate. Certificates created using the steps described below expire 30 years after creation. While you can proceed just following the instructions in this section, further details about the creation and use of self-signed
certificates is provided in the [certificate management appendix](#certificate-management).
1. Before creating the certificate, check the `~/config/openssl.cnf` file:
i. We recommend that information relevant to your setup is provided in the fields under `[req_distinguished_name]`.
ii. Check that the list under `[alt_names]` includes an entry relevant for the region your GCE setup is being installed in.
2. Run the following script:
```none
~/admin/ssl/create-self-signed-cert.sh
```
This script:
- Writes a new private key to 'ssl/key.clear.pem'.
- Configures the GCE installation scripts to use the new certificate.
- Uploads the certificate and key to the AWS Certificate Manager (ACM) service.
- Imports the certificate to the gce-cacerts trust store using the _keytool_ command.
#### Configure tags (optional)
GCE stacks and resources can be tagged with custom key-value pairs. This can be useful for tracking cost related to this specific GCE environment. The tags to use must be defined in the `/root/config/setup.sh`file before the GCE service is installed.
The format used when defining the tags is:
`TAGS="{'tag1': 'value1', 'tag2': 'value2' ...}"`
For example:
`TAGS="{'env': 'prod', 'department': 'Oncology', 'billingEntity': '2467'}"`
A maximum number of 50 tags can be specified.
#### Limit access to the Job Manager based on IP range (optional)
The JobManager service is the only GCE service facing the internet. The IP addresses allowed when accessing the JobManager service can be limited by editing the `ACCESS_LIMITED_TO` field in `setup.sh`.
Use CIDR notation for this field.
We highly recommend that access is limited to just the IP or IP range needed by client systems that should access GCE (e.g. those submitting jobs to GCE, or querying GCE for the status of jobs, etc.). The default value “0.0.0.0/0" allows access from any IP.
### Transfer installation files from the release repository
The `prepare.py` script retrieves the GCE application files from the release repository and transfers them to Amazon ECR and the installation bucket in Amazon S3.
Run the script, which is in the root user's home directory:
`prepare.py`
Wait for this script to complete before proceeding.
### Configure authentication for GCE access
#### Create a Cognito user pool
GCE makes use of an AWS Cognito user pool, which is configured using the `create_user_pool.py` script, found in the GCE administration host root's home directory.
- If GCE has an SSL certificate for a custom domain, it must be configured for this domain because the Cognito user pool will be configured to redirect to GCE:
`create_user_pool.py --config config/application-oauth2.yaml --domain my.domain.com`
- In other cases, run the script with just the config argument:
`create_user_pool.py --config config/application-oauth2.yaml`
This creates a Cognito user pool and a configuration file at `~/config/application-oauth2.yaml`, which should not need further adjustment.
#### Add Cognito users
Go to the Cognito service in the AWS Console and click on the Manage User Pools button.
You should see a userpool with the name
`-cog`
Click on the user pool name.
In this area, you can create Cognito users for those who should have access to GCE. For details, see the **Create a User** section in the [AWS Cognito documentation](https://docs.aws.amazon.com/cognito/latest/developerguide/how-to-create-user-accounts.html).
### Install the GCE service
The GCE service can now be installed by running the `create_stack.py` script, which is in the root user's home directory:
`create_stack.py`
Typically, it takes about 40 minutes to set up the GCE service, but this may vary.
Progress can be monitored from the CloudFormation service in the AWS Console.
When the _create_stack_ script has finished, copy the following information, which will have been printed to the terminal:
- The host ID
- The license file location (an S3 URL)
This information is needed for the next step.
After the GCE service is installed, two applications should be visible in the _Elastic Beanstalk_ AWS Console: `-JE-LicenseApp` and `-JobManagerApp`.
Further information on the CloudFormation templates run by this script can be found in the [installation details appendix](#installation-appendix).
### Get and install the GCE license file
A valid license file is needed on the system before any workflows can be run on GCE. If this is the first time GCE has been installed to this location, then you need to download a license file and install it into the relevant location in your GCE setup.
If you are given more than one license order ID, then a license file needs to be downloaded for each license order ID you receive. Generally one license is supplied per GCE setup.
Whenever license files are added or removed, the License Manager service needs to be restarted, so GCE registers that the license files are present.
#### Download a license file
To download a license file, open a web browser and navigate to the [Download a Network License file page](http://licensing.clcbio.com/LmxWSv2/GetNetworkLicenseFile).
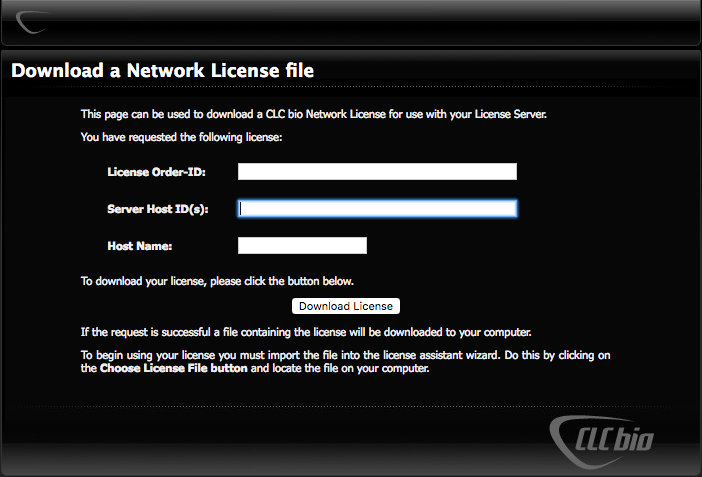
Fill in the fields on the form:
1. **License Order-ID**: This is sent to the license owner via email after the product is purchased.
2. **Server Host ID**: The host ID for the GCE environment was printed to the terminal after running the create_stack.py script. It can also be found in a file created by that script at:
`s3:////gce-license-files/-host-id.txt`.
3. **Host Name**: The name of the GCE environment.
Click on the *Download License* button and save the license file.
#### Install the license file on GCE
1. Upload the license file to the following location in S3:
`s3:////gce-license-files/`
Only one license file should be present in this location. If there are multiple license (.lic) files, remove the old ones.
The license file can be uploaded using:
- The AWS Console S3 upload functionality.
OR
- The AWS command line client (AWS CLI)
The command must include the --sse option if encyrption was enabled on the installation buck. That option enables Amazon S3 master-key encryption (AES256):
```none
aws s3 cp < local path to the license file > s3:////gce-license-files/ --sse
```
Installation of the AWS CLI is documented in this [installation guide](http://docs.aws.amazon.com/cli/latest/userguide/installing.html).
#### Restart the License Manager service
2. Restart the License Manager service and Job Executor service so they detect the newly uploaded license file by running the `restart_license_server.py` script, which is in the GCe administration host root user's home directory:
```none
restart_license_server.py
```
Restarting the services usually takes about a minute. When complete, a message should be written to the terminal stating that the health of the environment is [Green](https://docs.aws.amazon.com/elasticbeanstalk/latest/dg/health-enhanced-status.html).
Further information about updating licenses, moving licenses to new GCE installation locations, and monitoring licenses can be found in the [Configuration chapter](#updatemonitorlic).
#### (Optional) Add subscribers to the license expiration alarm
We recommend adding subscribers to the license expiration alarm at this stage, but it can be done later. Subscribing to this alarm can help ensure that new licenses are obtained before an existing license expires. This is described in further detail [in a later chapter](#licensealarm).
### Configure executor types and autoscaling
Autoscaling refers to spinning up GCE Job Executor EC2 instances to match demand. The EC2 instance types, maximum number of instances, and related information, is configurable in GCE.
On setups using a standard GCE license, these settings can be configured now, if desired. Alternatively, the defaults can be used, and these settings adjusted later as needed. If you wish to edit these settings, please see the section
on [configuring job execution environments](#configexecenvironments).
#### Configuring autoscaling on staging environments
When using a GCE staging license, we recommend editing these settings now and setting the maximum number of instances for each GCE Job Executor type to 3. How to do this is described below. Please also see [chapter 5](#moreautoscalinglimits) for more information on this topic, including the impact
of the `maxInstances` setting and its relationship to licensing, testing and related Amazon limits.
To configure the maximum number of instances for each GCE Job Executor type:
1. Open the file `config/ExecutorDescriptions.json`.
2. Set the value for the `maxInstances` field for each instance type to 3.
3. Run the `create_stack.py` script to update the existing GCE setup.
### Determine the GCE URL
To determine the GCE URL:
1. Go to the _Elastic Beanstalk_ page in the AWS Console.
2. Copy the information in the _URL_ column for the row where the Application Name entry includes "JobManagerApp". It will be of the form `..elasticbeanstalk.com`.
3. Use the "`https://...`" protocol for the URL.
An example of a GCE URL, where the GCE name is "gce-mycorp" and the region was us-west-2 is:
`https://gce-mycorp.us-west-2.elasticbeanstalk.com/`
### Check the GCE installation is ready for use
#### GCE Landing page
Go to the GCE URL using a web browser. This opens the GCE service _Landing Page_. From there, you can navigate to the GCE _Job overview_ page, described in [chapter 7](#monitorsystemstatus), and the _Enrollment_ page, used for generating an authentication token used by the GCE Command Line Tools
client.
Log in using Cognito user credentials.
If you experience problems, please check you are using the https protocol.
#### Check Elastic Beanstalk services
Check the status of the Elastic Beanstalk services in the AWS Console. In the Health column,
* `-JobManagerEnv` should be Green.
* `-LicenseEnv` should be Green.
Before jobs can be submitted to GCE from a CLC Workbench or CLC Server client, one or more [S3 cache buckets](#createcachebuckets) must be created.
(Workflows could now be submitted to this GCE setup using the GCE Command Line Tools client.)
### Set up S3 cache buckets for CLC Workbench or CLC Server client software
When the CLC Workbench or the CLC Server submits jobs to GCE, local data selected as input is uploaded to S3 as part of the submission. Submitting data already present in S3 is inefficient, so a cache is used to minimize unnecessary uploads.
The cache setup consists of:
- An S3 bucket configured specifically for this purpose, tagged to identify it as a cache bucket for GCE clients.
- CloudTrail
- Some lambda functions to handle the cache eviction strategy
CLC Workbench users and the CLC Genomics Server can share a cache, if desired, or multiple caches can be created if sharing the cache is not desirable.
It is not possible to repurpose an existing S3 bucket as a GCE cache bucket.
#### Setting up the cache bucket
For set up a cache bucket, you need the **Basic cache infrastructure URL**, which is in the top section of the [release webpage](../../install-page/index.html).
1. Select the CloudFormation service in the AWS Console.
2. Press the _Create Stack_ button and select "With new resources (standard)" from the drop down menu.
3. Keep the option "Template is ready" selected in the Prepare template area.
4. In the _Specify template_ area, select the _Amazon S3 URL_ option. In the field below that, enter the **Basic cache infrastructure URL**.
5. In the next step, specify a _Stack name_. This name must use only lower case characters, and be 25 or fewer characters in length), e.g. 'gce-cache'.
6. Under the Parameters section,
- Under `Cache Bucket` enter the name of an S3 bucket to create in the `Bucket name` field. This name must be unique across the whole of AWS. Naming restrictions and guidelines are provided in the AWS [documentation](http://docs.aws.amazon.com/AmazonS3/latest/dev/BucketRestrictions.html).
- Under `Cache Retention Policy` adjust the value for the `Minimum Age Before Removed` if desired. This is the number of days that files should be kept in the cache. The higher this value is the more data can be expected to be in the cache. There is no maximum size.
7. Settings on the next page, _Configure stack options_, can be ignored. E.g. _Tags_, _Permissions_, _Advanced options_, etc.
8. On the Review page, check the details and then check the boxes _I acknowledge that AWS CloudFormation might create IAM resources with custom names._ at the bottom of the page.
9. Press the _Create stack_ button.
The S3 cache bucket will now be created. When the creation process is complete, the status CREATE_COMPLETE will appear in the _Status_ column in the AWS Console.
[Additional cache buckets can be added if desired.](#custom-appendix)
### Test the GCE setup using a CLC Workbench client
You should now be ready to test GCE by [using a CLC Workbench with the Cloud Plugin installed](https://resources.qiagenbioinformatics.com/manuals/cloudplugin/current/index.php?manual=Installing_uninstalling_Workbench_plugins.html).
Before logging into GCE through your CLC Workbench, [configure access to the S3 cache bucket](https://resources.qiagenbioinformatics.com/manuals/clcgenomicsworkbench/current/index.php?manual=Working_with_data_in_AWS_S3.html).
Then [configure access to GCE](https://resources.qiagenbioinformatics.com/manuals/cloudplugin/current/index.php?manual=Configuring_cloud_connection.html),
Then [submit a workflow](https://resources.qiagenbioinformatics.com/manuals/cloudplugin/current/index.php?manual=Running_workflows_on_CLC_Genomics_Cloud_Engine.html).
Testing can also be done by submitting workflows to GCE via a CLC Genomics Server or using the GCE Command Line Tools client software.
Note: All versions of QIAGEN standard plugins with a major version corresponding to the GCE major version number have been transferred to your GCE setup automatically during installation. They and are thus available without further action needed. This is described further
in [chapter 5](#installplugins).
# Upgrade an Existing GCE Solution
Each new version of GCE is accompanied by the release of a new administration host CloudFormation template. With this template a new administration host can be created or an existing administration host can be updated.
Details of the upgrade procedure differ depending on the version of GCE being upgraded. Versions in the 20.x release line and earlier require the full AWS stack to be replaced. Version 21.0.0 and above only require the existing CloudFormation stacks to be updated, unless otherwise stated in the
release notes.CloudFormation stack updates can be done reasonably quickly, and will not cause data loss.
Full AWS stack replacement is more involved and takes longer, usually around 1 to 2 hours. Here, the GCE database is deleted, which means the job queue, job history and job executor environment configuration are cleared. Existing GCE Command Line Tools users will have to re-enroll after the upgrade.
However, the existing AWS Cognito configuration can be retained, and the existing license file can be re-used.
Deploying cache buckets is a separate activity. If there are changes to cache buckets required when upgrading, this will be documented in the release notes.
## Stack update (For versions after 21.0.0)
How to upgrade by updating the existing CloudFormation stacks is described step by step in the following subsections. Overall the process can be seen as split into two main steps:
1. Updating the administration host stack via CloudFormation.
2. Updating the rest of the GCE stacks via the administration host.
CloudFormation takes care of adding, removing and changing all the resources GCE is composed of. GCE will be unavailable for some time during the upgrade process.
### Step 1: Upgrade the administration host
To upgrade the existing administration host, enter the AWS web console and navigate to the CloudFormation service. Select the existing administration host stack and push the "Update" button. In the "Update stack" dialog, choose "Replace current template" and use the S3 URL to
the `GceAdminInstance.template` found on the [release webpage](../../index.html). When filling in the CloudFormation parameters you can keep the existing settings, but there may be new parameters that needs to be filled in.
A detailed description of the parameters can be found in [step 2](#installstep2) of the installation guide.
### Step 2: Reinitialize the administration host
SSH to the administration host, as described in [step 2](#installstep2), and initialize it by downloading the configuration of the existing stack. This is done by running the get_configuration.py script and specifying the main stack name of GCE as a parameter:
`get_configuration.py `
### Step 3: Download installation files
Having transferred the existing stack configuration to the administration host, the deployables of the upgrade version must be transferred by running the "prepare.py" script:
`prepare.py`
Further details on initialization of the administration host can be found in [step 3](#installstep3).
### Step 4: Maintenance mode
Before performing the upgrade, ensure there are no jobs running. The upgrade process will cause these jobs to fail. For this, we recommend putting GCE in maintenance mode, which allows currently running jobs to complete but no new jobs to be sent for processing. Maintenance mode is described further
in the [Maintenance mode](#maintenancemode) section.
When in maintenance mode wait for existing jobs to complete before proceeding with the next step.
### Step 5: Upgrade GCE stacks
Having ensured that the system is idle the upgrade is performed by running:
`create_stack.py`
When the script is done all changes have been applied to the system.
### Step 6: Leave maintenance mode
The upgrade is completed and the GCE should return to normal execution mode again. This is done by following the instructions in the [Maintenance mode](#maintenancemode) section.
### Rolling back a software upgrade
Stack upgrades can be rolled back simply by following the upgrade process again, but this time using an Administration host CLoudFormation template from the previous version of GCE.
## Full stack upgrade (From versions prior to 21.0.0)
Doing a full stack upgrade, means removing the existing version of GCE and deploying a new one from scratch. The GCE license can be re-used as long as the new deployment is given the same stack name and is deployed using the same AWS account and AWS region as the deployment being replaced. This can
only be done by first removing the old GCE deployment, since CloudFormation does not allow two stacks to have the same name.
We recommend that a snapshot of the database is taken before starting this process. When the old environment is deleted, all data in the database is lost and this snapshot will be needed if the upgrade needed to be rolled back for any reason.
### Step 1: Create a new administration host
To create the new administration host enter the AWS web console and navigate to the CloudFormation service. Use the `GceAdminInstance.template` template URL found on the [release webpage](../../index.html). When filling in the CloudFormation parameters enter the install bucket name used by the
existing installation.
A detailed description of how to create the administration host can be found in [step 2](#installstep2) of the installation guide.
### Step 2: Initialize the new administration host
SSH to the new administration host, as described in [step 2](#installstep2), and configure it just like in a new deployment. The configuration files used in the previous deployment can not always be used in a new deployment since the format of the files may have changed. But it can still be useful
to access the old configuration either via the old administration host or by finding the configuration files in S3 on this location: "S3://< installation bucket >/< stack name >/config/"
The deployables of the upgrade version can now be transfered by running the prepare script:
`prepare.py`
Further details on initialization of the administration host can be found in [step 3](#installstep3).
### Step 3: Delete the existing stacks
Before the upgraded infrastructure can be installed the existing stack must first be deleted.
SSH to the administration host and run the 'delete_stack.py' script. This will delete all the stacks that GCE is composed of. This does not delete the administration host or any cache bucket stacks.
Finally, delete the old administration host stack via CloudFormation in the AWS console.
### Step 4: Create the new stack
Having deleted the infrastructure of the old GCE version the next step is to re-create it in the updated version. This is done by running the create-stack script on the administration host:
`create_stack.py`
When the create script is done the status of the main services should be verified as described in [Validate the installation](#validate-installation).
#### Plugin handling
All versions of QIAGEN standard plugins with a major version corresponding to the GCE major version number are transferred to your GCE setup automatically during installation. No action is needed to have access to these.
Custom plugins will need to be deployed. This is described in [appendix 4](#custompluginaftergceupdate).
### Step 5: Re-enroll and re-configure clients
Since the GCE database is deleted during the stack upgrade, all existing users will now have to re-enroll and apply the new credentials on relevant clients. Instructions for enrolling can be found in the Command Line Tools manual.
# Data access
Access to input data is granted to GCE one of two ways:
* Through bucket policies for the [IAM roles used by the Job Manager and Job Executor EC2 instances](#iamroleaccess), or
* Using [S3 presigned URLs](#s3presignedurls), where input data is selected from S3 buckets where role-based access is not in place.
Output data is written to S3 buckets in regions and accounts accessible to the [Job Executor IAM role](#iamroleaccess).
When working with S3 buckets in the same region as GCE, files can be read from and written to free of charge. Working across regions will incur a small cost.
## Presigned URLs
Presigned URLs gives GCE _time limited access_ to only the files selected as input to the workflow being submitted.
GCE can be configured to always use presigned URLs, if desired. This is done through the "-SettingsTable" in in the DynamoDB database. Set the table item "signing_required" to "true" to enforce signing of all URLs.
[AWS documentation about presigned URLS](http://docs.aws.amazon.com/AmazonS3/latest/dev/ShareObjectPreSignedURL.html)
## Cross account access
Cross account access to files in S3 is configured by defining bucket policies granting access to the IAM roles used by GCE. These are the roles with names containing "JobManagerRole" or "JobExecutorRole", prefixed with the GCE stack name.
When writing a bucket policy the IAM roles are referenced by their ARN.
The minimum requirements for GCE input data buckets are the "GetObject" and "GetBucketLocation" actions.
A sample read-only cross account policy is included below. Please consult AWS documentation to ensure that the format is up to date with the newest AWS API changes:
```
{
"Version": "2012-10-17",
"Statement": [
{
"Sid": "Stmt1505825829420",
"Effect": "Allow",
"Principal": [
"arn:aws:iam::123456789012:role/job_executor/myprod-IAM-1GRJY6GX2-JobExecutorRole-VQ12X8PBWBRO",
"arn:aws:iam::123456789012:role/job_manager/myprod-IAM-1GRJY6GX2O-JobManagerRole-H77981FTL9VJ"
],
"Action": [
"s3:GetBucketLocation"
],
"Resource": "arn:aws:s3:::_data-bucket_"
},
{
"Sid": "Stmt1505825829421",
"Effect": "Allow",
"Principal": [
"arn:aws:iam::123456789012:role/job_executor/myprod-IAM-1GRJY6GX2-JobExecutorRole-VQ12X8PBWBRO",
"arn:aws:iam::123456789012:role/job_manager/myprod-IAM-1GRJY6GX2O-JobManagerRole-H77981FTL9VJ"
],
"Action": [
"s3:GetObject"
],
"Resource": ["arn:aws:s3:::_data-bucket_/*"]
}]
}
```
# Configuration
## General note about configuration and reverting changes
Much configuration of the QIAGEN CLC Genomics Cloud Engine is done by editing scripts or configuration files on the GCE administration host and then applying those changes by running the `create_stack.py` script. In these cases, changes made can be reverted (before they have been applied), by
running the `reset_configuration.py` script. This loads the configuration files as they were at the time the `create_stack.py` script was most recently run.
## Maintenance mode
Putting GCE into maintenance mode is useful when updating or making configuration changes. Maintenance mode suspends job distribution by the JobManager. When maintenance mode is activated:
- Jobs currently running are allowed to complete.
- Users can submit jobs, but those jobs will stay in the queue until maintenance mode is deactivated.
- Users can still log into GCE.
To put GCE into maintenance mode:
1. Open the DynamoDB service in the AWS console.
2. Click on `Tables` in the left hand menu.
3. Click on the name of the table with a name of the form -SettingsTable.
4. Click on the button `Explore table items` at the top right.
5. Scroll to the `Items returned` section.
6. Click on the `maintenance` item.
7. Set the maintenace parameter `value` to `true` to activate maintenance mode.
To deactivate maintenance mode, follow the same steps, but set the value to false at step 7.
See the AWS documentation for more on [DynamoDB Management Console](http://console.aws.amazon.com/dynamodb/home).
## Limiting access to the Job Manager based on IP range
The JobManager service is the only service facing the internet. We highly recommend that access is limited to just the IP or IP range needed by client systems that should access GCE (e.g. those submitting jobs to GCE, or querying GCE for the status of jobs, etc.). The default value “0.0.0.0/0"
allows access from any IP.
To update the IP addresses that should have access to an existing GCE setup, log into the GCE administration host and:
1. Change the value of the `ACCESS_LIMITED_TO` field in the `setup.sh` file to a more specific range, using CIDR notation.
2. Run the `create_stack.py` script.
## Applying security updates to the Job Manager
The Job Manager is an internet facing component, as we learned in the previous section, which means that in all circumstances security related updates should be applied on a regular basis.
We recommend placing the system in [maintenance mode](maintenancemode) and waiting for the current jobs to complete before applying updates.
To update the Job Manager simply run the script `update/update_jobmanager.py`, like so:
```none
update/update_jobmanager.py --deployment-name MyStack --deployment-region eu-west-1
```
Use the following parameters:
`--deployment-name`
: The name of the already deployed GCE stack, this value should be the same as `STACK_NAME` specified in `setup.sh`.
`--deployment-region`
: The AWS region of the GCE stack.
`--update-id`
: Optional ID used to identify new resources (image, application) part of the update, must be an alpha-numeric sequence max 13 characters long. If this parameter is omitted (recommended) an encoded time-stamp will be used (eg. upd1647856894).
The script will always create new resources alongside the existing resources used by the Job Manager. This means that it is possible to revert to a former application version if necessary (ie. if the updated version should fail).
See the AWS documentation for more on [managing and configuring Elastic Beanstalk applications](https://docs.aws.amazon.com/elasticbeanstalk/latest/dg/applications.html).
## Configuring job execution environments
### Overview of execution environment settings
Users specify computational requirements when launching a job to run on GCE. The options available to them are configured in the `config/InstanceTypes.json` file on the GCE administration host.
When a job is received by GCE, the computational requirements specified by the user are used to determine which GCE Job Executor instance type to use. These are configured in the `config/ExecutorDescriptions.json` file on the GCE administration host. Each entry includes an EC2 instance type,
computational requirements, a [maximum number of instances](#autoscaling) that can be run at once, and a priority.
When more than one GCE Job Executor instance type meets or exceeds the job requirements, the entry with the highest priority (lowest number) is used. Smaller instance types, or cheaper instance types, would typically be assigned smaller numbers (higher priorities).
As an example, say a user selects the "Small" option when launching a job to run on GCE. When checked against the GCE Job Executor instance types available, all of them meet or exceed the requirements for a "Small" job. However, the smallest instance type has been assigned the highest prioirity (
smallest number), and so it is used for this job.
This setup, with one configuration file specifying what options are seen by end users, and another file specifying resources to use and limits to apply to those resources, allows configuration changes to the latter without changing the end user experience. It does, however, mean that careful
attention should be paid to the priorities assigned to instance types in the `config/ExecutorDescriptions.json` file.
### Autoscaling
The number of the GCE Job Executor EC2 instances scales to meet demand, providing substantial scope for parallel job execution.
The size of the autoscaling group, that is, the maximum number of instances of a given type to launch in parallel, is specified in the `maxInstances` field in the `config/ExecutorDescriptions.json` file. Each time a new job is added or a job is completed the number of instances running is
reevaluated. If the maximum number has not been reached, a new instance is spun up. If the maximum has been reached, the job is queued until the number of instances drops below the maximum.
The number of instances running of a particular type does not affect the ability to submit jobs that will run on other instance types; a separate limit is applied to each GCE Job Executor type.
#### Changing the default autoscaling configuration
There is a default set of instance types and limits that can be modified. This is done by editing the following `InstanceTypes.json` under the administration host root user's config folder and `ExecutorDescriptions.json` in a region specific subfolder under the administration host root user's config
folder.
After making changes, run the `create_stack.py` script to apply the changes to GCE. When making changes to a running GCE setup, we recommend placing the system in [maintenance mode](maintenancemode) and waiting for the current jobs to complete before running the `create_stack.py` script.
In the `ExecutorDescriptions.json` file, if the an accelerated instance type is specified, (e.g. GPU, FPGA, etc.) an instance family name (eg. "P2", "G4" or the like) and a number of accelerator cores must also be specified. An example of such a configuration is:
```none
{
"instanceType" : "g4dn.4xlarge",
"active" : true,
"executorDescription" : {
"hardware" : {
"cores" : 16,
"memory" : 65536,
"gpu" : {
"instanceFamily" : "g4dn",
"accelCores" : 1
}
},
"executionType" : "Standard",
"priority" : 80
}
```
A corresponding entry in `InstanceTypes.json` would then look like:
```none
{
"name" : "SMALL-GPU-G4DN",
"requirements" : {
"minRam" : 64000,
"minCpuCores" : 16,
"instanceFamily" : "g4dn",
"minAccelCores" : 1
}
}
```
#### Limits on staging environments
When using a GCE staging license for testing purposes, we recommend reducing the maxInstances setting of all the autoscaling groups to 3, and then testing using only one instance type at a time. This is because the license will support only 3 instances _across all autoscaling groups_
simultaneously running. The `maxInstances` setting is applied _per autosscaling group_. Thus submitting to more than one autoscaling group at the same time when using a staging license can cause jobs to fail as GCE may then attempt to run more jobs in parallel than the license will support.
For a simple workflow, meaining one without [control flow elements](https://resources.qiagenbioinformatics.com/manuals/clcgenomicsworkbench/current/index.php?manual=Batching_part_workflow.html#sec:workflowcontrolflowelements), one EC2 instance, and therefore, one license, is needed for a single
workflow run. So if such a workflow is launched with a single input, one license is needed. If 3 inputs are selected and the workflow is run in batch mode, 3 EC2 instances will be started up, and so 3 licenses will be needed for this batch job.
Caution is required when using workflows with [control flow elements](https://resources.qiagenbioinformatics.com/manuals/clcgenomicsworkbench/current/index.php?manual=Batching_part_workflow.html#sec:workflowcontrolflowelements) on GCE setups with a staging license. This is because such workflows are
split up behind the scenes before execution. Even with a single input, such workflows can translate to many workflows in the context of GCE, depending on their design. Setting `maxInstances` appropriately will keep jobs from failing due to a lack of license capacity, but can lead to long execution
times as autoscaling is limited.
#### Autoscaling and AWS limits
AWS have their own limits, which may need to be raised if the expected usage patterns will exceed the default values. Requests to raise AWS limits can be made via the Service Quotas AWS service.
As an example, at the time of writing, to run GCE with the default configuration for the maximum number of instances (100), the AWS limit that needs to be raised is called `Running On-Demand Standard (A, C, D, H, I, M, R, T, Z) instances`.
That limit is based on the number of vCPUs used by the instances. The default GCE configuration has 4 instance types, eaching scaling to a maximum of 100 instances. One type has 8 cores, and the rest have 16 cores. We can thus calculate the number of vCPUs needed to run the system at full load as:
8 x 100 + 16 x 100 x 3 = 5600
For most situations, it is unlikely that all the instance types will need to be scaled to the maximum level at the same time. We recommend requesting enough vCPUs to run the most demanding instance type at full scale. In our example that would be calculated as:
16 x 100 = 1600
If GCE requests more instances than the AWS limit, it will just not scale up to the number of instances it is requesting. GCE users will not experience any service unavailability and jobs will not fail because of this.
## S3 signing policy
It is possible to require all S3 URIs submitted to the GCE to be presigned. This should be enabled if S3 Access Control Lists or Bucket Policies are used to restrict users' access to S3 buckets on the same account as GCE is deployed. Enabling this option will ensure that job submitter has access to
the resources used in the job submission. Activating this option has a disadvantage of creating more egress traffic and as a result increasing operating cost.
Signing policy is controlled using [DynamoDB Management Console](http://console.aws.amazon.com/dynamodb/home).
To require presigned URIs:
1. Open the DynamoDB service in the AWS console.
2. Click on `Tables` in the left hand menu.
3. Click on the name of the table with a name of the form -SettingsTable>.
4. Click on the button `Explore table items` at the top right.
5. Scroll to the `Items returned` section.
6. Click on the `signing_required` item.
7. Set the signing_required `value` to `true`.
By default, presigned URIs are not required. (I.e. the signing_required `value` is set to `false`.
## Updating and monitoring GCE licenses
This section covers updating and monitoring of GCE licenses. Download and installation of licenses is covered in the [Installation chapter](#installlic).
### Updating or upgrading a GCE license
If a license file expires, a new license file must be installed and registered. The steps involved are:
1. **Download a new license file.** See the [Installation chapter](#downloadlicensefile) for details. This usually involves using a new license order ID, sent to the license owner by email after purchasing the renewal.
2. **Remove the old license file** Remove the license file from S3 that the new license file is replacing. This may be an expired license, a soon-to-expire license, or simply a license file being upgraded. License files are stored under `s3:////gce-license-files/`.
2. **Install the new license on on GCE** See the [Installation chapter](#installlicensefile") for details.
4. **Register the changes by restarting the License Manager** Run the `restart_license_server.py` script on the administration host. We recommend this action is done when the queue is empty to ensure that running jobs are not interrupted. Restarting the services usually takes about a minute.
#### Licensing a new GCE installation
A given license file or a license order ID already used to download a license for another GCE setup cannot be re-used for a separate GCE installation. A new license order ID will be needed.
Changing the region the GCE stack is in will also require a new license order ID.
To get a new license order ID, contact QIAGEN Bioinformatics Support (ts-bioinformatics@qiagen.com) specifying that you wish to transfer your GCE license to a new GCE installation. Please include your existing license order ID and, if possible, the host ID of your old GCE setup. The host ID can be
found in the file `s3:////gce-license-files/-host-id.txt`, where the installation bucket and stack name refer to the old GCE setup.
After Support has completed their work, you will need to download a new license file for the new installation, install it, and register this change with the new system.
### License expiration alarm
GCE provides an option for subscribing to a license expiration alarm. The alarm is triggered 60 days prior to license expiration and notifications are provided in a variety of forms, including e-mail and SMS. Recipients are easily added through the AWS web console by navigating to the SNS service
and adding subscriptions to the `-JE-LicenseExpirationEvents` topic.
Subscribing to this alarm can help ensure that new licenses are obtained before an existing license expires.
SNS configuration documentation is provided by [AWS](https://docs.aws.amazon.com/sns/latest/dg/sns-getting-started.html#SubscribeTopic).
### Inspect license metrics
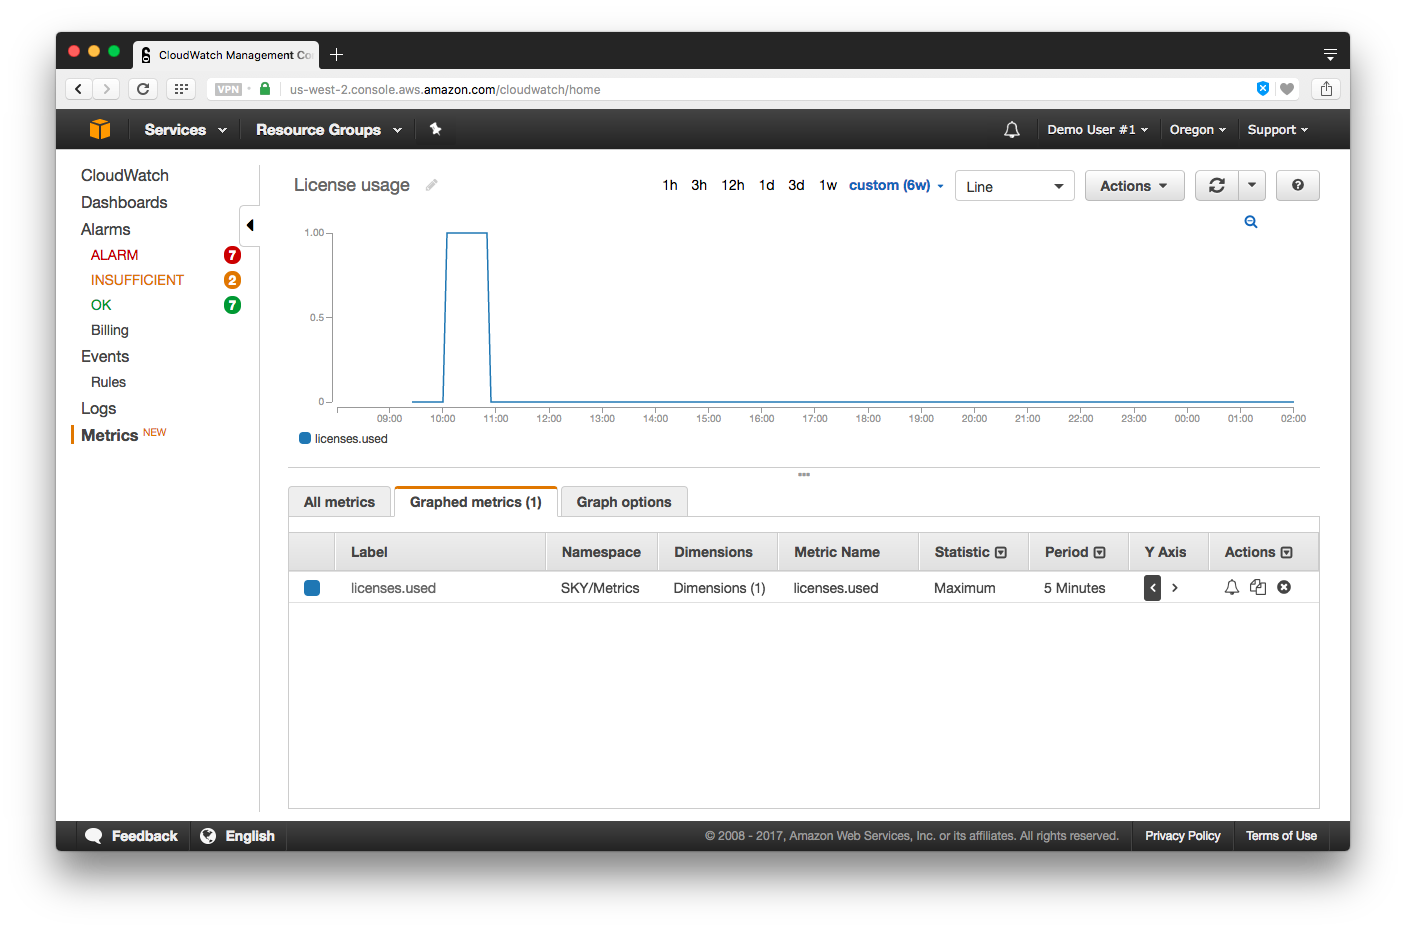
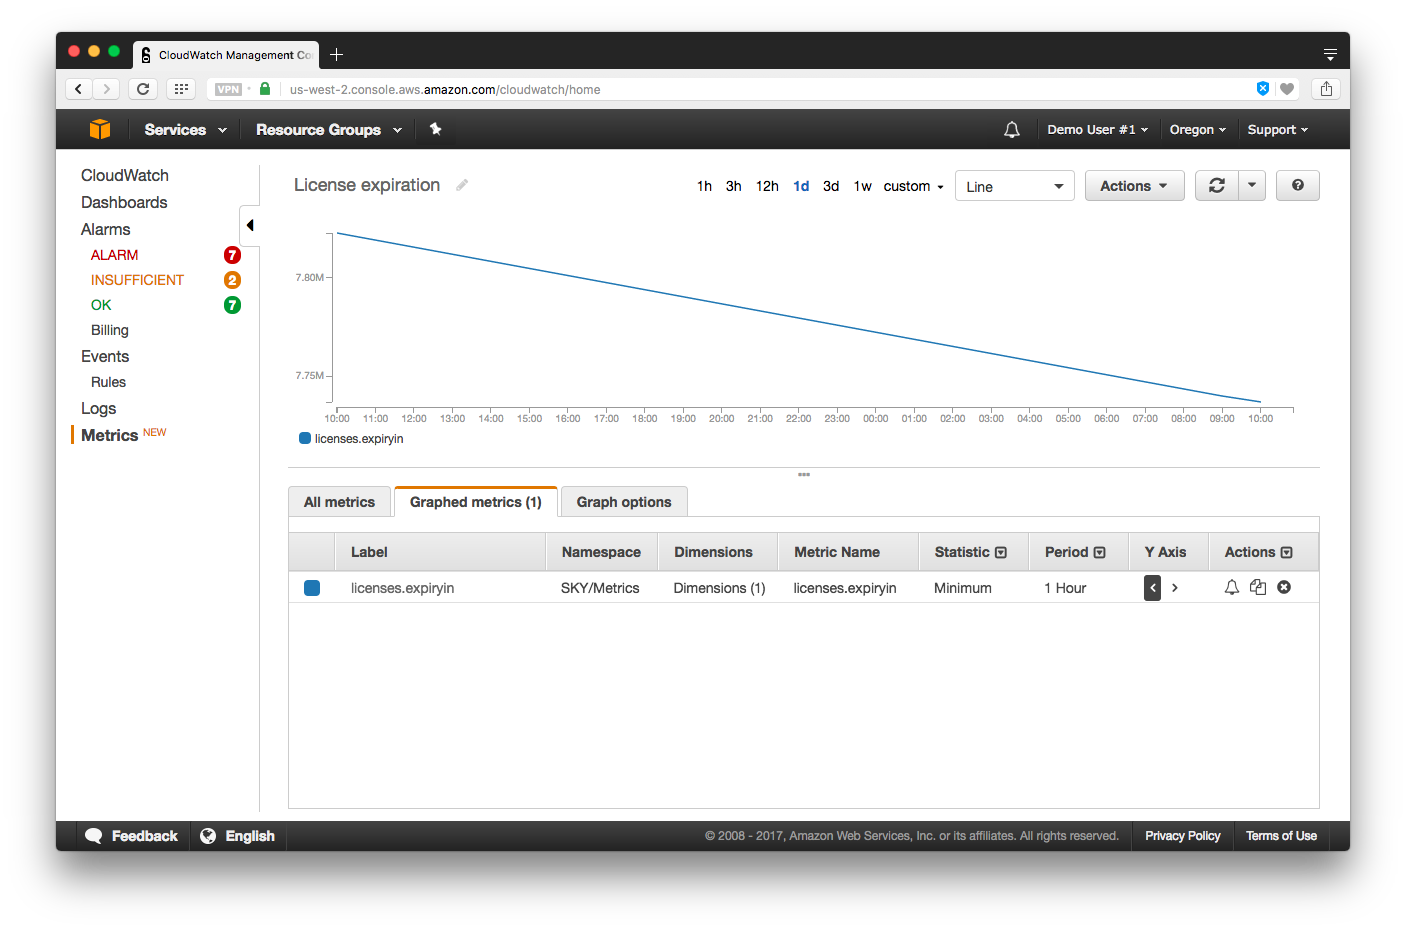
The License Manager service monitors and reports license usage and expiration metrics. These metrics can be inspected in CloudWatch.
1. Open the CloudWatch service in the AWS console.
2. Expand the _Metrics_ section in the left hand menu, and click on _All metrics_.
3. In the _Metrics_, click on _SKY/Metrics_ and then _EnvironmentName_.
4. Go to the _Graphed metrics_ tab. Select the metrics of interest in the bottom area.
When looking at license usage, we recommend changing the value in the Statistic column to _Maximum_. When looking at license expiration, we recommend changing the value in the Statistic column to _Minimum_.
## QIAGEN plugins on GCE
All versions of QIAGEN standard plugins with a major version corresponding to the GCE major version number are transferred to newly created GCE setups automatically during installation and are thus available without further action needed.
When a newer version of a plugin is released by QIAGEN, it is immediately available to all GCE environments _from the QIAGEN location_. Thus, while no action is strictly needed, we recommend for efficiency, that you periodically run the following script from your GCE administration host:
`sync_latest_qiagen_plugins.py`
This will transfer newer plugins to your AWS account.
Making custom plugins available to GCE is descrbed in [appendix 4](#installcustomplugins).
### Plugin versions used when a workflow is run on GCE
The plugin version used when running an analysis ono GCE will be the version present in the workflow submitted to GCE.
Submitting via a CLC Workbench client, this is the version of the plugin installed on that Workbench at the time the workflow is submitted. When submitting using GCE Command Line Tools, it is the version that was on the CLC Workbench at the time the workflow installer (.cpw) was created.
# Logging
This chapter describes how to monitor, inspect, and export the log files created by the system using the AWS CloudWatch Management Console. For a general introduction to CloudWatch, see [Amazon CloudWatch Documentation](http://aws.amazon.com/documentation/cloudwatch/).
>
> **Notice:** *The system log files will not contain the signing part of pre-signed URLs. This part of the URL is not log to prevent that access to log files unintentionally also grants access to input data.*
>
## Monitoring Log Files
Log files are created by all running EC2 instances instantiated by the system and saved locally on each EC2 instance
(e.g. Job Manager, Job Executor, and CLC Genomics Server logs).
A _CloudWatch Logs_ agent is running on each EC2 instance, which provides an automated way to send log data back to the centralized _CloudWatch Logs_ repository hosted by CloudWatch. The agent contains the following components:
* A plugin to the AWS CLI that pushes log data to CloudWatch Logs.
* A script (daemon) that runs the CloudWatch Logs aws logs push command to send data to CloudWatch Logs.
* A cron job ensuring that the daemon is always running.
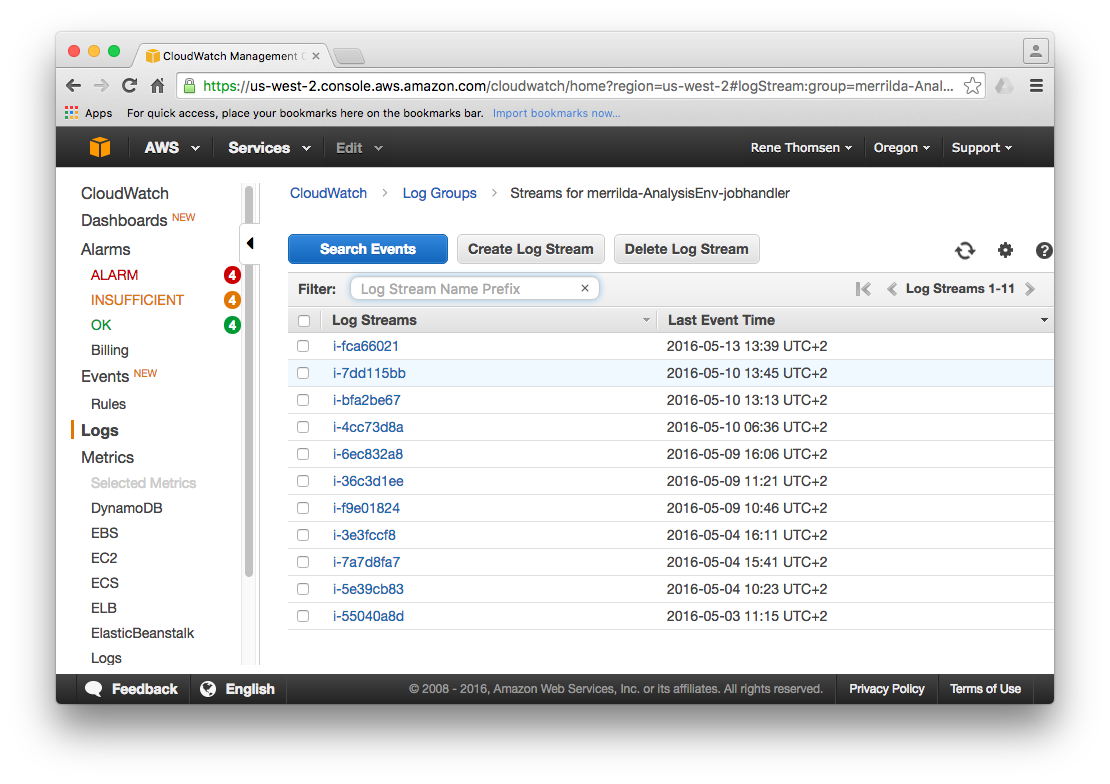
Logs collected by the _CloudWatch Logs_ agents are accessible from the Log Groups page in the CloudWatch Management Console:

## Viewing Log Data
It is possible to inspect the log streams for specific services by selecting a given log group. Each of the streams shown in the screenshot below are named after the EC2 instance that they are collecting log data from.
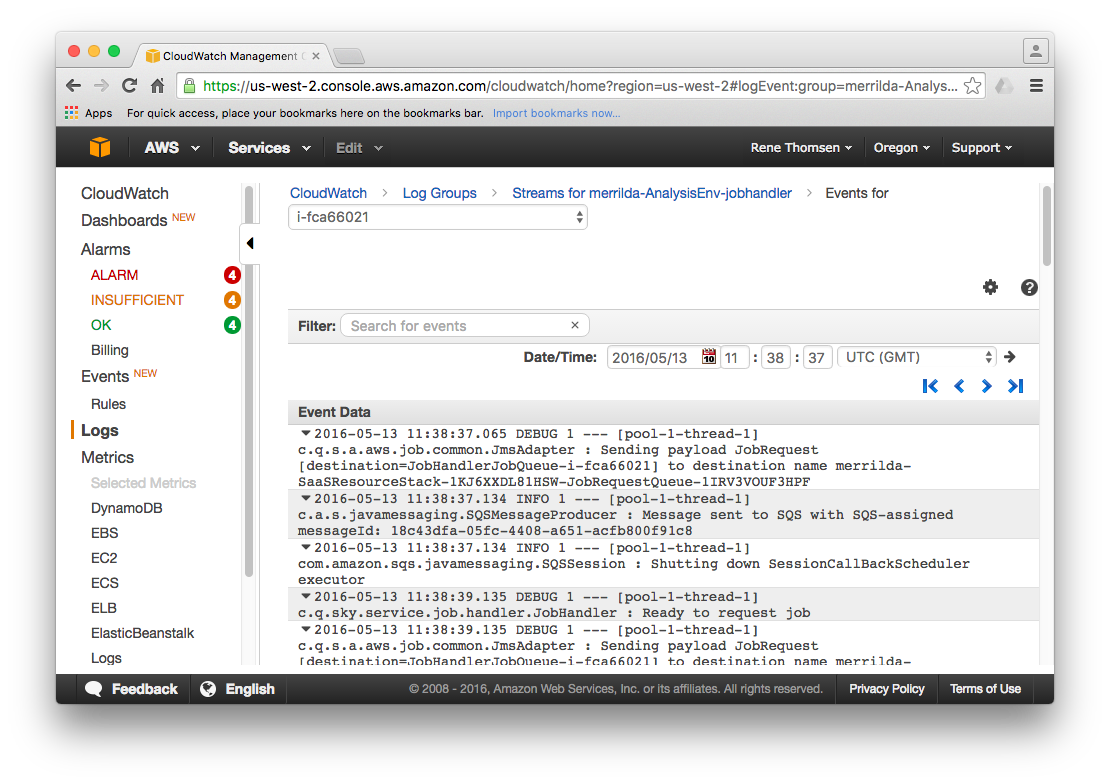
Select one of the log streams to inspect the actual log data available for a given instance. A list of entries from the log file is presented similar to the example output shown below. It is possible to navigate the log data and locate a log entry for a given point in time.
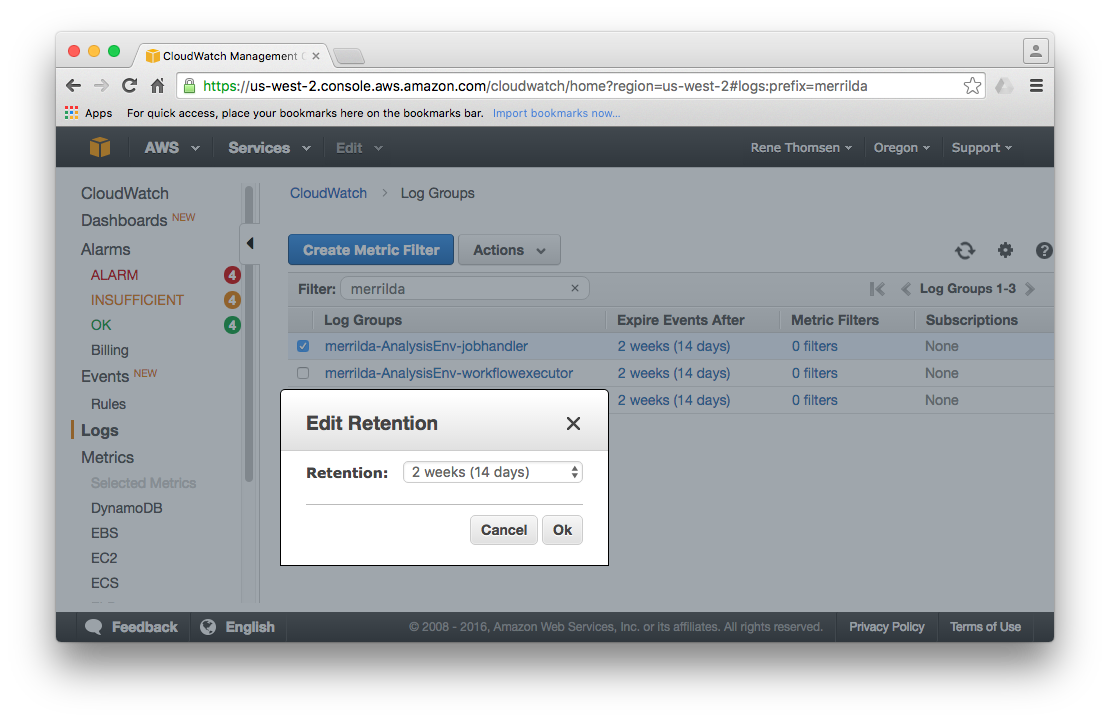
## Changing Log Retention
By default, log files collected by CloudWatch are stored for six months but the retention period can be changed if needed
(see [Setting Log Retention](http://docs.aws.amazon.com/AmazonCloudWatch/latest/DeveloperGuide/SettingLogRetention.html) for details).
Any log file older than the current retention setting is automatically deleted. Local log files stored on the EC2 instances are
automatically deleted when the given instance is shutdown or terminated.
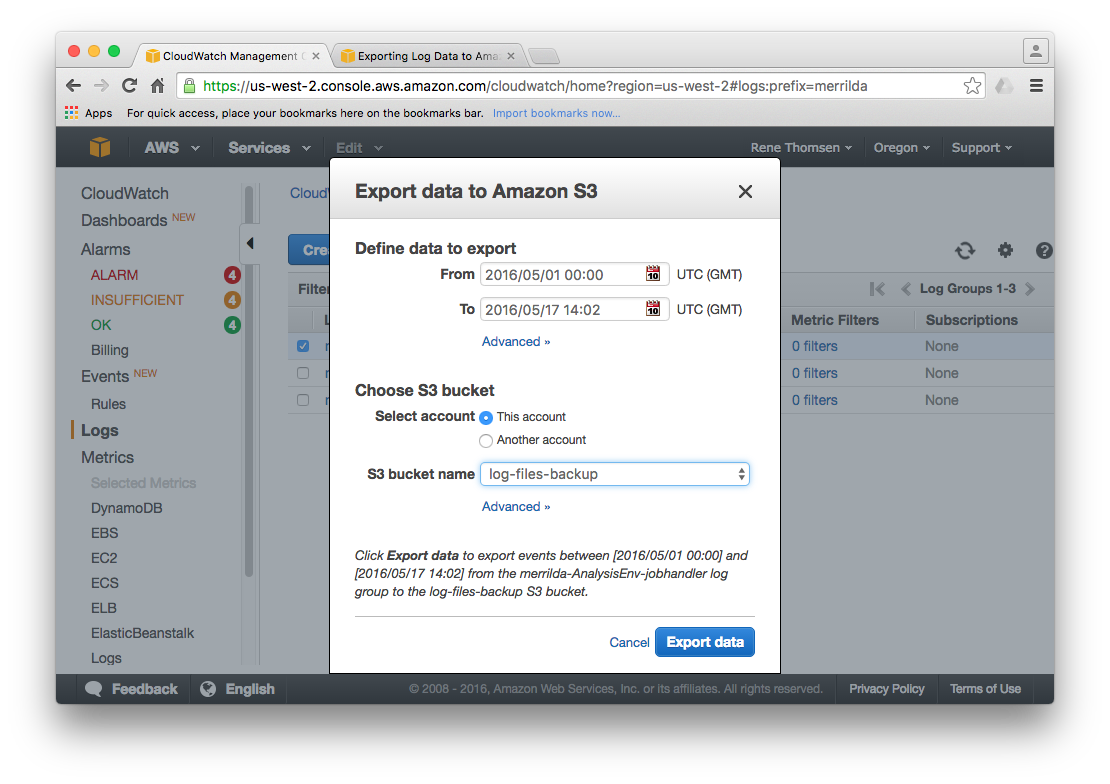
## Exporting Log Data
Log data from selected log groups can be exported to an Amazon S3 bucket for use by other third-party software products.
See [Exporting Log Data in Bulk to Amazon S3](http://docs.aws.amazon.com/AmazonCloudWatch/latest/DeveloperGuide/S3Export.html) for details
on how to export log files using either CloudWatch or the Amazon CLI.
# Monitoring
## Job and batch end-state notifications
Whenever a job arrives in an end-state (FAILED, COMPLETED or CANCELLED) the system sends a message to the Amazon SNS push notification service.
When all jobs in a batch have reached an end state, the system sends a message (DONE) to the Amazon SNS push notification service.
The SNS service provides means for delivering notifications to a number of subscribers over a variety of channels, including e.g. SQS and e-mail.
During installation an SNS topic is created, which a user or a resource can easily subscribe to (SNS topic: `-jobStatusChange`).
The SNS topic is created without any subscribers and it is up to the user to add subscribers and create the AWS resources and/or policies that
may be necessary for delivering the notifications. The exact format of the messages received will depend on the type of delivery channel,
since Amazon for example add a footer to e-mail notifications and various metadata to the Json message sent over SQS.
Below is an example of the JSON format used for SQS messages.
In general, we refer to Amazon's documentation for the details of their specific message formats.
```none
{
"Type" : "Notification",
"MessageId" : "db1d173a-02da-52fa-8389-466e725a8cef",
"TopicArn" : "arn:aws:sns:us-west-2:990456615767:kirkegac-JobStatusChangeEvents",
"Message" : "{\"resourceType\":\"Job\",\"id\":\"43a77d7e-fe59-4f86-a6b8-834c89357470\",\"status\":\"COMPLETED\"}",
"Timestamp" : "2017-03-28T14:08:00.638Z",
"SignatureVersion" : "1",
"Signature" : "RmofvQNTKSA9IXfSf4LVe1fcm0vnXd3+hdUMPzqorOU6fIUhtV4ux0OYdelwlj6X...",
"SigningCertURL" : "https://sns.us-west-2.amazonaws.com/SimpleNotificationServic... .pem",
"UnsubscribeURL" : "https://sns.us-west-2.amazonaws.com/?Action=Unsubscribe&Subscript..."
}
```
In the message sent to SNS from GCE, the "Message" attribute is JSON formatted containing resource type, job/batch id and final end state, ie. no header information or metadata about the job.
The resource type is either "Job" or "Batch". The id is either the job or batch id. Final end state is FAILED, COMPLETED or CANCELLED for jobs and DONE for batches.
```none
{
"resourceType":"Job",
"id":"43a77d7e-fe59-4f86-a6b8-834c89357470",
"status":"COMPLETED"
}
```
## Monitoring the Status of the System
The system features a dedicated summary page, providing information about recent jobs and the general state of the system.
The page is accessed by directing a web browser to the address `https:///jobmanager-webapp/summary/index.html`,
where `` is the URL of the Job Manager service. After authentication, a system summary is presented.
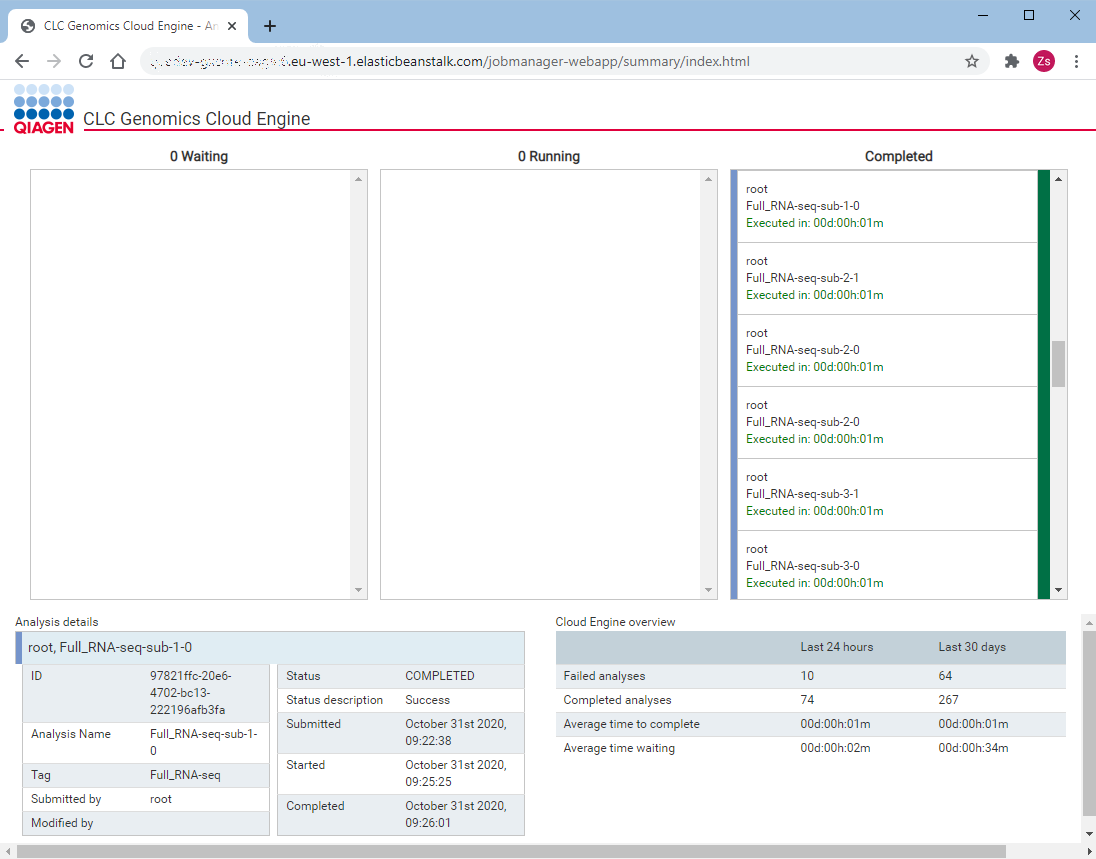
The summary page is comprised of 3 main parts: system overview in the lower right corner, details of the currently selected
job in the lower left corner and a job queue overview in the top part of the page.
# Cost savings
## Shutting down administration host
Once you are done with installation and configuration you have an option of shutting down the administration host to reduce your compute costs.
In the AWS management console navigate to EC2 and then to Auto Scaling groups category. Find an autoscaling group that corresponds to your deployment by searching for 'admin-host' in the search box.
Select the group and edit its desired and minimum capacities to be 0. This will shutdown the running administration host and prevent replacements from being launched.
Be aware that all information that you stored on the administration host will be lost. This does not apply to configuration of active deployments that is stored in the config folder.
This configuration can be restored by running `get_configuration.py ` command.
Should you need the administration host again you can change minimum and desired capacities of the autoscaling group back to 1.
# Appendix 1: Further installation details
## CloudFormation installation files
The installation procedure uses CloudFormation for creating and configuring required AWS components.
Resources are defined in a set of CloudFormation script files (.template),
which are all outlined in the following.
**DbConnection.template**
VPC peering connection between service VPC and database VPC.
**GenomicsCloudEngine.template**
Configures and creates all CloudFormation stacks and describes the dependencies between them.
**GenomicsCloudEngineDb.template**
Configures the CLC Genomics Cloud Engine Database in a separate VPC.
**IAMResources**
Sets up IAM roles and policies.
**JobExecutor.template**
Creates ElasticBeanstalk environment and application for Job Executor.
**JobManager.template**
Creates ElasticBeanstalk environment and application for Job Manager.
**JobManagerAccess.template**
Grant access to the Job Manager to use KMS for encryption
**LambdaResources.template**
Lambda functions for installation support.
**LicenseServer.template**
Creates ElasticBeanstalk environment and application for the required License server.
**NetworkResources.template**
Network components and network topology configuration. Creates VPC, subnets and routing tables.
**SettingsResources.template**
A DynamoDB table and associated resources. This DynamoDB table is used for settings controling GCE.
**ResourceStrings.template**
Simple utility for generating various string dependencies eg. URLs put together by multiple strings.
##Administration host scripts
The following admin scripts are available in the root directory on the administration host:
* `prepare.py`: Transfer all the installation files from QIAGENs AWS accout to your AWS account.
* `create_stack.py`: create a new or update an existing stack using the current configuration settings.
* `delete_stack.py` deletes the deployed stack.
* `~/config/`: directory containing configuration templates for setting up GCE.
* `restart_licenseserver.py`: restarts the license manager service. Used after uploading new license file.
# Appendix 2: Certificate management
## Updating SSL/TLS certificate
The GCE SSL/TLS certificate is easily updated from ACM as described in the [AWS documentation](https://docs.aws.amazon/acm/latest/userguide/import-reimport.html). The arn of the certificate used by GCE can be found
in `~/config/setup.sh` on the administration host.
## Using a Self-signed Certificate
In the installation chapter it is described how to configure GCE with either a certificate issued by
a root CA or a self-signed certificate for e.g. evaluation purposes or staging systems.
While the installation of a self-signed certificate is handled transparently by the install scripts, it may be of use
to understand some of the finer details of running GCE with a self-signed certificate.
You will be guided through the process of generating a self–signed certificate using
command line tools (`openssl`), configure the CLC Genomics Cloud Engine service
to use this certificate and trust the certificate on the clients.
Note that your organization may impose strict security requirements for
certificate trust and management. You should always consult your local
security team before deploying the service in production.
### Generating a Self–signed Certificate
This guide uses the open source command line tool `openssl` which is available
on all platforms supported by the CLC Genomics Cloud Engine. The tool is only used
for generating the SSL private key and certificate offline.
The setup and admin scripts include a `~/admin/ssl/create-self-signed-cert.sh` bash
script that automates the process. The script assumes access to the `openssl`,
`aws` (Amazon command line tools) and `keytool` (Java command line tool for
trust– and key store management) on the system path.
Before running the script, note the following:
* The script generates an SSL private key that is stored in clear text in the file
system. The SSL private key protects the HTTPS connections that is made to
the CLC Genomics Cloud Engine service. Care must be taken to ensure that this
key is kept secret.
* The script assumes certain defaults for the information that is written into
the certificate, in particular the "Subject Alternative Name" extension that
HTTPS clients use to validate that they are connected to the correct host.
Review that the `~/config/openssl.cnf` file contains the correct information. Wildcard
certificates (with e.g. `DNS.1 = *.us-west-2.elasticbeanstalk.com`) may be
sufficient for evaluation purposes, but a production certificate should be
specific.
* The self–signed certificate has a default lifetime of one year.
This may be changed in the script if desired.
If you are using a platform without bash, you can view the script in an editor
and perform the steps manually in a terminal.
Once the script completes, it will have issued a certificate and uploaded it to
Amazon IAM along with the SSL private key. The CLC Genomics Cloud Engine stack will use
this certificate in the load balancer.
The scripts also creates a trust store called `gce-cacerts`, which consists of a
default trust store from the Java Runtime Environment with the self–signed
certificate added. In the following, you will be guided through configuring
certificate trust in the CLC Genomics Cloud Engine client.
### Configuring Trust for the CLC Genomics Cloud Engine Command Line Tools
The CLC Genomics Cloud Engine Command Line Tools make connections to the
CLC Genomics Cloud Engine service over HTTPS to ensure confidentiality of data
transmitted to the service. To validate that the client is connecting to the
correct service, the SSL server certificate will be validated as is common
practice. With a self–signed certificate (or a certificate issued from a
corporate PKI) the certificate will typically fail this validation because the
certificate (or root CA certificate) is not in the trust store. Therefore, the
client needs to be properly configured to trust the service, which can be done in two ways:
either by having the tool contact the CLC Genomics Cloud Engine service configured with the certificate
and learn the certificate, or by explicitly trusting the certificate based on the `~/ssl/cert.pem` file
generated by the script used earlier in this chapter.
Please see the CLC Genomics Cloud Engine Command Line Tools User Manual for further instructions.
# Appendix 3: Uninstalling the GCE Solution
To remove GCE from your AWS account, actions are taken on the administration host, followed by actions taken from the AWS Console.
**1. Actions from the administration host:**
The templates for the VPCs containing the QIAGEN CLC Genomics Cloud Engine services and the QIAGEN CLC Genomics Cloud Engine Database are deleted using script on the administration host:
1. Log into the administration host.
2. Run `"get_configuration.py "`. This downloads the settings for the GCE installation that should be deleted, in preparation for the next step.
3. Run `"delete_stack.py"`. This deletes the GCE stack the settings were downloaded for.
4. Wait for this script to complete before proceeding.
If your aim was to re-install GCE from scratch, you can do this at this point. To fully remove GCE, proceed to the next section.
**2. Actions from the AWS Console:**
After the `"delete_stack.py"` script has completed, the rest of the GCE setup can be deleted from the AWS Console.
1. Log out of the administration host.
2. Log into the AWS Console.
3. Delete the GCE administration host via the _CloudFormation_ service in the AWS Console. The GCE administration host stack also owns one sub-stack with the name prefix awseb, which will be deleted automatically.
4. In the _S3_ service, empty the GCE installation bucket (details are provided in prerequisites).
5. Delete the docker registries (_job-manager_, _workflow-executor_, _licenseserver_, _licenseserver-boot_) from the AWS Elastic Container Registry.
6. Delete all queues with the _JobCommand_ prefix from the _SQS_ service.
7. Delete all log groups prefixed with the name of the main GCE stack from the _Cloud Watch_ service.
Additional resources set up to support the use of GCE can also be removed at this point from within the AWS Consolue if they are not being used for other purposes (e.g. S3 buckets, Cognito user pool, etc.)
# Appendix 4: Custom setup information
The information in this appendix is for configuration that is not needed for most GCE setups.
## Set up additional cache buckets
Further cache buckets can be added to the existing infrastructure. To do this, you need the following information:
1. The **Additional cache bucket URL**. This can be found in the top section of the [release webpage](../../install-page/index.html).
2. The name of the Trail created when you made the first cache bucket.
3. The region of the Trail created for the first cache bucket.
To find the information for points 2 and 3:
- Go to the CloudFormation service in the AWS Console.
- Open the configuration for the first cache bucket created.
- Go the `Outputs` tab.
Values for TrailHomeRegion and TrailName are provided under the `Outputs` tab.
**To create another cache bucket:**
1. Select the CloudFormation service in the AWS Console.
2. Press the _Create Stack_ button and Select "With new resources (standard)" from the drop down menu.
3. Keep the option "Template is ready" selected in the Prepare template area.
4. In the _Specify template_ area, select the _Amazon S3 URL_ option. In the field below that, enter the **Additional cache bucket URL**.
5. In the next step, specify a _Stack name_. This name must use only lower case characters, and be 25 or fewer characters in length), e.g. 'gce-team2-cache'.
6. Under the Parameters section,
- Under `Cache Bucket` enter the name of an S3 bucket to create in the `Bucket name` field. This name must be unique across the whole of AWS. Naming restrictions and guidelines are provided in the AWS [documentation](http://docs.aws.amazon.com/AmazonS3/latest/dev/BucketRestrictions.html).
- Under `Associated CloudTrail`, in the `Trail Name` field, enter the value of the TrailName for the original cache bucket created.
- In the `Trail home region` field enter the value for the TrailHomeRegion of the original cache bucket created.
7. Settings on the next page, _Configure stack options_, can be ignored. E.g. _Tags_, _Permissions_, _Advanced options_, etc.
8. On the Review page, check the details and then check the boxes _I acknowledge that AWS CloudFormation might create IAM resoures._ at the bottom of the page.
9. Press the _Create stack_ button.
The S3 cache bucket will now be created. When the creation process is complete, the status CREATE_COMPLETE will appear in the _Status_ column in the AWS Console.
## Make custom plugins available for GCE
### Adding and updating custom plugins
Custom plugins are installed for use by GCE by uploading them to S3 and running a script on the administration host.
Plugins are stored in the `custom_plugins` directory, found at:
`s3://< GCE install bucket >/< Stack name >/custom-plugins/`
Multiple versions of the same plugin can be present. Plugins can be renamed or placed in sub folders to avoid overwriting an existing file. All cpa files in the aforementioned folder, and its subfolders, will be installed when the following steps are carried out:
1. Log into the administration host.
2. If you are working with more than one GCE setup, check that the `STACK_NAME=<your stack name>` field in the `setup.sh` file refers to the right setup.
3. Run the following script, present in the root user's home directory:
`deploy_custom_plugins.py`
After running this script, please wait at least 10 minutes before submitting a workflow that uses the new plugins to GCE. It takes time for all parts of the system to register the new plugins.
No action is needed for standard QIAGEN plugins, as these were transferred to the newly created GCE setup automatically during installation. Please see the [QIAGEN plugins on GCE](#installplugins) section for further details.
#### Updating custom plugins after updating GCE
Custom plugins also need to be deployed after updating GCE.
When updating GCE within the same major version line, where you will continue to use exactly the same CLC Workbench or CLC Server version locally, the existing plugin bundle can be reused by placing the content of the original plugin directory into the new plugin location:
`aws s3 mv s3://< GCE install bucket >//custom_plugins/ s3://< GCE install bucket >//custom_plugins/ --recursive --sse`
and then deploying the plugin bundle by running:
`deploy_custom_plugins.py`
If an updated version of the CLC Workbench or CLC Server will be used, a new set of compatible custom plugins must be uploaded to the plugin directory, as described in the section above.
## Adminster multiple GCE environments from one administration host
The `config` folder in the root user's home directory contains the configuration information for a particular GCE environment. The environment you are currently working with is the one named in the `STACK_NAME` entry of the `setup.sh` config file.
When using the administration host to administer more than one GCE environment, you can load the configuration files for different GCE setups by running the `get_configuration.py` with the name of the relevant GCE setup as an argument:
`get_configuration.py `
If you have updated the configuration of one environment, but have not applied those changes, e.g. by running the `create_stack.py` script, the changes will be lost if you load the configuration files for another environment.