Interact with Kaazing Gateway Using the WebSocket API
This procedure describes how you can use the WebSocket API—provided by the Kaazing .NET client library—from a .NET application. This API allows you to take advantage of the WebSocket standard as described in the HTML5 specification. For example, you can create a .NET application that uses the Kaazing .NET client library to interact directly with a back-end server. The support for WebSocket is provided by the WebSocket class and its supporting classes.
The Kaazing Microsoft .NET WebSocket API supports the following deployment scenarios:
- .NET 4.0 Frameworks
- .NET 4.6 (4.6.2) Frameworks, including Windows Surface RT
- Windows 8 (8.1) desktop and Surface Pro applications
- Windows Phone 8.1 native apps
Before You Begin
This procedure is part of Checklist: Build Microsoft .NET WebSocket Clients.
Note: Learn about supported browsers, operating systems, and platform versions in the Release Notes.
Taking a Look at the Microsoft .NET Client Tutorial App
Take a look at a demonstration application that was built with the Kaazing .NET SDK. To see this demo in action, perform the following steps:
- Download or clone the Kaazing .NET Tutorials project from https://github.com/kaazing/dotnet.client.tutorials.
- Navigate to the WebSocket app for Windows Desktop at dotnet.client.tutorials\ws\WindowsDesktop.
- Double-click EchoDemo.sln. The solution opens in Visual Studio.
- In Solution Explorer, right-click EchoDemo and click Build.
To run the app, click the Start arrow. The desktop app appears in a new window.
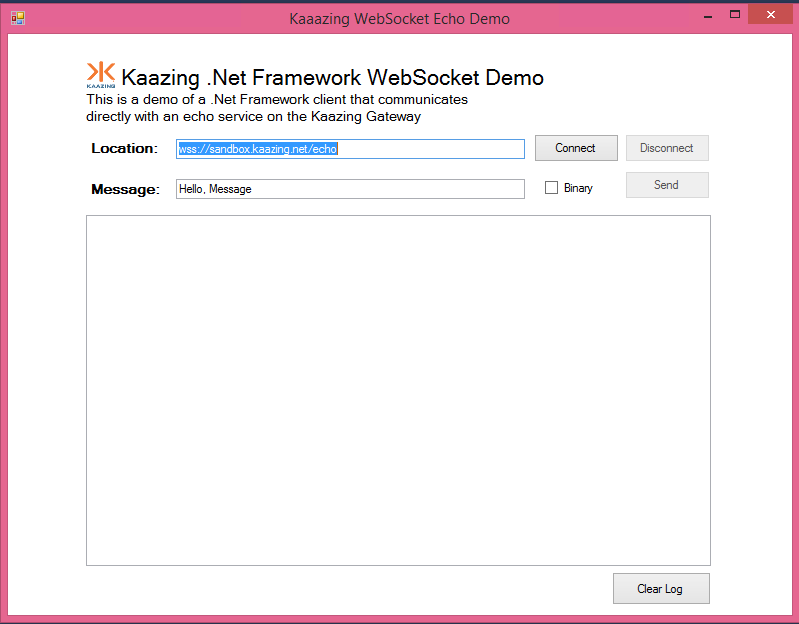
Figure: Windows Desktop Tutorial App - In the app, click Connect to connect to the publicly available Kaazing WebSocket Gateway and Echo service at URL
wss://demos.kaazing.com/echo. - Click Send to send and receive a message from the Kaazing WebSocket Gateway.
Supported Data Types
You can send a WebSocket message using one of the following data types:
- String — A text WebSocket message (UTF-8).
- Binary (using the ByteBuffer class) — A compact byte array representation for sending, receiving and processing binary data using WebSocket.
Primary WebSocket Microsoft .NET API Features
The examples in this section will demonstrate how to open and close a WebSocket connection, send and receive messages, and error handling.
Connecting and Closing Connections
The following example demonstrates how to open and close a connection. The code includes authentication, and calls functions to update the client UI with messages describing the connection state.
private void ConnectButton_Click(object sender, EventArgs e)
{
 // Immediately disable the connect button
 ConnectButton.Enabled = false;
 LocationText.Enabled = false;

 //setup ChallengeHandler to handler Basic/Application Basic authentications
 BasicChallengeHandler basicHandler = BasicChallengeHandler.Create();
 basicHandler.LoginHandler = new LoginHandlerDemo(this);

 factory.ChallengeHandler = basicHandler;
 webSocket = factory.CreateWebSocket();
 Log("CONNECT:" + LocationText.Text);

 webSocket.OpenEvent += new OpenEventHandler(OpenHandler);
 webSocket.CloseEvent += new CloseEventHandler(CloseHandler);
 webSocket.MessageEvent += new MessageEventHandler(MessageHandler);

 webSocket.Connect(LocationText.Text);
}

private void DisconnectButton_Click(object sender, EventArgs e)
{
 Log("DISCONNECT");
 webSocket.Close();
}
Sending and Receiving Messages
The following code demonstrates sending (SendButton_Click) and receiving messages (MessageHandler) using all of the supported data types.
private void SendButton_Click(object sender, EventArgs e)
{
 if (checkBox_Binary.Checked)
 {
  ByteBuffer buf = new ByteBuffer();
  buf.PutString(MessageText.Text, Encoding.UTF8);
  buf.Flip();
  Log("SEND BINARY:" + buf.GetHexDump());
  webSocket.Send(buf);
 }
 else
 {
  Log("SEND TEXT:" + MessageText.Text);
  webSocket.Send(MessageText.Text);
 }
}
...
private void MessageHandler(object sender, MessageEventArgs args)
{
 this.BeginInvoke((InvokeDelegate)(() =>
 {
  switch(args.MessageType) {
   case EventType.BINARY:
   Log("BINARY MESSAGE: "+  BitConverter.ToString(args.Data.Array));
   break;
   case EventType.TEXT:
   Log("TEXT MESSAGE: " + Encoding.UTF8.GetString(args.Data.Array));
   break;
   case EventType.CLOSE:
   Log("CLOSED");
   break;
  }
 }));
}
To Use the Kaazing WebSocket .NET API
To demonstrate the Kaazing WebSocket .NET SDK, let's create a simple .NET desktop application that uses the Kaazing WebSocket Gateway and its Echo service to send and receives Echo messages over WebSocket. This is the same .NET Echo desktop application that is available on Github as part of the Kaazing .NET tutorials here https://github.com/kaazing/dotnet.client.tutorials.
- Install .NET Framework 4.6.2. To see if you have this version installed, see How to: Determine Which .NET Framework Versions Are Installed.
Install a .NET Integrated Development Environment (IDE). This procedure assumes that you are using Microsoft Visual Studio or the free Visual Studio Community.
Note: You can develop .NET Framework applications in any of the .NET programming languages. Microsoft Visual C# is used in the code examples in this document.
- Download the Kaazing Microsoft .NET SDK NuGet package file (.nupkg) from kaazing.com/download.
- Open Visual Studio.
- Create a new project. Click File, click New, and then click Project.
- Click the Installed navigation heading, expand Templates, expand Visual C#, and click Windows Desktop.
- Click Windows Forms Application.
- At the top of the dialog, select .NET Framework 4.6.2.
- In Name, enter EchoDemo and click OK. Visual Studio created the new EchoDemo project.
- Install the Kaazing Microsoft .NET SDK.
- Click TOOLS, click NuGet Package Manager, and then click Package Manager Settings.
- In the navigation, click Package Sources.
- Click the plus icon to add a new source.
- In Name, enter Kaazing.
- In Source, click the browse button, ....
- Locate the folder containing the .nupkg file for the Kaazing Microsoft .NET SDK and click Select.
- Click OK.
- Right-click the EchoDemo project, and click Manage NuGet Packages.
- Click Online, click Kaazing, and then click Install.
- Click Close.
- In your project, expand the References element to see the Kaazing .NET SDK libraries.
- Next, let's create the UI for the application. In EchoDemo, rename the Form1.cs form to MainForm.cs and let Visual Studio rename all related references.
- Expand MainForm.cs and click MainFormDesigner.cs.
- Replace the existing code with the code below. You can also obtain the code on Github at https://github.com/kaazing/dotnet.client.tutorials/blob/develop/ws/WindowsDesktop/MainForm.Designer.cs. This code will define the User Interface for the application:
namespace EchoDemo
{
 partial class MainForm
 {
  /// <summary>
  /// Required designer variable.
  /// </summary>
  private System.ComponentModel.IContainer components = null;

  /// <summary>
  /// Clean up any resources being used.
  /// </summary>
  /// <param name="disposing">true if managed resources should be disposed; otherwise, false.</param>
  protected override void Dispose(bool disposing)
  {
   if (disposing && (components != null))
   {
    components.Dispose();
   }
   base.Dispose(disposing);
  }

  #region Windows Form Designer generated code

  /// <summary>
  /// Required method for Designer support - do not modify
  /// the contents of this method with the code editor.
  /// </summary>
  private void InitializeComponent()
  {
   System.ComponentModel.ComponentResourceManager resources = new System.ComponentModel.ComponentResourceManager(typeof(MainForm));
   this.checkBox_Binary = new System.Windows.Forms.CheckBox();
   this.label3 = new System.Windows.Forms.Label();
   this.Subtitle = new System.Windows.Forms.Label();
   this.Title = new System.Windows.Forms.Label();
   this.SendButton = new System.Windows.Forms.Button();
   this.MessageText = new System.Windows.Forms.TextBox();
   this.MessageLabel = new System.Windows.Forms.Label();
   this.DisconnectButton = new System.Windows.Forms.Button();
   this.ConnectButton = new System.Windows.Forms.Button();
   this.ClearLogButton = new System.Windows.Forms.Button();
   this.Output = new System.Windows.Forms.TextBox();
   this.LocationText = new System.Windows.Forms.TextBox();
   this.LocationLabel = new System.Windows.Forms.Label();
   this.SuspendLayout();
   //
   // checkBox_Binary
   //
   this.checkBox_Binary.AutoSize = true;
   this.checkBox_Binary.Location = new System.Drawing.Point(537, 146);
   this.checkBox_Binary.Name = "checkBox_Binary";
   this.checkBox_Binary.Size = new System.Drawing.Size(55, 17);
   this.checkBox_Binary.TabIndex = 38;
   this.checkBox_Binary.Text = "Binary";
   this.checkBox_Binary.UseVisualStyleBackColor = true;
   //
   // label3
   //
   this.label3.AutoSize = true;
   this.label3.Font = new System.Drawing.Font("Microsoft Sans Serif", 10F, System.Drawing.FontStyle.Regular, System.Drawing.GraphicsUnit.Point, ((byte)(0)));
   this.label3.Location = new System.Drawing.Point(75, 73);
   this.label3.Name = "label3";
   this.label3.Size = new System.Drawing.Size(343, 17);
   this.label3.TabIndex = 37;
   this.label3.Text = "directly with an echo service on the Kaazing Gateway";
   //
   // Subtitle
   //
   this.Subtitle.AutoSize = true;
   this.Subtitle.Font = new System.Drawing.Font("Microsoft Sans Serif", 10F, System.Drawing.FontStyle.Regular, System.Drawing.GraphicsUnit.Point, ((byte)(0)));
   this.Subtitle.Location = new System.Drawing.Point(75, 56);
   this.Subtitle.Name = "Subtitle";
   this.Subtitle.Size = new System.Drawing.Size(390, 17);
   this.Subtitle.TabIndex = 36;
   this.Subtitle.Text = "This is a demo of a .Net Framework client that communicates";
   //
   // Title
   //
   this.Title.AutoSize = true;
   this.Title.Font = new System.Drawing.Font("Microsoft Sans Serif", 16F, System.Drawing.FontStyle.Regular, System.Drawing.GraphicsUnit.Point, ((byte)(0)));
   this.Title.Location = new System.Drawing.Point(108, 30);
   this.Title.Name = "Title";
   this.Title.Size = new System.Drawing.Size(435, 26);
   this.Title.TabIndex = 35;
   this.Title.Text = "Kaazing .Net Framework WebSocket Demo";
   //
   // SendButton
   //
   this.SendButton.Enabled = false;
   this.SendButton.Location = new System.Drawing.Point(617, 137);
   this.SendButton.Name = "SendButton";
   this.SendButton.Size = new System.Drawing.Size(85, 28);
   this.SendButton.TabIndex = 34;
   this.SendButton.Text = "Send";
   this.SendButton.UseVisualStyleBackColor = true;
   this.SendButton.Click += new System.EventHandler(this.SendButton_Click);
   //
   // MessageText
   //
   this.MessageText.Location = new System.Drawing.Point(168, 145);
   this.MessageText.Name = "MessageText";
   this.MessageText.Size = new System.Drawing.Size(349, 20);
   this.MessageText.TabIndex = 33;
   this.MessageText.Text = "Hello, Message";
   //
   // MessageLabel
   //
   this.MessageLabel.AutoSize = true;
   this.MessageLabel.Font = new System.Drawing.Font("Microsoft Sans Serif", 10F, System.Drawing.FontStyle.Bold, System.Drawing.GraphicsUnit.Point, ((byte)(0)));
   this.MessageLabel.Location = new System.Drawing.Point(80, 146);
   this.MessageLabel.Name = "MessageLabel";
   this.MessageLabel.Size = new System.Drawing.Size(77, 17);
   this.MessageLabel.TabIndex = 32;
   this.MessageLabel.Text = "Message:";
   //
   // DisconnectButton
   //
   this.DisconnectButton.Enabled = false;
   this.DisconnectButton.Location = new System.Drawing.Point(617, 100);
   this.DisconnectButton.Name = "DisconnectButton";
   this.DisconnectButton.Size = new System.Drawing.Size(85, 28);
   this.DisconnectButton.TabIndex = 31;
   this.DisconnectButton.Text = "Disconnect";
   this.DisconnectButton.UseVisualStyleBackColor = true;
   this.DisconnectButton.Click += new System.EventHandler(this.DisconnectButton_Click);
   //
   // ConnectButton
   //
   this.ConnectButton.Location = new System.Drawing.Point(526, 100);
   this.ConnectButton.Name = "ConnectButton";
   this.ConnectButton.Size = new System.Drawing.Size(85, 28);
   this.ConnectButton.TabIndex = 30;
   this.ConnectButton.Text = "Connect";
   this.ConnectButton.UseVisualStyleBackColor = true;
   this.ConnectButton.Click += new System.EventHandler(this.ConnectButton_Click);
   //
   // ClearLogButton
   //
   this.ClearLogButton.Location = new System.Drawing.Point(604, 538);
   this.ClearLogButton.Name = "ClearLogButton";
   this.ClearLogButton.Size = new System.Drawing.Size(99, 33);
   this.ClearLogButton.TabIndex = 29;
   this.ClearLogButton.Text = "Clear Log";
   this.ClearLogButton.UseVisualStyleBackColor = true;
   this.ClearLogButton.Click += new System.EventHandler(this.ClearLogButton_Click);
   //
   // Output
   //
   this.Output.Location = new System.Drawing.Point(78, 181);
   this.Output.Multiline = true;
   this.Output.Name = "Output";
   this.Output.Size = new System.Drawing.Size(625, 351);
   this.Output.TabIndex = 28;
   //
   // LocationText
   //
   this.LocationText.Location = new System.Drawing.Point(168, 105);
   this.LocationText.Name = "LocationText";
   this.LocationText.Size = new System.Drawing.Size(349, 20);
   this.LocationText.TabIndex = 27;
   this.LocationText.TextChanged += new System.EventHandler(this.LocationText_TextChanged);
   //
   // LocationLabel
   //
   this.LocationLabel.AutoSize = true;
   this.LocationLabel.Font = new System.Drawing.Font("Microsoft Sans Serif", 10F, System.Drawing.FontStyle.Bold, System.Drawing.GraphicsUnit.Point, ((byte)(0)));
   this.LocationLabel.Location = new System.Drawing.Point(80, 105);
   this.LocationLabel.Name = "LocationLabel";
   this.LocationLabel.Size = new System.Drawing.Size(75, 17);
   this.LocationLabel.TabIndex = 26;
   this.LocationLabel.Text = "Location:";
   //
   // MainForm
   //
   this.AutoScaleDimensions = new System.Drawing.SizeF(6F, 13F);
   this.AutoScaleMode = System.Windows.Forms.AutoScaleMode.Font;
   this.BackColor = System.Drawing.SystemColors.ControlLightLight;
   this.ClientSize = new System.Drawing.Size(784, 581);
   this.Controls.Add(this.checkBox_Binary);
   this.Controls.Add(this.label3);
   this.Controls.Add(this.Subtitle);
   this.Controls.Add(this.Title);
   this.Controls.Add(this.SendButton);
   this.Controls.Add(this.MessageText);
   this.Controls.Add(this.MessageLabel);
   this.Controls.Add(this.DisconnectButton);
   this.Controls.Add(this.ConnectButton);
   this.Controls.Add(this.ClearLogButton);
   this.Controls.Add(this.Output);
   this.Controls.Add(this.LocationText);
   this.Controls.Add(this.LocationLabel);
   this.Name = "MainForm";
   this.Text = "Kaaazing WebSocket Echo Demo";
   this.Load += new System.EventHandler(this.MainForm_Load);
   this.ResumeLayout(false);
   this.PerformLayout();

  }

  #endregion

  private System.Windows.Forms.CheckBox checkBox_Binary;
  private System.Windows.Forms.Label label3;
  private System.Windows.Forms.Label Subtitle;
  private System.Windows.Forms.Label Title;
  private System.Windows.Forms.Button SendButton;
  private System.Windows.Forms.TextBox MessageText;
  private System.Windows.Forms.Label MessageLabel;
  private System.Windows.Forms.Button DisconnectButton;
  private System.Windows.Forms.Button ConnectButton;
  private System.Windows.Forms.Button ClearLogButton;
  private System.Windows.Forms.TextBox Output;
  private System.Windows.Forms.TextBox LocationText;
  private System.Windows.Forms.Label LocationLabel;
 }
}
- Next, let's start adding the code for our application. Right-click MainForm.cs and click View Code.
Note: The entire code for MainForm.cs can be found on Github at https://github.com/kaazing/dotnet.client.tutorials/blob/develop/ws/WindowsDesktop/MainForm.cs.In the MainForm.cs code window, replace the default import statements with the following:
using Kaazing.HTML5;
using Kaazing.Security;
using System;
using System.Collections.Generic;
using System.ComponentModel;
using System.Data;
using System.Drawing;
using System.Linq;
using System.Text;
using System.Threading;
using System.Threading.Tasks;
using System.Windows.Forms;
- In the MainForm class, add the WebSocket factory object:
namespace EchoDemo { public partial class MainForm : Form { private WebSocket webSocket = null; private WebSocketFactory factory = new WebSocketFactory(); public delegate void InvokeDelegate(); /// The code for the subsequent steps goes here. } } - Next, add the
MainForm()function just below the/// The code for the subsequent steps goes herecomment. It will set up the form, and set the default URL for the application to connect to. We will use the publicly available Kaazing WebSocket Gateway atwss://demos.kaazing.com/echo:/// <summary> /// .Net HTML5 Demo Form /// </summary> public MainForm() { InitializeComponent(); string defaultLocation = "wss://demos.kaazing.com/echo"; LocationText.Text = defaultLocation; } private void HTML5DemoForm_Load(object sender, EventArgs e) { } private void HandleLog(string message) { this.BeginInvoke((InvokeDelegate)(() => { Log("LOG: " + message); })); } - Create a function to respond when the user clicks the Connect and Disconnect buttons. The method will respond to the Connect button by creating a WebSocket connection using the WebSocket factory, call methods to update the UI (we will add these later), call the
MessageEventHandler()to handle the messages that will be received on the connection, and connect to the URL specified earlier:/// /// Button click handlers /// private void ConnectButton_Click(object sender, EventArgs e) { // Immediately disable the connect button ConnectButton.Enabled = false; LocationText.Enabled = false; webSocket = factory.CreateWebSocket(); Log("CONNECT:" + LocationText.Text); webSocket.OpenEvent += new OpenEventHandler(OpenHandler); webSocket.CloseEvent += new CloseEventHandler(CloseHandler); webSocket.MessageEvent += new MessageEventHandler(MessageHandler); webSocket.Connect(LocationText.Text); } private void DisconnectButton_Click(object sender, EventArgs e) { Log("DISCONNECT"); webSocket.Close(); } - Create a function to respond when the user clicks the Send button. The
SendButton_Click()function determines if the Binary checkbox is selected and uses the ByteBuffer() object to handle binary data. The function then updates the console with the message and sends the message over WebSocket.private void SendButton_Click(object sender, EventArgs e) { if (checkBox_Binary.Checked) { ByteBuffer buf = new ByteBuffer(); buf.PutString(MessageText.Text, Encoding.UTF8); buf.Flip(); Log("SEND BINARY:" + buf.GetHexDump()); webSocket.Send(buf); } else { Log("SEND TEXT:" + MessageText.Text); webSocket.Send(MessageText.Text); } } - Define the console log for the User Interface. This console is updated by most event handlers and displays both send and received messages.
/// /// Console output /// private const int LOG_LIMIT = 50; private Queue<string> logLines = new Queue<string>(); private void Log(string arg) { logLines.Enqueue(arg); if (logLines.Count > LOG_LIMIT) { logLines.Dequeue(); } string[] o = logLines.ToArray<string>(); o = o.Reverse<string>().ToArray<string>(); Output.Text = string.Join("\r\n", o); } private void ClearLogButton_Click(object sender, EventArgs e) { logLines.Clear(); Output.Text = ""; } - Add the event handler that is called when the application connects to the Gateway. The function prevents crossthreading via Invoke and then enables the Send Disconnect buttons now that the connection is made.
private void OpenHandler(object sender, OpenEventArgs args) { this.BeginInvoke((InvokeDelegate)(() => { Log("CONNECTED"); DisconnectButton.Enabled = true; SendButton.Enabled = true; })); } - Add the event handler that is called when the WebSocket connection is closed.
private void CloseHandler(object sender, CloseEventArgs args) { this.BeginInvoke((InvokeDelegate)(() => { Log("DISCONNECTED"); LocationText.Enabled = true; ConnectButton.Enabled = true; DisconnectButton.Enabled = false; SendButton.Enabled = false; })); } - Add the
MessageHandler()function to manage received messages. As you can see, messages fall into one of three event types: binary, text, and a control message. A switch statement is used to evaluate the messages, encode them as needed, and log the messages to the console.private void MessageHandler(object sender, MessageEventArgs args) { this.BeginInvoke((InvokeDelegate)(() => { switch(args.MessageType) { case EventType.BINARY: Log("BINARY MESSAGE: "+ BitConverter.ToString(args.Data.Array)); break; case EventType.TEXT: Log("TEXT MESSAGE: " + Encoding.UTF8.GetString(args.Data.Array)); break; case EventType.CLOSE: Log("CLOSED"); break; } })); } - Add a event handler to respond to when the WebSocket URL is changed by the user.
private void LocationText_TextChanged(object sender, EventArgs e) { if (LocationText.Text.Length == 0) { ConnectButton.Enabled = false; } else { ConnectButton.Enabled = true; } } - Lastly, enter an event handler for loading the main form.
private void MainForm_Load(object sender, EventArgs e) { } - Ensure that you have the closing braces.
} } - Save your project.
- Build and test your WebSocket .NET application.
- From the Build menu, click Build. The Visual Studio output console records the successful build.
- Click Start. The WebSocket .NET desktop application displays.
- Ensure that the Location field contains wss://demos.kaazing.com/echo. Click Connect. The log console displays CONNECTED.
- Click Send. The text message is sent and the Echo service on the Gateway returns the message.
Notes
- The Microsoft .NET 4.0 Frameworks has a maximum connection limit of two per domain, similar to the browser limitation. For any Microsoft .NET application that uses more than one WebSocket connection at a time, you must either ensure that any WebSocket connection is closed by using
WebSocket.Close()before opening another WebSocket connection, or increase the connection limit on the application by updating themaxconnectionattribute in theapp.configfile. For more information, see (KG-1851) Two Connection Limit in Kaazing Clients for Microsoft .NET in Release Notes.